
5.5.1
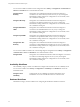
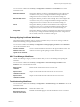
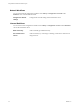
Table Of Contents
- Using VMware vCenter Orchestrator Plug-Ins
- Contents
- Using VMware vCenter Orchestrator Plug-Ins
- Introduction to Orchestrator Plug-Ins
- Configure the Orchestrator Plug-Ins
- Using the vCenter Server Plug-In
- Configuring the vCenter Server Plug-In
- vCenter Server Plug-In Scripting API
- Using the vCenter Server Plug-In Inventory
- Access the vCenter Server Plug-In Workflow Library
- vCenter Server Plug-In Workflow Library
- Batch Workflows
- Cluster and Compute Resource Workflows
- Custom Attributes Workflows
- Datacenter Workflows
- Datastore and Files Workflows
- Datacenter Folder Management Workflows
- Host Folder Management Workflows
- Virtual Machine Folder Management Workflows
- Guest Operation Files Workflows
- Guest Operation Processes Workflows
- Power Host Management Workflows
- Basic Host Management Workflows
- Host Registration Management Workflows
- Networking Workflows
- Distributed Virtual Port Group Workflows
- Distributed Virtual Switch Workflows
- Standard Virtual Switch Workflows
- Resource Pool Workflows
- Storage Workflows
- Storage DRS Workflows
- Basic Virtual Machine Management Workflows
- Clone Workflows
- Linked Clone Workflows
- Linux Customization Clone Workflows
- Tools Clone Workflows
- Windows Customization Clone Workflows
- Device Management Workflows
- Move and Migrate Workflows
- Other Workflows
- Power Management Workflows
- Snapshot Workflows
- VMware Tools Workflows
- Using the Configuration Plug-In
- Using the vCO Library Plug-In
- Using the SQL Plug-In
- Using the SSH Plug-In
- Using the XML Plug-In
- Using the Mail Plug-In
- Using the Net Plug-In
- Using the Enumeration Plug-In
- Using the Workflow Documentation Plug-In
- Using the HTTP-REST Plug-In
- Using the SOAP Plug-In
- Using the AMQP Plug-In
- Using the SNMP Plug-In
- Using the Active Directory Plug-In
- Index

n
Verify that you have a connection to a database from the Inventory view.
Procedure
1 Click the Workflows view in the Orchestrator client.
2 In the workflows hierarchical list, select Library > SQL > Configuration and navigate to the Add tables
to a database workflow.
3 Right-click the Add tables to a database workflow and select Start workflow.
4 Select a database to which to add tables.
5 Select the tables that you want to add.
6 Click Submit to run the workflow.
After the workflow runs successfully, the added database tables appear in the Inventory view of the
Orchestrator client.
Update a Database
You can run a workflow to update the configuration of a database that is in the plug-in's inventory.
Procedure
1 Log in to the Orchestrator client as an administrator.
2 Click the Workflows view in the Orchestrator client.
3 In the Workflows hierarchical list, select Library > SQL > Configuration and navigate to the Update a
database workflow.
4 Right-click the Update a database workflow and select Start workflow.
5 Select a database that you want to update.
6 In the Name text box, type the new name of the database.
The database appears in the Inventory view with the name that you specify.
7 Select the type of the database.
8 In the Connection URL text box, type the new address of the database.
9 Select the session mode that the plug-in uses to connect to the database.
Option Description
Shared Session
The plug-in uses shared credentials to connect to the database. You must
provide the database credentials for the shared session.
Session Per User
The Orchestrator client retrieves credentials from the user who is logged
in.
NOTE To use session per user mode, you must authenticate by using a
user name only. You should not use domain\user or user@domain for
authentication.
10 Click Submit to run the workflow.
Chapter 6 Using the SQL Plug-In
VMware, Inc. 49