
5.5
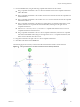

Table Of Contents
- Developing with VMware vCenter Orchestrator
- Contents
- Developing with VMware vCenter Orchestrator
- Developing Workflows
- Key Concepts of Workflows
- Phases in the Workflow Development Process
- Access Rights for the Orchestrator Client
- Testing Workflows During Development
- Creating and Editing a Workflow
- Provide General Workflow Information
- Defining Attributes and Parameters
- Workflow Schema
- Obtaining Input Parameters from Users When a Workflow Starts
- Requesting User Interactions While a Workflow Runs
- Add a User Interaction to a Workflow
- Set the User Interaction security.group Attribute
- Set the timeout.date Attribute to an Absolute Date
- Calculate a Relative Timeout for User Interactions
- Set the timeout.date Attribute to a Relative Date
- Define the External Inputs for a User Interaction
- Define User Interaction Exception Behavior
- Create the Input Parameters Dialog Box for the User Interaction
- Respond to a Request for a User Interaction
- Calling Workflows Within Workflows
- Running a Workflow on a Selection of Objects
- Developing Long-Running Workflows
- Configuration Elements
- Workflow User Permissions
- Validating Workflows
- Debugging Workflows
- Running Workflows
- Resuming a Failed Workflow Run
- Generate Workflow Documentation
- Use Workflow Version History
- Restore Deleted Workflows
- Develop a Simple Example Workflow
- Create the Simple Workflow Example
- Create the Schema of the Simple Workflow Example
- Create the Simple Workflow Example Zones
- Define the Parameters of the Simple Workflow Example
- Define the Simple Workflow Example Decision Bindings
- Bind the Action Elements of the Simple Workflow Example
- Bind the Simple Workflow Example Scripted Task Elements
- Define the Simple Workflow Example Exception Bindings
- Set the Read-Write Properties for Attributes of the Simple Workflow Example
- Set the Simple Workflow Example Parameter Properties
- Set the Layout of the Simple Workflow Example Input Parameters Dialog Box
- Validate and Run the Simple Workflow Example
- Develop a Complex Workflow
- Create the Complex Workflow Example
- Create a Custom Action for the Complex Workflow Example
- Create the Schema of the Complex Workflow Example
- Create the Complex Workflow Example Zones
- Define the Parameters of the Complex Workflow Example
- Define the Bindings for the Complex Workflow Example
- Set the Complex Workflow Example Attribute Properties
- Create the Layout of the Complex Workflow Example Input Parameters
- Validate and Run the Complex Workflow Example
- Scripting
- Orchestrator Elements that Require Scripting
- Limitations of the Mozilla Rhino Implementation in Orchestrator
- Using the Orchestrator Scripting API
- Access the Scripting Engine from the Workflow Editor
- Access the Scripting Engine from the Action or Policy Editor
- Access the Orchestrator API Explorer
- Use the Orchestrator API Explorer to Find Objects
- Writing Scripts
- Add Parameters to Scripts
- Accessing the Orchestrator Server File System from JavaScript and Workflows
- Accessing Java Classes from JavaScript
- Accessing Operating System Commands from JavaScript
- Exception Handling Guidelines
- Orchestrator JavaScript Examples
- Developing Actions
- Creating Resource Elements
- Creating Packages
- Index

5 Click the Type text box and type vc:virtualm in the search text box in the parameter type dialog box.
6 Select VC:VirtualMachine from the proposed list of parameter types and click Accept.
7 Add a description of the parameter in the Description text box.
For example, type The virtual machine to power on.
8 Repeat Step 2 through Step 7 to create a second input parameter, with the following values.
n
Name: toAddress
n
Type: String
n
Description: The email address to send the result of this workflow to
9 Click Save at the bottom of the Inputs tab.
You defined the workflow's input parameters.
What to do next
Define the bindings between the element parameters.
Define the Simple Workflow Example Decision Bindings
You bind a workflow's elements together in the Schema tab of the workflow editor. Decision bindings
define how decision elements compare the input parameters received to the decision statement, and
generate output parameters according to whether the input parameters match the decision statement.
Prerequisites
Complete the following tasks.
n
“Create the Simple Workflow Example,” on page 81.
n
“Create the Schema of the Simple Workflow Example,” on page 82.
n
“Define the Parameters of the Simple Workflow Example,” on page 85.
n
Open the workflow for editing in the workflow editor.
Procedure
1
On the Schema tab, click the Edit icon ( ) of the VM Powered On? decision element.
2 On the Decision tab, click the Not set (NULL) button and select vm as the decision element's input
parameter from the list of proposed parameters.
3 Select the state equals statement from the list of decision statements proposed in the drop-down menu.
A Not set button appears in the value text box, which presents you with a limited choice of possible
values.
4 Select poweredOn.
5 Click Save at the bottom of the workflow editor's Schema tab.
You have defined the true or false statement against which the decision element will compare the value of
the input parameter it receives.
What to do next
You must define the bindings for the other elements in the workflow.
Developing with VMware vCenter Orchestrator
86 VMware, Inc.