
1.2.0

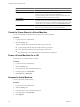
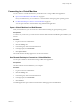
Table Of Contents
- Lifecycle Manager Administration Guide
- Contents
- About This Book
- Understanding LCM
- Setting Up the Virtual Machine Environment
- Configuring the Infrastructure for Requested Virtual Machines
- Automatic Placement
- Register a Datastore
- Register a Resource Pool
- Create a Resource Pool
- Register a Virtual Machine Folder
- Create a Virtual Machine Folder
- Register a Network or a Port Group Using DHCP
- Register a Network or a Port Group with a Range or a Subnet
- Create a Range or a Subnet for an Existing DHCP Network
- Create an IP Address Range
- Create a Subnet
- Create a Template Profile
- Join a Domain or a Workgroup
- Create a Customization Template
- Relink Unlinked Elements
- Configuring the Criteria for Requested Virtual Machines
- Configuring the Infrastructure for Requested Virtual Machines
- Using LCM
- Request a Virtual Machine
- Display Requested Virtual Machines
- Modify Request Options
- Check the Power State of a Virtual Machine
- Power a Virtual Machine On or Off
- Suspend a Virtual Machine
- Connecting to a Virtual Machine
- Create a Snapshot
- Revert to a Snapshot
- Generate Reports
- Registering Virtual Machines with LCM
- Activate Web View Debug Mode
- Relink Tokens to Virtual Machines
- Check Licensing Status
- Export Logs and Application Settings
- Troubleshooting LCM
- Customizing LCM
- Index

Customization Template Attributes
You can assign custom values for template attributes.
Table 3-1. Customization Template Attributes
Attribute Values
Memory reservation (MB) Minimum is 0 (default is 256)
Memory limit/size (MB) Minimum is -1; must be a multiple of 4 (default is 1024); must be greater than the
Memory reservation value
Selecting -1 maintains the same memory as the vCenter Server template.
Memory shares low, normal, or high (default is normal)
CPU reservation (MHz) Minimum is 0 (default is 200)
CPU limit (MHz) Minimum is -1 (default is 2000); must be greater than the CPU reservation value
Selecting -1 maintains the same CPU number as the vCenter Server template.
CPU count 1, 2, 3, or 4 (default is 1)
CPU shares low, normal, or high (default is normal)
Disk shares low, normal, or high (default is normal)
Modify the Decommissioning Time
You can change the decommissioning time in the Orchestrator client.
Procedure
1 Log in to the Orchestrator client as an administrator.
2 Click the Policies view.
3 Right-click the Lifecycle Scheduler policy and select Stop policy.
4 Right-click the Lifecycle Scheduler policy and select Edit.
5 Click the Scripting tab in the right pane.
6 Select Midnight - Delete VMs.
7 On the General view underneath, type the new decommissioning time.
8 Click Save and close.
9 Right-click the Lifecycle Scheduler policy and select Start policy.
The new decommissioning time is now applied.
Display Requested Virtual Machines
You can display the requested virtual machines according to their status, such as available or rejected.
For information about possible virtual machine request states, see “Virtual Machine Request Status Icons,” on
page 26.
Chapter 3 Using LCM
VMware, Inc. 25