
1.2.0


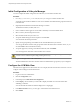


Table Of Contents
- Lifecycle Manager Installation and Configuration Guide
- Contents
- About This Book
- Introducing LCM
- Installing and Configuring Orchestrator
- Orchestrator Components Setup Guidelines
- Install Orchestrator
- Configuring Orchestrator
- Check Configuration Readiness
- Log In to the Orchestrator Configuration Interface
- Change the Default Password
- Revert to the Default Password for Orchestrator Configuration
- Configure the Network Connection
- Change the Default Configuration Ports on the Orchestrator Client Side
- Import the vCenter SSL Certificate
- Configuring LDAP Settings
- Password Encryption and Hashing Mechanism
- Configure the Database Connection
- Server Certificate
- Configure the Default Plug-Ins
- Import the vCenter Server License
- Start the Orchestrator Server
- Export the Orchestrator Configuration
- Import the Orchestrator Configuration
- Configure the Maximum Number of Events and Runs
- Change the Web View SSL Certificate
- Define the Server Log Level
- Maintenance and Recovery
- Controlling Orchestrator Access
- Installing and Configuring LCM
- Installing LCM
- Configuring LCM
- Check Configuration Readiness
- Initial Configuration of Lifecycle Manager
- Configure the LCM Web View
- Set Approval Requirements
- Configure Archiving Settings
- Change Authorization Groups
- Change the Naming Convention for Virtual Machines
- Enable Email Notifications
- Configure Email Notification Content
- Configure Currency and Date Formats
- Upgrading Orchestrator and LCM
- Uninstall LCM and Orchestrator
- Index

Install Lifecycle Manager
You must install LCM through the Orchestrator configuration interface.
Procedure
1 Log in to the Orchestrator configuration interface.
http://orchestrator_server:8282
2 On the General tab, click Install Application.
3 Browse to select the LCM .vmoapp file.
CAUTION If you are running Orchestrator on Windows Server 2008, you must manually rename the file
extension to .vmoapp. When you download the .vmoapp file, Windows Server 2008 automatically renames
the file extension to .zip, which is not supported by the Orchestrator configuration interface.
4 Click Install.
5 On the Licences tab, click Plug-in Licences.
6 Type the LCM serial number and click Apply changes.
Configuring LCM Database Options
You must configure the options for the LCM database table and the networking database table in the
Orchestrator configuration interface.
n
Configure the LCM Database Plug-In on page 65
The LCM database table contains virtual-machine-specific data that is managed by LCM, such as when
the virtual machine was created, who created it, and other specifications.
n
Configure the Networking Database Plug-In on page 66
The networking database table contains data related to the management of the IP addresses.
Configure the LCM Database Plug-In
The LCM database table contains virtual-machine-specific data that is managed by LCM, such as when the
virtual machine was created, who created it, and other specifications.
Procedure
1 Log in to the Orchestrator configuration interface.
http://orchestrator_server:8282
2 On the vCenter Lifecycle Manager tab, select the database connection type.
Option Description
Same as vCO
Select this option to store LCM data in the Orchestrator database.
Custom
Select this option to store LCM data in a database different from the
Orchestrator database.
NOTE The best practice is to use a separate database for LCM.
Depending on the type of database you are connecting to, the required
information might vary. For a list of the connection parameters that you
might be required to specify, see “Database Connection Parameters,” on
page 40.
3 Click Apply changes.
Chapter 9 Installing LCM
VMware, Inc. 65