
5.3
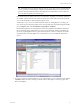
Table Of Contents
- Copyright
- About This Book
- Preparing for Installation
- Installing VCM Using Installation Manager
- Upgrading VCM and Related Components
- Getting Started with VCM Components and Tools
- Getting Started with VCM
- Discover, License, and Install Windows Machines
- Verifying Available Domains
- Checking the Network Authority
- Assigning Network Authority Accounts
- Discovering Windows Machines
- Licensing Windows Machines
- Installing the VCM Windows Agent on your Windows Machines
- Performing an Initial Collection
- Exploring Windows Collection Results
- Getting Started Collecting Windows Custom Information
- Discover, License, and Install UNIX/Linux Machines
- Discover, License, and Install Mac OS X Machines
- Discover, License, and Collect Oracle Data from UNIX Machines
- Customize VCM for your Environment
- How to Set Up and Use VCM Auditing
- Discover, License, and Install Windows Machines
- Getting Started with VCM for Virtualization
- Virtual Environment Configuration
- ESX 2.5/3.x,vSphere 4, and ESXi Servers Collections
- vCenter Server Collections
- Configuring Agent Proxy Virtualization Collections
- Configuring Agent Proxy Machines
- Configuring ESX/vSphere Servers
- Configuring Web Services for ESX/vSphere Server Communication
- Performing an Initial Virtualization Collection
- Exploring Virtualization Collection Results
- Configuring vCenter Server Data Collections
- About the vSphere Client VCM Plug-in
- Further Reading
- Getting Started with VCM Remote
- Getting Started with VCM Patching
- Getting Started with Software Provisioning
- VMware vCenter Configuration Manager Package Studio
- Software Repository for Windows
- Package Manager for Windows
- Overview of Component Relationships
- Installing the Software Provisioning Components
- Using Package Studio to Create Software Packages and Publish to Repositories
- Using VCM Software Provisioning for Windows
- Related Software Provisioning Actions
- Further Reading
- Getting Started with VCM Management Extensions for Assets
- Getting Started with VCM Service Desk Integration
- Getting Started with VCM for Active Directory
- Getting Started with VCM for SMS
- Getting Started with Windows Server Update Services
- Accessing Additional Compliance Content
- Installing and Getting Started with VCM Tools
- Maintaining VCM After Installation
- Troubleshooting Problems with VCM
- Configuring a Collector as an Agent Proxy
- Index

n
You must obtain or write a PowerShell script that will return data in a VCM-compatible element-
normal XML format.
n
The VCM agent (for VCM 5.3 or later) must be installed on each VCM-managed machine used to
collect the Windows custom information. Older agents must first be upgraded.
n
PowerShell must be installed on each VCM-managed machine. PowerShell is installed by default on
Windows 2008 R2 and Windows 7 machines. For Windows XP, 2003, 2003 R2, 2008, and Vista machines,
PowerShell must be installed separately. You cannot install PowerShell on Windows 2000 or NT4
machines. In cases where PowerShell is not installed on the target VCM-managed machine, the WCI
collection will return a "Not Executed" success status. See Job Status Reporting for WCI.
n
Windows Custom Information supports PowerShell version 2.0, and should work with later versions of
PowerShell as well.
n
After installing PowerShell on a VCM-managed machine, you must reboot the machine to ensure that
collections will work properly.
n
If the VCM Collector will be used as a client for WCI collections, ensure that PowerShell is installed on
the Collector machine.
n
VCM ships with default Administration settings for Agent Thread (default is set to below normal
thread priority) and Agent Data Retention (default is 15-day change log). However, you can change
these settings if you desire.
n
Before file-based PowerShell scripts can be executed by the WCI collection filter on the VCM Collector
and/or the VCM-managed machine, you change the execution policy on the VCM-managed machines.
The PowerShell execution policy on the VCM machine must be set to Remote Signed, All Signed, or
Unrestricted. If the policy is set to All Signed, the scripts must be signed, and the appropriate
certificates distributed before collections can be run.
Procedure
To collect and view Windows Custom Information from VCM-managed machines, follow these steps.
1. Obtain PowerShell script(s) from VMware Professional Services or another source (or you can write
your own). For more information about scripts, see Getting Started with PowerShell Scripts.
2. Select Administration | Collection Filters | Filters.
3. Click Add Filter to add a collection filter. The Collection Filter Wizard appears.
4. Enter a name for the filter, and then click Next. The Data Type page appears.
5. Select Windows, and then the Custom Information (Win) data type. Click Next. The Windows
Custom Information Filter page appears.
6. Select your Script Type, which defaults to PowerShell v1.0 Text Output.
7. Select the Output Type of Element Normal XML.
8. Specify the Timeout in seconds. This setting specifies how long the Agent will allow a PowerShell script
to run before attempting to end the process. The purpose of this setting is to prevent blocked or
excessively long-running scripts from blocking other Agent requests.
9. In the Script area, paste the content of your user-defined PowerShell script, which contains statements
specific to the data type you will be collecting. Depending on your script, parameters to be configured
may exist near the top of the script.
10. VCM handles violations of any duplicate path attributes in the PowerShell scripts through the
Duplicate Handling settings. In the Duplicate Handling area, select one of the following: Discard,
Increment, or Fail with Error.
Getting Started with VCM
VMware, Inc. 73