
5.3
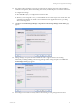
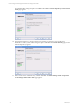
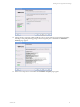
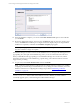

Table Of Contents
- Copyright
- About This Book
- Preparing for Installation
- Installing VCM Using Installation Manager
- Upgrading VCM and Related Components
- Getting Started with VCM Components and Tools
- Getting Started with VCM
- Discover, License, and Install Windows Machines
- Verifying Available Domains
- Checking the Network Authority
- Assigning Network Authority Accounts
- Discovering Windows Machines
- Licensing Windows Machines
- Installing the VCM Windows Agent on your Windows Machines
- Performing an Initial Collection
- Exploring Windows Collection Results
- Getting Started Collecting Windows Custom Information
- Discover, License, and Install UNIX/Linux Machines
- Discover, License, and Install Mac OS X Machines
- Discover, License, and Collect Oracle Data from UNIX Machines
- Customize VCM for your Environment
- How to Set Up and Use VCM Auditing
- Discover, License, and Install Windows Machines
- Getting Started with VCM for Virtualization
- Virtual Environment Configuration
- ESX 2.5/3.x,vSphere 4, and ESXi Servers Collections
- vCenter Server Collections
- Configuring Agent Proxy Virtualization Collections
- Configuring Agent Proxy Machines
- Configuring ESX/vSphere Servers
- Configuring Web Services for ESX/vSphere Server Communication
- Performing an Initial Virtualization Collection
- Exploring Virtualization Collection Results
- Configuring vCenter Server Data Collections
- About the vSphere Client VCM Plug-in
- Further Reading
- Getting Started with VCM Remote
- Getting Started with VCM Patching
- Getting Started with Software Provisioning
- VMware vCenter Configuration Manager Package Studio
- Software Repository for Windows
- Package Manager for Windows
- Overview of Component Relationships
- Installing the Software Provisioning Components
- Using Package Studio to Create Software Packages and Publish to Repositories
- Using VCM Software Provisioning for Windows
- Related Software Provisioning Actions
- Further Reading
- Getting Started with VCM Management Extensions for Assets
- Getting Started with VCM Service Desk Integration
- Getting Started with VCM for Active Directory
- Getting Started with VCM for SMS
- Getting Started with Windows Server Update Services
- Accessing Additional Compliance Content
- Installing and Getting Started with VCM Tools
- Maintaining VCM After Installation
- Troubleshooting Problems with VCM
- Configuring a Collector as an Agent Proxy
- Index

n
Installing using Add/Remove Programs: When invoking setup.exe from Add/Remove
Programs, the option to repair VCM is available. The Repair option checks for missing files and
settings, and then replaces them.
CAUTION You should not invoke Repair unless directed to do so by VMware Customer Support.
Repair requires access to your original installation media.
2. Click Next. The License Agreement page appears.
3. Review and accept the license agreement, and then click Next. The Select Installation Type page
appears.
4. Ensure that all of the components are marked for installation.
NOTE If one of the software components cannot be upgraded, the check box for the specified
component will be cleared and a note will be added next to the node in the selection dialog indicating
why it is disabled. This situation can occur due to an invalid upgrade or an incomplete copy of the
install image.
5. Click Next. The Gather System Information page appears.
6. Foundation Checker will gather information about the machine to prepare it for the installation. When
the system check is complete, the Foundation Checker results will either be successful or show errors.
For the upgrade to proceed, the results must be successful. If the system checks encounter errors, you
must resolve those errors before proceeding. Click View Results and use Foundation Checker Help to
locate the source of the problem.
7. After the system checks are successful, Installation Manager displays a summary of the components to
be installed. To continue, click Next. The Configure Components page appears, requesting
confirmation of the Default Collector Service Account.
8. If the account is changing, type the new values. If the account remains the same, click Next. The
Application Services Account configuration page appears.
9. If the account is changing, type the new values. If the account remains the same, click Next. The CM
Remote Virtual Directory configuration page appears.
10. If the account is changing, type the new values. If the account remains the same, click Next. The
Virtualization Client Plug-in configuration page appears.
11. Do not select SSL unless your machine is already configured for SSL.
12. If the account is changing, type the new values. If the account remains the same, click Next. The Install
Components page appears.
13. Review the summary list, and then click Upgrade. The installation process begins. Depending on your
hardware configuration, the process may take 30 minutes or longer.
14. When the process is completed, the Upgrade/Repair Complete page appears.
15. When the Installation Manager has successfully upgraded the software components, click Finish.
NOTE VMware strongly recommends that you take the time to configure SQL Server settings now,
including configuring the VCM database file growth and database recovery settings, in order to fine-tune
your VCM Database. Instructions for configuring these settings are provided in "Maintaining VCM After
Installation" on page 247.
Upgrading Existing Windows Agents
Use the Upgrade Agent wizard to upgrade the Agent files on one or more machines.
vCenter Configuration Manager Installation and Getting Started Guide
38 VMware, Inc.