
5.3

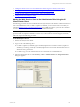
Table Of Contents
- Copyright
- About This Book
- Preparing for Installation
- Installing VCM Using Installation Manager
- Upgrading VCM and Related Components
- Getting Started with VCM Components and Tools
- Getting Started with VCM
- Discover, License, and Install Windows Machines
- Verifying Available Domains
- Checking the Network Authority
- Assigning Network Authority Accounts
- Discovering Windows Machines
- Licensing Windows Machines
- Installing the VCM Windows Agent on your Windows Machines
- Performing an Initial Collection
- Exploring Windows Collection Results
- Getting Started Collecting Windows Custom Information
- Discover, License, and Install UNIX/Linux Machines
- Discover, License, and Install Mac OS X Machines
- Discover, License, and Collect Oracle Data from UNIX Machines
- Customize VCM for your Environment
- How to Set Up and Use VCM Auditing
- Discover, License, and Install Windows Machines
- Getting Started with VCM for Virtualization
- Virtual Environment Configuration
- ESX 2.5/3.x,vSphere 4, and ESXi Servers Collections
- vCenter Server Collections
- Configuring Agent Proxy Virtualization Collections
- Configuring Agent Proxy Machines
- Configuring ESX/vSphere Servers
- Configuring Web Services for ESX/vSphere Server Communication
- Performing an Initial Virtualization Collection
- Exploring Virtualization Collection Results
- Configuring vCenter Server Data Collections
- About the vSphere Client VCM Plug-in
- Further Reading
- Getting Started with VCM Remote
- Getting Started with VCM Patching
- Getting Started with Software Provisioning
- VMware vCenter Configuration Manager Package Studio
- Software Repository for Windows
- Package Manager for Windows
- Overview of Component Relationships
- Installing the Software Provisioning Components
- Using Package Studio to Create Software Packages and Publish to Repositories
- Using VCM Software Provisioning for Windows
- Related Software Provisioning Actions
- Further Reading
- Getting Started with VCM Management Extensions for Assets
- Getting Started with VCM Service Desk Integration
- Getting Started with VCM for Active Directory
- Getting Started with VCM for SMS
- Getting Started with Windows Server Update Services
- Accessing Additional Compliance Content
- Installing and Getting Started with VCM Tools
- Maintaining VCM After Installation
- Troubleshooting Problems with VCM
- Configuring a Collector as an Agent Proxy
- Index

In VCM:
1. Click Collect. The Collection Type Selection dialog box appears.
2. Select Machine Data, and then click OK.
3. In the Available list, double-click the designated Agent Proxy machine to move it to the Selected list.
4. Select the Select Data Types to collect from these machines option, and then click Next.
5. Expand the Windows node, and then select the Machines data type check box.
6. Select the Use default filter option, and then click Next.
7. Click Finish.
8. Before proceeding to the next set of steps, verify that you have successfully collected the Machines data
type. Click Console | Windows (tab) | Operating System | Machines, then verify that your Agent
Proxy machine appears in the data grid. If you have recently upgraded the agent to VCM 5.3, please
ensure that you re-collect the machines data as noted above.
Installing Agent Proxies
Installing the Agent Proxy adds the SSH key and the CSI_COMM_Proxy_SVC group to the target
machine, and adds the SSH key pairs to the database.
IMPORTANT Some platforms are no longer supported for the current Agent Proxy version. See VCM
Hardware and Software Requirements Guide for currently supported platforms and Agent Proxy versions.
In VCM:
1. Click Administration | Machines Manager | Additional Products | vCenter CM for Virtualization
| Agent Proxies.
2. Select the machine or machines on which you are installing the Agent Proxy. If your designated Agent
Proxy machine is not displayed, it failed to meet one or more of the following requirements:
n
The machine is running Windows Server 2003 Service Pack 2 or later.
n
The machine is licensed in VCM.
n
The 4.11 Agent or later is installed.
Resolve the issue and continue.
3. Click Install. The Machines page of the Install Agent Proxies wizard appears.
4. The available machines are displayed in the upper list. The selected machines are displayed in the lower
list. You can perform the following actions on the page:
n
All Machines: Select the option to install the Agent Proxy on all eligible machines.
n
Selected Machines Only: (Default option) Select the option to install the Agent Proxy on all
machines listed in the lower pane.
n
Filtered Machines: Click Define to create a filter based on Machine Name or Domain Name, and
then select the Filtered Machines option.
n
Arrow buttons: Select a machine name in one of the panes and use the arrow buttons to move it
from one pane to the other. Additionally, you may double-click a machine name to move it
between panes.
5. Click Next. The Option page appears.
vCenter Configuration Manager Installation and Getting Started Guide
122 VMware, Inc.