POD INSTALLATION AND CONFIGURATION GUIDE EMC CIS Series 1 Document Version: 2015-01-26 Installation of EMC CIS Series 1 virtual pods as described this guide, requires that your NETLAB+ system is equipped with software version 2015.R1.beta.2 or later. Copyright © Network Development Group, Inc. www.netdevgroup.com NETLAB Academy Edition, NETLAB Professional Edition, and NETLAB+ are registered trademarks of Network Development Group, Inc. VMware is a registered trademark of VMware, Inc.
EMC CIS Series 1 Pod Installation and Configuration Guide Contents 1 2 3 4 5 6 Introduction ................................................................................................................ 3 1.1 Introducing the EMC CIS Series 1 Pod .................................................................. 3 Planning....................................................................................................................... 4 2.1 Pod Creation Workflow .................................
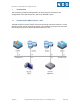
EMC CIS Series 1 Pod Installation and Configuration Guide 1 Introduction This document provides detailed guidance on performing the installation and configuration of the EMC CIS Series 1 pod on the NETLAB+ system. 1.1 Introducing the EMC CIS Series 1 Pod The EMC CIS Series 1 pod is a 100% virtual pod consisting of 6 virtual machines. Linked together through virtual networking, these 6 virtual machines provide the environment for a student or a team to perform the EMC CIS Series 1 labs.
EMC CIS Series 1 Pod Installation and Configuration Guide Planning 2 This guide provides specific information pertinent to delivering the EMC CIS Series 1 pod. The NETLAB+ Remote PC Guide Series provides the prerequisite guidance for setting up your VMware infrastructure, including: An introduction to virtualization using NETLAB+. Detailed setup instructions for standing up VMware vCenter and VMware ESXi. Virtual machine and virtual pod management concepts using NETLAB+.
EMC CIS Series 1 Pod Installation and Configuration Guide 2.2 Pod Resource Requirements The EMC CIS Series 1 course will consume 51 GB of storage per each master pod instance. The following table provides details of the storage requirements for each of the virtual machines in the pod. Virtual Machine Client ESXi01 ESXi02 NAS01 NAS02 VCSA Total Recommended 2.3 Initial Master Pod (Thin Provisioning) 10.5 1 1 15 15 8.
EMC CIS Series 1 Pod Installation and Configuration Guide 2.4 NETLAB+ Requirements Installation of EMC CIS Series 1 pods, as described in this guide, requires that your NETLAB+ system is equipped with NETLAB+ version 2015.R1.beta.2 or later. Previous versions of NETLAB+ do not support requirements for the EMC CIS Series 1 course on the physical host servers. For additional information regarding NETLAB+ requirements, please refer to the NETLAB+ Remote PC Guide Series. 2.
EMC CIS Series 1 Pod Installation and Configuration Guide 3 Obtaining Software and Licenses 3.1 Downloading OVF Files The virtual machines are available as Open Virtualization Format (OVF) or Open Virtualization Archive (OVA) files. These files are available for download from CSSIA. To request access to the preconfigured virtual machine templates from CSSIA: 1. 2. 3. 4. 5. 6. 7. 8. 3.2 Go to the CSSIA Resources page: http://www.cssia.org/cssia-resources.cfm.
EMC CIS Series 1 Pod Installation and Configuration Guide 4 Master Pod Configuration 4.1 Deploying Virtual Machine OVF/OVA Files Deploy on your host server the pod virtual machine OVF/OVA files you have downloaded. 1. Connect to the vCenter Server from a machine that house the virtual machine image files obtained from CSSIA. 2. Select Hosts and Clusters in the address bar. 3. Click on the first ESXi Host Server. 4. Click on File -> Deploy OVF Template. 5.
EMC CIS Series 1 Pod Installation and Configuration Guide 8. On the Datastore window, select the appropriate datastore and click Next. 9. On the Disk Format window, select Thin provision format and click Next. 10. On the Network Mapping window, ensure SAFETY NET is selected for all Destination Networks. Click Next. If SAFETY NET is not available, please refer to the NETLAB+ Remote PC Guide Volume 3 for the installation and configuration of the virtual network.
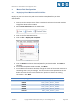
EMC CIS Series 1 Pod Installation and Configuration Guide 4.2 Modify and Activate Virtual Machines The following tasks must be performed prior to taking snapshots or assigning the virtual machines to pods. 4.2.1 Modify Virtual Machines Once the virtual machines are imported onto the host, change the CPU hardware virtualization and the Network Interface Cards (NIC’s) MAC address via the VMware vSphere Web Client interface. The following steps will guide you through the process. 1.
EMC CIS Series 1 Pod Installation and Configuration Guide 3. For all of the virtual machines manually assign the MAC addresses for each NIC. The table below identifies the MAC addresses per NIC.
EMC CIS Series 1 Pod Installation and Configuration Guide 4.2.2 Activate Licenses This pod is designed to use the VMware IT Academy (vITA) infrastructure license keys for the vSphere ESXi hosts (ESXi01 and ESXi02) and for the vCenter virtual machines. The vITA Infrastructure license keys are to be used for licensing the master pods using the root account only. The students are not to have access to the root accounts nor to the Infrastructure licenses. Root account credentials are available upon request.
EMC CIS Series 1 Pod Installation and Configuration Guide 7. Enter the vITA infrastructure license keys in the text area box provided then click Finish. 8. To assign the vCenter key, click on the vCenter Server Instances tab then click on the Assign License Key… button. 9. In the Assign License Key popup window, select the radio button associated with the key you just entered and then click the OK button. 10.
EMC CIS Series 1 Pod Installation and Configuration Guide 4.3 Create Snapshots for the Master Virtual Machines In order to proceed with pod cloning, snapshots must be created on each of the pods virtual machines. Verify that all VMs are powered off before taking snapshots. 1. Open the vClient on your management workstation. Connect to your vCenter Server on your management machine. 2. Select Hosts and Clusters in the address bar. 3.
EMC CIS Series 1 Pod Installation and Configuration Guide 4.5 NETLAB+ Virtual Machine Inventory Setup This section will guide you in adding your templates to the Virtual Machine Inventory of your NETLAB+ system. 1. Login into your NETLAB+ system using the administrator account. 2. Select the Virtual Machine Infrastructure link. 3. Click the Virtual Machine Inventory link. 4. Click the Import Virtual Machines button. 5.
EMC CIS Series 1 Pod Installation and Configuration Guide 4.6 Create the Master EMC CIS Series 01 Pod This section will assist you in adding the EMC CIS Series 1 Pod to your NETLAB+ system. 1. Login into NETLAB+ with the administrator account. 2. Select the Equipment Pods link. 3. Create a new pod by scrolling to the bottom and clicking the Add a Pod button. 4. On the New Pod Wizard, page click Next. 5. Then select the EMC CIS Series 1 pod radio button and click Next. 6.
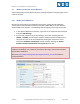
EMC CIS Series 1 Pod Installation and Configuration Guide 4.7 Update Master Pod Update the master pod to associate the virtual machines with the newly created pod. 1. Update the master pod on your NETLAB+ system. a. Login into NETLAB+ with the administrator account. b. Select the Equipment Pods link. 2. Select EMC CIS Series 1 master pod. 3. Click on the Magnifying Glass icon next to the first VM. Please note that your PC IDs will not match the graphic below. 4. Click on Modify PC Settings. 5.
EMC CIS Series 1 Pod Installation and Configuration Guide 6. In the Base Virtual Machine drop-box, select the corresponding virtual machine from the inventory. 7. Update Base Snapshot to your GOLDEN_MASTER snapshot. 8. Review the information on the screen and click Update PC Settings. 9. Click on Show Pod. 10. Repeat steps 3-9 for the remaining virtual machines. Make sure the pod status is Offline prior to continuing. The cloning process requires the pod be offline.
EMC CIS Series 1 Pod Installation and Configuration Guide Pod Cloning 5 This section will help you create multiple student pods. The following sections describe the NETLAB+ pod cloning feature used to create student pods on one or two host systems. 5.1 Linked Clones and Full Clones NETLAB+ can create linked clones or full clones. A linked clone (or linked virtual machine) is a virtual machine that shares virtual disks with the parent (or master) virtual machine in an ongoing manner.
EMC CIS Series 1 Pod Installation and Configuration Guide 5. Select the New Pod ID. It is advised to keep the pods in numerical order. If the pod IDs are not in numerical order, they will not show up in the scheduler in numerical order. 6. Click Next. 7. Enter a New Pod Name. For example, EMC CIS Series 1. Click Next. 8. When the action has finished processing, a settings screen will be present. 9. The three key columns for this master pod clone are Source Snapshot, Clone Type and Clone Role.
EMC CIS Series 1 Pod Installation and Configuration Guide 5.3 Copying Your Master Pod to the Second Host For this task, we will use the pod cloning utility to copy our master pod to the second host. 1. Login into NETLAB+ with the administrator account. 2. Select the Equipment Pods link. 3. Click on the master pod that was created on the 1st VMware host server. 4. Click the Clone button to create a new pod based on the settings of this pod. 5. Select the New Pod ID.
EMC CIS Series 1 Pod Installation and Configuration Guide a. Source Snapshot should be set to the GOLDEN_MASTER snapshot you created previously. b. Under Clone Type, click the dropdown menu and verify that Full is selected. c. Under Clone Role, click the dropdown menu and select Master. d. Under Runtime Host, select the 2nd host system (which should be different than the system you are cloning from). 10. When you are done changing settings, Click Clone Pod.
EMC CIS Series 1 Pod Installation and Configuration Guide 6 Assigning Pods to Students, Teams , or Classes Please refer to the NETLAB+ Pod Assignment Guide for details on using the Pod Assignment feature. 1/26/2015 Copyright © Network Development Group, Inc. www.netdevgroup.