
User guide


150 | Protecting Workstations and Servers
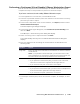
8. In the Options pane, enter the information for the virtual machine and memory
usage as described in the following table.
9. Click Perform initial ad-hoc export to test the export of the data.
10. Click Save.
Exporting Windows Data using Hyper-V Export
In AppAssure 5, you can choose to export data using Hyper-V Export by performing
a one-time or continuous export. Complete the steps in the following procedures to
export using Hyper-V Export for the appropriate type of export.
Performing a One-Time Hyper-V Export
You can choose to perform a one-time export for Hyper-V. Complete the steps in this
procedure to perform a one-time export.
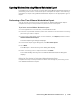
To perform a one-time Hyper-V export
1. In the AppAssure 5 Core Console, click the Machines tab.
2. In the list of protected machines, select the machine or cluster with the recovery
point that you want to export.
3. In the Actions drop-down menu for that machine, click Export, and then select
Hyper-V Export.
The Select Export Type dialog box displays.
4. In the Select Export Type dialog box, click One-time export.
5. Click Next.
The Hyper-V Export - Select Recovery Point dialog box displays.
6. Select a recovery point to export and then click Next.
The Hyper-V dialog box displays.
Text Box Option
Virtual Machine Enter a name for the virtual machine being created; for example, VM-
0A1B2C3D4.
NOTE: The default name is the name of the source machine.
Memory Specify the memory for the virtual machine.
Click Use the same amount of RAM as the source machine to
specify that the RAM configuration is the same as the source
machine. Or,
Click Use a specific amount of RAM to specify how much RAM to
use; for example, 4096 Megabytes (MB). The minimum amount
allowed is 512 MB and the maximum is determined by the capability
and limitations of the host machine.