
User guide

136 | Protecting Workstations and Servers
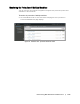
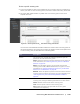
3. Click the right angle bracket > symbol next to a volume in the selected recovery
point to expand the view.
You can view information about the selected volume in the expanded recovery point
as described in the following table.
Mounting a Recovery Point for a Windows Machine
In AppAssure 5, you can mount a recovery point for a Windows machine to access
stored data through a local file system.
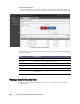
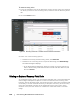
To mount a recovery point for a Windows machine
1. In the AppAssure 5 Core Console, navigate to the Mount Recovery Point dialog box
by doing one of the following:
Click the Machines tab.
i. In the Actions drop-down menu for the machine or cluster with the recovery
that you want to mount, click Mount.
ii. In the Mount Recovery Point dialog box, click to select a recovery point in the
list, and then click Next.
The Mount Recovery Points dialog box appears.
In the left navigation area of the AppAssure 5 Core Console, select the machine
that you want to mount to a local file system.
The Summary tab for the selected machine displays.
i. Click the Recovery Points tab.
ii. In the list of recovery points, click the right angle bracket > symbol to expand
the recovery point that you want to mount.
iii. In the expanded details for that recovery point, click Mount.
The Mount Recovery Points dialog box appears.
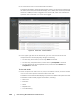
Text Box Description
Title Indicates the specific volume in the recovery point.
Raw Capacity Indicates the amount of raw storage space on the entire volume.
Formatted Capacity Indicates the amount of storage space on the volume that is available
for data after the volume is formatted.
Used Capacity Indicates the amount of storage space currently used on the volume.
When mounting recovery points from data restored from Windows machines that has data
deduplication enabled, you will need to make sure that deduplication is also enabled on the Core
server.