Product Guide McAfee MOVE AntiVirus (Agentless) 3.6.
COPYRIGHT Copyright © 2015 McAfee, Inc., 2821 Mission College Boulevard, Santa Clara, CA 95054, 1.888.847.8766, www.intelsecurity.com TRADEMARK ATTRIBUTIONS Intel and the Intel logo are registered trademarks of the Intel Corporation in the US and/or other countries.
Contents Preface 5 About this document . . . . . . . . . . . . . . . . . . . . . . . . . . . . . . . . . 5 Conventions . . . . . . . . . . . . . . . . . . . . . . . . . . . . . . . . . 5 Find product documentation . . . . . . . . . . . . . . . . . . . . . . . . . . . . . . 6 1 Introduction 7 About McAfee MOVE AV Agentless . . . . . . . . . . . . . . . . . . . . . . . . . . . 8 Components and what they do . . . . . . . . . . . . . . . . . . . . . . . . . . . . . 9 Features . . . . . . . . . . . . . .
Contents 3 Monitoring and managing your environment 45 Integration with ePolicy Orchestrator . . . . . . . . . . . . . . . . . . . . . . . . . . Policy management . . . . . . . . . . . . . . . . . . . . . . . . . . . . . . . . . Configuring policies . . . . . . . . . . . . . . . . . . . . . . . . . . . . . . How quarantine works . . . . . . . . . . . . . . . . . . . . . . . . . . . . . . . . The restore tool at-a-glance . . . . . . . . . . . . . . . . . . . . . . . . . . Restore a file . . . . . . . . .
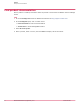
Preface This guide provides the information you need to configure, use, and maintain your McAfee product. Contents About this document Find product documentation About this document Thank you for choosing this McAfee product. This document contains important information about the current release. We strongly recommend that you read the entire document. Conventions This guide uses these typographical conventions and icons.
Preface Find product documentation Find product documentation After a product is released, information about the product is entered into the McAfee online Knowledge Center. Task 6 1 Go to the Knowledge Center tab of the McAfee ServicePortal at http://support.mcafee.com. 2 In the Knowledge Base pane, click a content source: • Product Documentation to find user documentation • Technical Articles to find KnowledgeBase articles 3 Select Do not clear my filters.
1 Introduction McAfee Management for Optimized Virtual Environments AntiVirus (McAfee® MOVE AntiVirus) is an anti-virus solution for virtual environments. It removes the need to install an anti-virus application on every virtual machine (VM), yet provides the protection and performance needed for your organization requirements.
1 Introduction About McAfee MOVE AV Agentless The Multi-Platform deployment option: • Uses McAfee ePO to manage the MOVE configuration on the client systems, offload scan server, and SVA Manager (OSS Manager). • Leverages the McAfee Agent for policy and event handling. • Uses McAfee ePO for reports on viruses that are discovered on the VMs. This option is described in the product documentation for McAfee MOVE AV (Multi-Platform).
Introduction Components and what they do 1 Components and what they do Each component performs specific functions to keep your environment protected. ePolicy Orchestrator — Allows you to configure policies to manage McAfee MOVE AV Agentless and provides reports on malware discovered within your virtual environment. Security Virtual Appliance (SVA) — Provides anti-virus protection for VMs and communicates with the loadable kernel module on the hypervisor, ePolicy Orchestrator, and the GTI servers.
1 Introduction Features VMware vCenter — Console that manages the ESXi servers, which host the guest VMs that require protection. Hypervisor (ESXi) — Allows multiple operating systems to run concurrently on a hosted system. The hypervisor is a virtual operating platform that manages the execution of the guest operating systems. ESXi is an embedded hypervisor for servers that runs directly on server hardware without requiring an additional underlying operating system.
Introduction Features 1 Greater Data Center visibility McAfee Data Center Connector, which is also part of the Data Center Security suite, provides a complete view into virtual data centers and imports key properties like servers, hypervisors, and virtual machines through the McAfee ePO console. You can register a cloud account for VMware vSphere, Amazon Web Services (AWS), or OpenStack with McAfee ePO to discover and gain visibility into all VMs, and protect them with MOVE AntiVirus.
1 Introduction Features 12 McAfee MOVE AntiVirus (Agentless) 3.6.
2 Installation and configuration To set up your environment for MOVE AV Agentless, you install VMware vShield Endpoint, configure the Security Virtual Appliance (SVA), and install the product extensions.
2 Installation and configuration Requirements These items come pre-installed: Operating system Ubuntu 12.0.4 Software VirusScan Enterprise for Linux 2.0 McAfee Agent 4.8 McAfee MOVE AV Agentless We recommend that you set the SVA's time zone, date, and time to match your McAfee ePO server. Otherwise, the on-demand scan (ODS) does not start at the time that you have specified. Software requirements for McAfee ePO-based deployment • ePolicy Orchestrator 4.6.8, 5.1.0, 5.1.1, 5.3.
2 Installation and configuration Download the McAfee MOVE AV (Agentless) packages • VMware vSphere 5.1, 5.5 • VMware NSX Manager 6.0.5 and later For details about system requirements and instructions for setting up the ePolicy Orchestrator environment, see the McAfee ePolicy Orchestrator Installation Guide. For details about system requirements and instructions for setting up the NSX Manager environment, see the product documentation for VMware NSX Manager.
2 Installation and configuration Install the McAfee MOVE AV Agentless extension • McAfee MOVE AV (Agentless) restore tool (MOVE‑AV‑AL_RestoreTool_3.6.0.zip) • McAfee MOVE AV (Agentless) multiple OVF deployment tool (MOVE‑AV‑AL_SVA_Deployment_3.6.0 .zip) Download this package, if you are not using the NSX Manager-based deployment option. Install the McAfee MOVE AV Agentless extension A product's extension must be installed before ePolicy Orchestrator can manage the product.
Installation and configuration Install VMware Endpoint 2 Task For option definitions, click ? in the interface. 1 From the ePolicy Orchestrator console, click Menu | Software | Extensions | Install Extension. 2 Browse to and select each extension file, then click OK. 3 Extension File McAfee Agent EPOAGENTMETA.ZIP McAfee VirusScan Enterprise for Linux LYNXSHLD2000.ZIP McAfee VirusScan Enterprise for Linux reports LYNXSHLD2000PARSER.
2 Installation and configuration Setting up the SVA Setting up the SVA You must deploy the OVF and configure the SVA before you can begin using the Agentless deployment option. OVF deployment options The provided OVF must be deployed to each hypervisor to protect the associated VMs. There are three deployment options. • McAfee ePO-based deployment - You can check in the SVA and deploy it using McAfee ePO to one or more clusters.
Installation and configuration McAfee ePO-based deployment 2 Product trial version — Allows you to use the McAfee ePO-based SVA deployment feature to manage an environment with 10 hypervisors or fewer. If you use this extension in an environment with more than 10 hypervisors, this error message appears. You are using the product with a trial license that only allows you to manage an environment with 10 hypervisors or fewer. Please contact your McAfee sales professional to purchase an unrestricted license.
2 Installation and configuration McAfee ePO-based deployment Set up a common configuration for SVA deployment Before deploying the SVA, complete this common configuration on the McAfee ePO server, so that these settings are retrieved and used for every SVA deployment, which is done from the same McAfee ePO server. Task For option definitions, click ? in the interface. 1 Log on to McAfee ePO as an administrator. 2 Click Menu | Automation | MOVE AV Agentless.
Installation and configuration McAfee ePO-based deployment 2 3 From the Configuration tab, click IP Pool to open the IP Pool: IP Pool Details page with these SVA details and actions: 4 Click Actions | Add IP Pool to open the Add IP Pool page and configure these settings as needed: Options Description IP Pool Name Type a name for the IP Pool. Start IP Type the starting IP address for the pool. End IP Type the ending IP address for the pool. Gateway Type the default gateway address.
2 Installation and configuration McAfee ePO-based deployment 4 Click Actions | Add SVA to open the Check-in SVA (zip) file page. 5 From Select SVA (zip) file to check-in, browse to and select the SVA package, then click OK. This action checks in the SVA package to McAfee ePO. You can check in version 3.6 SVA package only.
Installation and configuration McAfee ePO-based deployment 4 2 Click Edit under Action to open the vShield Manager Configuration dialog box and edit these vShield Manager account details. Make sure that your vShield Manager account and its details are ready. Option Description vCenter Name Specifies the name of the registered vCenter account. vShield Manager Name Specifies the name of the registered vShield Manager.
2 Installation and configuration McAfee ePO-based deployment The SVA deployment process using McAfee ePO involves these three simple steps: 1 Common configuration — Before deploying the SVA, complete this common configuration of the MOVE SVA and McAfee ePO, so that these settings are retrieved and used for every SVA deployment, which is done from the same McAfee ePO server. 2 Service deployment — Select the hypervisor and configure the parameters necessary for deployment.
Installation and configuration McAfee ePO-based deployment • 2 SVA Host Name — Displays the name of the SVA host. Example: SVA-1- host-5421. • Here, SVA — Indicates the SVA Hostname Prefix, which is defined in the General Configuration page. • 1 — Specifies the vCenter ID. • host-5421 — Specifies the Host ID. • Datastore (Free Space) — Specifies the free space present in the datastore, where the SVA service virtual machines storage is added. • Provision Type — Specifies the provision type.
2 Installation and configuration McAfee ePO-based deployment • 6 Warning — Check for specific warnings like: • VM Tools are not running. • Compatibility checking failed. • VMs are not part of the domain as McAfee ePO. From the Verification page, click Deploy to start the SVA deployment. You can now navigate to the Status tab and view the deployment tasks and their details.
Installation and configuration McAfee ePO-based deployment 3 From the Status tab, you can view the SVA deployment or upgrade details. 4 Click any of the SVA deployment jobs to view these Job Status Details and its Task Status Details. 2 Table 2-3 Job status Item Description Start Time Indicates the date and time when the SVA deployment started. End Time Indicates the date and time when the SVA deployment ended. Deployment Type Displays whether the SVA deployment type is Deploy, Upgrade, Remove.
2 Installation and configuration McAfee ePO-based deployment Table 2-5 During SVA deployment (continued) Task type Description Enabling vShield Driver Enables vShield Driver on the client machines. Testing EICAR Tests EICAR on one of the client machine on which vShield Driver installation is successful. Table 2-6 During SVA removal Task type Description Disabling vShield Driver Disables vShield Driver on the client systems.
2 Installation and configuration McAfee ePO-based deployment Table 2-7 During SVA upgrade (continued) Task type Description Removing SVA Removing the powered off old SVA from hypervisor Enabling vShield Driver Enables vShield Driver on the client machines. Testing EICAR Tests EICAR on one of the client machine on which vShield Driver installation is successful.
2 Installation and configuration Deploy VMware Endpoint After initiating the SVA removal process, you can view the Job Status Details and Task Status Details for the removal on the McAfee ePO server. Table 2-9 Job status Item Description Start Time Indicates the date and time when the SVA deployment started. End Time Indicates the date and time when the SVA deployment ended. Deployment Type Displays the SVA deployment type as Remove.
2 Installation and configuration VMware NSX Manager-based deployment 7 On the Select storage page, select the Datastore where you want to add the SVA service virtual machines storage, or select Specified on host. The selected datastore must be available on all hosts in the selected cluster. If you selected Specified on host, the datastore for the ESX host must be specified in the AgentVM Settings of the host before it is added to the cluster. For details, see vSphere API/SDK documentation.
2 Installation and configuration VMware NSX Manager-based deployment 3 From the Server Type drop-down list on the Description page, select NSX Manager, and specify a unique user‑friendly name and some details that can help you identify the server, then click Next. 4 On the Details page, configure these settings as needed: • NSX Manager Address — Type the IP address or the host name of the available NSX Manager. • NSX Manager Username — Type the user name of the available NSX Manager.
Installation and configuration VMware NSX Manager-based deployment 2 Check in the SVA package to McAfee ePO You must check in and host the SVA package in McAfee ePO, so that you can use it with VMware NSX Manager, then deploy it to the cluster. You can view and delete the SVA package using McAfee ePO. Before you begin • From the McAfee download site, download MOVE-AV-AL_OVF_3.6.0.zip. If you installed the ePolicy Orchestrator server 4.6.
2 Installation and configuration VMware NSX Manager-based deployment Task For option definitions, click ? in the interface. 1 Log on to McAfee ePO as an administrator. 2 Click Menu | Configuration | MOVE Service Registration. This action lists all NSX Managers registered in McAfee ePO. 3 From the Actions column on the MOVE Service configuration page, click Register to open the Register NSX server dialog box.
Installation and configuration VMware NSX Manager-based deployment 7 2 On the Select storage page, select the Datastore where you want to add the SVA service virtual machines storage, or select Specified on host. The selected datastore must be available on all hosts in the selected cluster. If you selected Specified on host, the datastore for the ESXi host must be specified in the AgentVM Settings of the host before it is added to the cluster. For details, see vSphere API/SDK documentation.
2 Installation and configuration VMware NSX Manager-based deployment Create a global security group You can select all data centers from the available vCenter and configure them as a security group, so that you can assign a security policy to this group and protect it from viruses. Before you begin • VMware vSphere 5.5 is installed and added to the cluster. • The MOVE SVA is registered with VMware NSX Manager. • The McAfee MOVE AV (Agentless) extension is installed on the McAfee ePO server.
Installation and configuration Deploy multiple OVFs 2 For this... Do this... Name Type the name of the MOVE service. Description Type some details about the MOVE service, which help you to identify the SVA. Actions • Apply — Select this to apply the SVA. • Block — Select this to block the SVA. Service Type From the drop-down list, select Anti Virus. Service Name From the drop-down list, select McAfee MOVE AV. Service Configuration From the drop-down list, select MOVE-Global Policy.
2 Installation and configuration Deploy multiple OVFs Task 1 Gather this information, which you require to run the configuration script: SVA IP address vCloud Networking and Security Manager IP address or DNS name vCenter IP address or DNS name User name and password User name and password Don't use special characters when creating the user name or password for vCenter. Using special characters results in failure to deploy the SVA.
Installation and configuration Deploy multiple OVFs Column header OVF property ePO Server Network The name of the ESXi network that the McAfee ePO server uses to manage the McAfee SVA. 2 To successfully deploy the SVA to a hypervisor with a network that is serviced by a distributed switch (vDS), at least two hypervisors must be connected to the vDS to provide DVPort backing.
2 Installation and configuration Configure the SVA Task 1 From the vSphere Client, select the resource pool on the hypervisor where you want to deploy the OVF, then click File | Deploy OVF Template to open the OVF wizard. 2 Apply these settings to deploy the OVF: For this option... Do this... Source Browse to and select move-sva.ovf file. OVF Template Details Review details about the OVF. End User License Agreement (EULA) Accept this to continue.
Installation and configuration Configure the SVA • 2 If you select the Manual Deployment option and don't provide the configuration information about the Properties page, you must manually configure the SVA. The MOVE AV Agentless Security Virtual Appliance (SVA) OVF (Open Virtualization Format) template has a preconfigured Time Zone, DATE and TIME, using default values. So, the scheduled on-demand scans in MOVE AV Agentless start at a different time than what you have configured.
2 Installation and configuration OVF properties 3 At the prompt, log on with these credentials: • User name: svaadmin • Password: admin The configuration script runs automatically the first time you log on. 4 Follow the prompts and answer questions as they apply to your environment. OVF properties If you manually deploy the OVF from the vSphere Client, the Properties page contains these settings.
Installation and configuration Uninstalling McAfee MOVE AV (Agentless) Category Setting Description SVA Host name The host name of the SVA. SVA savaadmin Password The password of the svaadmin account. vCloud Networking and Security Manager IP Address The IP address or DNS name of the vCloud Networking and Security Manager. vCloud Networking and Security Manager Password The password used to register the SVA with the vCloud Networking and Security Manager.
2 Installation and configuration Uninstalling McAfee MOVE AV (Agentless) Unregister the VMware NSX Manager from McAfee ePO Select the registered VMware NSX Manager and unregister it from the McAfee ePO server. Task 1 Log on to McAfee ePO as an administrator. 2 Click Menu | Configuration | MOVE Service Registration. This action lists all NSX Managers registered in McAfee ePO. 3 From the Actions column on the MOVE Service configuration page, click Unregister for the registered NSX Manager.
3 Monitoring and managing your environment The Agentless deployment option monitors the status of virtual desktops and changes behavior from the ePolicy Orchestrator console.
3 Monitoring and managing your environment Policy management Policies and their categories Policy information is grouped into two categories: SVA and Scan. You can create, modify, or delete as many policies as needed under these categories. ePolicy Orchestrator provides a preconfigured McAfee Default policy, which cannot be edited or deleted but can be copied. You then modify these copies to suit your needs.
3 Monitoring and managing your environment Policy management • User — Enter the user name credentials to connect with the server. • Password — Enter the password associated with the user. After you save and reopen an SVA policy, the vCenter password will appear blank. Even though it appears blank, it is saved in the policy settings. The password must be re-entered to test connection settings. The user account requires at least read access to the vCenter server or the ESXi host.
3 Monitoring and managing your environment Policy management Table 3-1 Scan Items Option Definition On-Access Scan files When an attempt is made to open, close, or rename a file, the scanner intercepts the operation and takes these actions. 1 The scanner determines if the file should be scanned based on this criteria: • The file’s extension matches the configuration. • The file has not been cached, excluded, or previously scanned.
Monitoring and managing your environment Policy management 9 3 In the Actions tab, configure When a threat is found behavior. You must select a first action and a secondary action. For the first action, available options are Delete files automatically and Deny access to files. The only current secondary action option is Deny access to files. 10 In the Quarantine tab, enable the Quarantine configuration option, so that the malware that is detected on any virtual machine is quarantined.
3 Monitoring and managing your environment How quarantine works 2 From the ePolicy Orchestrator console, click Menu | Systems | System Tree. 3 Select the system from the list, then select Actions | Agent | Wake Up Agents. Client events are sent to ePolicy Orchestrator. 4 View the Threat Event Log: click Menu | Reporting | Threat Event Log. A new event is present, which indicates that malware was detected on the client.
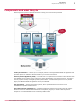
Monitoring and managing your environment How quarantine works 3 The restore tool at-a-glance This diagram provides an overview of how the quarantine restore tool works. The restore tool requires Java Runtime Environment (JRE) 1.6 or 1.7. For JRE 1.7, you must modify quarantine_restore.cmd by adding -Djava.net.preferIPv4Stack=true to the JVMARGS variable. 1 Connect to a quarantine share. 2 View the list of quarantined files. 3 View the VMs corresponding to the selected file.
3 Monitoring and managing your environment Enabling the scan policy quarantine configuration Task 1 From the folder where you extracted MOVE-AV-AL_RestoreTool.3.6.0.zip, run quarantine_restore.cmd to launch the quarantine restore tool. The Connect dialog box is automatically displayed. 2 Enter the location and credentials of the quarantine share, then click OK. Use the Connect button to display the dialog and connect to another share.
Monitoring and managing your environment Using the SVA policy quarantine settings 3 Using the SVA policy quarantine settings The Quarantine settings tab is located on the SVA Policy page. The malware that is detected on any virtual machine is quarantined only when you have enabled the Quarantine configuration option under Scan policy. Table 3-3 Quarantine settings Settings Description Quarantine network share Quarantined files are stored on the specified network share.
3 Monitoring and managing your environment How VM-based scan configuration works 3 In the Advanced Sharing dialog box, select Share this folder, then change Share name to quarantine$. The $ symbol hides the share. 4 Click Permissions, select the default user name Everyone, click Remove, then click Apply. 5 Click Add to select an object type. You can give permission only to administrators who require access to the quarantine folder.
Monitoring and managing your environment Scan diagnosis 3 Follow these steps to run the policy collection immediately: a Click Menu | Configuration | Server Settings, then click MOVE AV [Agentless] under Setting Categories. b Click Run. The Policy collection completed successfully message appears on successful collection of the policies. Enabling the Policy collector option periodically updates the target SVAs with the latest Scan policies.
3 Monitoring and managing your environment Scan diagnosis 8 Click Menu | Reporting | Queries & Reports and select MOVE AV [Agentless] under McAfee Groups to view and run these scan diagnostic queries: • MOVE AV [Agentless]: Top 10 Scanned File Extensions for each SVA — Lists the top 10 file extensions scanned by the SVA. • MOVE AV [Agentless]: Top 10 Scanned Files for each SVA — Lists the top 10 files scanned by the SVA.
Monitoring and managing your environment Scan diagnosis 3 At the end of specified minutes, the tool completes the analysis and displays the results. The default allowed time limit is 1 minute. You can also change the time limit by editing the svaconfig.xml file present at /opt/McAfee/move /etc/. To stop the scan diagnostic tool while it is collecting the data, use the Ctrl+C keys.
3 Monitoring and managing your environment Monitoring the SVA Monitoring the SVA Monitor the status of the SVA using the Threat Event Log in ePolicy Orchestrator, or the Health and Alarms feature in VMware vShield Endpoint. View the Threat Event Log Use the Threat Event Log to quickly view and sort through events in the database. You can choose which columns are displayed in the sortable table. Depending on which products you are managing, you can also take certain actions on the events.
3 Monitoring and managing your environment Queries and reports To create reports, your assigned permission set must include the ability to create and edit reports. You can restrict access to reports using groups and permission sets exactly as you restrict access to queries. Reports and queries can use the same groups, and because reports primarily consist of queries, this allows for consistent access control. McAfee Agent isn't installed on each VM.
3 Monitoring and managing your environment Queries and reports 60 McAfee MOVE AntiVirus (Agentless) 3.6.
4 Managing the SVAs Deploying a new SVA to the hypervisor in the previous version of McAfee MOVE AV (Agentless) requires you to unregister the existing SVA, then deploy the latest SVA to the hypervisor. This option ensures that you have the latest security updates. Review this list before unregistering the existing SVA and deploying the new SVA in your environment. • The 3.6.0 ePolicy Orchestrator extension upgrades the 3.5.x extension.
4 Managing the SVAs Unregister the SVAs from vCloud Networking and Security Manager Task For option definitions, click ? in the interface. 1 Log on to McAfee ePO as an administrator. 2 Click Menu | Queries and Reports | Actions | Import Definitions to open the Import Queries page. 3 Click Choose File to browse and select the MOVE_AV_Query_SVA_IPs.xml file from the folder where you extracted MOVE‑AV‑AL_SVA_Deployment_3.6.0.zip.
Managing the SVAs Unregister the SVAs from vCloud Networking and Security Manager 4 Task 1 Gather this information, which you need to run the unregister script: ePolicy Orchestrator Server IP address and port User name and password You must have a valid ePolicy Orchestrator user name that uses ePolicy Orchestrator authentication. vCenter IP address or DNS name User name and password vCloud Networking and Security Manager McAfee MOVE AntiVirus (Agentless) 3.6.
4 Managing the SVAs Unregister the SVAs from vCloud Networking and Security Manager 2 64 From the folder where you extracted MOVE‑AV‑AL_SVA_Deployment_3.6.0.zip, run launch.bat to start the command prompt. McAfee MOVE AntiVirus (Agentless) 3.6.
Managing the SVAs Upgrade the extension 3 4 Enter 1 to unregister the existing SVA from the selected vCloud Networking and Security Manager. You can enter 2 to deploy the new SVA. For details about deploying the SVA, see Setting up the SVA. 4 Enter the MOVE SVA version 3.5.0 or 3.5.1. 5 Follow the prompts and answer the questions as they apply to your environment.
4 Managing the SVAs Assign a policy 6 Turn off the SVA. Do not delete this SVA until the 3.6.0 version is successfully deployed. This SVA can be used to help troubleshoot deployment issues. 7 Deploy a new SVA to the hypervisor. For details about other methods to deploy the SVA, see Setting up the SVA. Assign a policy Assign a policy to a specific group of the System Tree. You can assign policies before or after a product is deployed. Task For option definitions, click ? in the interface.
Managing the SVAs Upgrade the SVA using NSX Manager 3 Delete the version 3.5 SVA from the cluster in the vCenter. 4 Remove all McAfee MOVE AV policy from Security policies in the VMware vCenter Web Client console. 5 Unregister the registered NSX Manager using McAfee ePO. 6 a Log on to the McAfee ePO server as an administrator. b Click Menu | Configuration | MOVE Service Registration. This action lists all NSX Managers registered in McAfee ePO.
4 Managing the SVAs Upgrade the SVA using NSX Manager 68 McAfee MOVE AntiVirus (Agentless) 3.6.
A SVA security requirements The following security measures are implemented on the SVA. Security measure Description apparmor apparmor is a kernel module that envelops processes and limits their system access to predefined items as defined in their profile. The MOVE scanning process, mvsvc, contains this profile: /etc/apparmor.d/opt .McAfee.move.bin.mvsvc. There are two apparmor modes: complain and enforce. By default, mvsvc is in enforce mode.
A SVA security requirements 70 McAfee MOVE AntiVirus (Agentless) 3.6.
Index A account vShield Manager 22 Agentless deployment option install extension 16 integration with ePolicy Orchestrator 45 policy management 45 C common configuration setting up 20 components defined 9 overview 9 configuration quarantine settings 50 security virtual appliance 41 VM-based scanning 54 conventions and icons used in this guide 5 CSV file properties 38 D deployment McAfee ePO 18 Network and Security services 31 options 18 OVF 37, 39 VMware vShield Endpoint 30 vShield Manager 30 diagnostic t
Index O open virtualization format deployment options 18 manual deployment 39 properties 42 P permissions VMware vCenter 18 policies Agentless 45 applying 49 assigning 66 configuring for Agentless 46 creating a Scan policy 47 creating an SVA policy 46 management 45 Scan 46, 47 SVA 46 Q quarantine folder, configuring 53 overview 50 restore a file 51 restore tool 51 scan policy settings 52, 53 queries reports 58 query file, importing 61 R registering SVA security 31, 33 reports 58 requirements operating s
00