vCenter Chargeback User’s Guide vCenter Chargeback 1.5 This document supports the version of each product listed and supports all subsequent versions until the document is replaced by a new edition. To check for more recent editions of this document, see http://www.vmware.com/support/pubs.
vCenter Chargeback User’s Guide You can find the most up-to-date technical documentation on the VMware Web site at: http://www.vmware.com/support/ The VMware Web site also provides the latest product updates. If you have comments about this documentation, submit your feedback to: docfeedback@vmware.com Copyright © 2010 VMware, Inc. All rights reserved. This product is protected by U.S. and international copyright and intellectual property laws.
Contents About This Book 5 1 Introduction to vCenter Chargeback 7 What Is Chargeback 7 Chargeback Solution for Virtual Environments Overview of vCenter Chargeback 8 7 2 Installing vCenter Chargeback 11 Hardware Requirements 11 Software Requirements 12 Prerequisites for vCenter Chargeback 13 Download and Extract the vCenter Chargeback Installer 15 Install vCenter Chargeback 15 Create a vCenter Chargeback Cluster 19 Install vCenter Chargeback with an Existing Database Schema Upgrading vCenter Chargeback
vCenter Chargeback User’s Guide Managing a Chargeback Hierarchy 78 6 Managing and Configuring vCenter Chargeback Cost Elements 87 vCenter Chargeback Cost-Related Elements Managing Cost Models 92 Managing Fixed Costs 96 Managing Cost Templates 99 Managing Billing Policies 101 Configuring Cost at the Entity Level 103 Physical Infrastructure Costing 105 87 7 Generating Reports 107 About Reports 107 Generate a Cost Report 109 Generate a Usage Report 110 Generate Cost Comparison Report 112 Scheduling Repor
About This Book The vCenter Chargeback User's Guide provides information about configuring and using the chargeback solution for virtual environments that use VMware Infrastructure or VMware vSphere. Intended Audience This book is intended for anyone who wants to install, upgrade, or use vCenter Chargeback. The information in this book is written for experienced Windows or Linux system administrators who are familiar with virtual machine technology and datacenter operations.
vCenter Chargeback User’s Guide Services provides offerings to help you assess, plan, build, and manage your virtual environment. To access information about education classes, certification programs, and consulting services, go to http://www.vmware.com/services. 6 VMware, Inc.
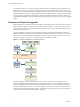
Introduction to vCenter Chargeback 1 vCenter Chargeback is an end-to-end cost reporting solution for virtual environments using vSphere. Before you install and start using vCenter Chargeback, an understanding of what chargeback is and about chargeback solution for a virtual environment would be helpful.
vCenter Chargeback User’s Guide A chargeback solution for a virtual environment defines a hierarchy with different types of entities such as departments, divisions, business units, cost centers, physical servers, virtual machines, and so on. For each entity type, a cost model is defined that determines the rate for each unit of a resource utilized. The chargeback solution determines the resource usage by using either utilization-based metering or allocation-based metering of virtual machines.
Chapter 1 Introduction to vCenter Chargeback When you install vCenter Chargeback, the vCenter Chargeback application, the load balancer, and the data collectors are installed and run on the same machine. Although the vCenter Chargeback database can also be installed on the same machine, in a real-world scenario you would install the application and the database on separate machines.
vCenter Chargeback User’s Guide 10 VMware, Inc.
Installing vCenter Chargeback 2 Before you install vCenter Chargeback, you must ensure that the minimum hardware and software requirements are met and the relevant pre-installation tasks are performed.
vCenter Chargeback User’s Guide Software Requirements Other than an operating system, you must have a database management system and a Web browser installed to run and access vCenter Chargeback.
Chapter 2 Installing vCenter Chargeback Prerequisites for vCenter Chargeback Before installing and running vCenter Chargeback few pre-install tasks have to be preformed. Networking Prerequisites You must perform the following pre-installation tasks for the successful installation and running of vCenter Chargeback: n Check whether the ports are free. Ensure that the ports that you specify during the installation are free.
vCenter Chargeback User’s Guide You must provide the details of this vCenter Chargeback database and database user when installing vCenter Chargeback. The installer will use these details to create the database schema and objects. Also, vCenter Chargeback will log in to the vCenter Chargeback database using the details of this database user and perform the necessary database operations.
Chapter 2 Installing vCenter Chargeback Table 2-1. vCenter Chargeback Pre-Install Checklist (Continued) Item Requirement Type Microsoft SQL Server 2005 or later Checked Oracle Database 10g or later Database name Create a database for vCenter Chargeback and note down the database name. URL IP address of the vCenter Chargeback database Ensure that the machine on which the database is installed has a static IP address.
vCenter Chargeback User’s Guide Procedure 1 Run the vCenter-CB.exe file. The installation wizard is displayed. 2 Click Next on the Introduction screen. 3 Accept the end-user license agreement, and click Next. 4 Provide the path for the installation directory, and click Next. If the specified installation directory exists, ensure that it is empty. If the specified installation directory does not exist, the installer creates the directory. The install path must contain at least one folder.
Chapter 2 Installing vCenter Chargeback 6 Enter the IP address and port details for the vCenter Chargeback application, and click Next. Option Description IP Address Static IP address of the machine on which you are installing vCenter Chargeback. Do not use localhost instead of the IP address. HTTP Port An unused HTTP port through which vCenter Chargeback can communicate. Load-Balancer Port An unused port through which vCenter Chargeback can communicate with the load balancer (Apache Server).
vCenter Chargeback User’s Guide Option Description Database Username The name of the database user. The database user must have privileges to read the VMware Cloud Director database objects. Database Password Password for the user name that you have provided. If the installer successfully connects to the database, the next screen is displayed. 11 Review the information displayed on the Pre-Installation Summary screen, and click Install.
Chapter 2 Installing vCenter Chargeback 3 Provide the required certificate information and press Enter. You are prompted to enter the some information to be included in the generated SSL certificate. 4 5 Option Description Country Code A two letter code for the country. State or Province Name Name of the state or province. Locality Name Name of the city or town. Organization Name Name of the organization. Common Name Your name. Email Address An email address.
vCenter Chargeback User’s Guide Installing a vCenter Chargeback Cluster Instance You can create a cluster of vCenter Chargeback instances that use the same database and load balancer. Procedure 1 Run the vCenter-CB.exe file. The installation wizard is displayed. 2 Click Next on the Introduction screen. 3 Accept the end-user license agreement, and click Next. 4 Provide the path for the installation directory, and click Next. If the specified installation directory exists, ensure that it is empty.
Chapter 2 Installing vCenter Chargeback 6 Click Use it. The vCenter Chargeback instance will use this existing vCenter Chargeback database. 7 Enter the IP address and port details for the vCenter Chargeback application, and click Next. Option Description IP Address Static IP address of the machine on which you are installing vCenter Chargeback. Do not use localhost instead of the IP address. HTTP Port An unused HTTP port through which vCenter Chargeback can communicate.
vCenter Chargeback User’s Guide 12 Review the information displayed on the Pre-Installation Summary screen, and click Install. The installer starts installing the various components. If the installation is successful, the URL for accessing the vCenter Chargeback application and the information required to add this installed instance to the cluster is displayed. 13 Note this information, and click Done.
Chapter 2 Installing vCenter Chargeback 4 Provide the path for the installation directory, and click Next. If the specified installation directory exists, ensure that it is empty. If the specified installation directory does not exist, the installer creates the directory. The install path must contain at least one folder. You cannot provide only the drive name. 5 Enter the vCenter Chargeback database-related information, and click Next.
vCenter Chargeback User’s Guide Option Description Load-Balancer Port An unused port through which vCenter Chargeback can communicate with the load balancer (Apache Server). Server Instance Name A unique user-defined name for the vCenter Chargeback instance. This name is used by the load balancer to identify the instance. If the specified ports are free, the next screen is displayed. 8 Enter the load balancer-related information, and click Next.
Chapter 2 Installing vCenter Chargeback 12 Review the information displayed on the Pre-Installation Summary screen, and click Install. The installer starts installing the various components. If the installation is successful, the URL for accessing the vCenter Chargeback application is displayed. 13 Note this URL, and click Done. The installer displays a dialog stating whether you want to generate your own SSL certificate. 14 Click Skip now, I'll generate it later.
vCenter Chargeback User’s Guide You can also back up the relevant configuration files from the current vCenter Chargeback installation, so that you can restore the existing installation if the upgrade fails. See KB 1026796 (http://kb.vmware.com/kb/1026796) for further details. Upgrade vCenter Chargeback You can upgrade an existing vCenter Chargeback instance to a later version.
Chapter 2 Installing vCenter Chargeback 7 (Optional) If you chose to install the VMware Cloud Director Data Collector, enter the VMware Cloud Director database-related information, and click Next. Option Description Database Type The type of database used to create the VMware Cloud Director database. The only permissible value is ORACLE. Database URL The IP address of the system on which the VMware Cloud Director database is installed.
vCenter Chargeback User’s Guide In earlier releases, any user can view any of the vCenter Servers or cost models. However, starting from vCenter Chargeback 1.5, users must be assigned role with privileges to access the cost models and vCenter Servers. Only the super user can view all the resources in the application. The vCenter Server users who are added to the application can view the vCenter Server to which they belong. These users can also view the default hierarchy of the corresponding vCenter Server.
Chapter 2 Installing vCenter Chargeback VMware vCenter Chargeback - vShield Manager DataCollectorEmbedded Starting this service starts the vShield Manager Data Collector instance that was installed along with the vCenter Chargeback application.
vCenter Chargeback User’s Guide By integrating VMware Cloud Director with vCenter Chargeback, you can perform the following tasks: n Meter and charge for allocation and usage of VMware Cloud Director resources, including virtual datacenters, vApps, templates and media file storage. n Meter and charge for external network bandwidth, network count, and network services, such as DHCP, NAT, and firewall. n Deliver multi-tenant chargeback reports.
Chapter 2 Installing vCenter Chargeback 3 4 Select the relevant data collector download option from the Tools menu. Option Description Download Data Collector Select this option to download the installer for the vCenter Chargeback Data Collector. Download VMware Cloud Director Data Collector Select this option to download the installer for the VMware Cloud Director Data Collector.
vCenter Chargeback User’s Guide 6 Provide the details of the vCenter Chargeback database that the data collector must synchronize with the vCenter Server databases, and click Next. Option Description Database Type The type of database used to create the vCenter Chargeback database. This can be either SQL SERVER or ORACLE. Database URL The IP address or host name of the system on which the vCenter Chargeback database is installed.
Chapter 2 Installing vCenter Chargeback Install VMware Cloud Director Data Collector If you want to integrate a vCenter Chargeback instance with a VMware Cloud Director instance, you must have a VMware Cloud Director Data Collector instance installed and running. You can install a VMware Cloud Director Data Collector instance along with vCenter Chargeback or separately by using the VMware Cloud Director Data Collector installer.
vCenter Chargeback User’s Guide Option Description Database Username The name of the database user. The database user must have privileges to create and delete schema, as well as read from and write to the database. If you select Windows Authentication for SQL Authentication Mode, you must provide the Windows user account name. The user name must be of the form DomainName\UserName. Also, the user must have the Log on as a service permission.
Chapter 2 Installing vCenter Chargeback Install vShield Manager Data Collector If you integrate a vCenter Chargeback instance with a VMware Cloud Director instance, you must have a vShield Manager Data Collector instance installed and running to fetch the network statistics from vShield Manager. You can install a vShield Manager Data Collector instance along with vCenter Chargeback or separately using the vShield Manager Data Collector installer.
vCenter Chargeback User’s Guide Option Description Database Username The name of the database user. The database user must have privileges to create and delete schema, as well as read from and write to the database. If you select Windows Authentication for SQL Authentication Mode, you must provide the Windows user account name. The user name must be of the form DomainName\UserName. Also, the user must have the Log on as a service permission.
Chapter 2 Installing vCenter Chargeback 7 Review the information displayed on the Pre-Installation Summary screen, and click Install. The installer starts installing the data collector. If the installation is successful, the URL for accessing vCenter Chargeback is displayed. 8 Note the URL, and click Done. NOTE If the installation fails, the uninstaller starts automatically and removes all the components installed.
vCenter Chargeback User’s Guide You must also remove the instance name from the list of instances included in the worker.balancer.balance_workers parameter under the Define the LB worker section. For the example suggested in the previous step, the entry might be as follows: # Define the LB worker worker.balancer.type=lb worker.balancer.sticky_session = 1 worker.balancer.method=R worker.balancer.balance_workers=worker1,worker2,chargeTest,sample0 Delete the chargeTest entry from the list of instances.
Configuring Administration Settings 3 As an administrative user, you can perform various administrative tasks, such as configuring the LDAP and SMTP servers in the application and adding as well as updating vCenter Server information. To perform these administrative tasks, you must have the Super User or Administrator role. The user account details provided during the installation has the Super User role defined on it. Log in to the application by using this administrative user account.
vCenter Chargeback User’s Guide Configure the SMTP Server Setting You must configure the SMTP server setting in vCenter Chargeback to send the generated and archived reports through email. You must have the Super User role to perform this task. Procedure 1 In the Settings tab, click General. 2 Click Add in the Email Setting section. The Manage Email Server screen is displayed. 3 4 Provide information about the SMTP server that the application uses to send emails.
Chapter 3 Configuring Administration Settings 4 Option Description User Name User name to be used for authentication, if authentication type is Require Login. Password Password for the user name provided above. Maximum Attachment Size(KB) The maximum permissible file size for email attachments. The size specified is in KB. Click Edit. The email address is displayed in the Email Setting section. Delete the SMTP Server Setting You can remove an existing SMTP server and add a new one.
vCenter Chargeback User’s Guide 3 Option Description error The error level designates error events that might still allow the application to continue running. fatal The fatal level designates very severe error events that will presumably lead the application to abort. Click Apply. Managing LDAP Servers Starting with vCenter Chargeback 1.5, you can configure one or more LDAP server in the application.
Chapter 3 Configuring Administration Settings What to do next If you have selected the Enable LDAPS option, you must download the certificate from the LDAP server on to your local machine and add it to the vCenter Chargeback keystore. To do this, on the machine on which the load balancer service is running, you must then run the following command: Installation_Path\VMware\VMware vCenter Chargeback\jre\bin> keytool -import -trustcacerts keystore "Installation_Path\VMware\VMware vCenter Chargeback\jre\lib\se
vCenter Chargeback User’s Guide 5 Option Description LDAP Limit The maximum number of Windows Active Directory users or groups to be fetched and displayed in the Add User Account screen of the application. Enable LDAPS Select this option to enable LDAP over SSL. Click Save. The table on the LDAP Servers page lists the modified information for the selected LDAP server.
Chapter 3 Configuring Administration Settings Add vCenter Server Information vCenter Chargeback can calculate overall resource utilization and corresponding cost only for vCenter Servers that are added to the application. You can add one or more vCenter Server instances to vCenter Chargeback. You must have the Super User role or the Administrator role to perform this task. Prerequisites n Before you add a vCenter Server, you must ensure that the vCenter Server is accessible over the network.
vCenter Chargeback User’s Guide 4 Option Description Database Type The database type can be either SQL Server (default) or Oracle. Authentication Type If you have set the Database Type to SQL Server, you can set the Authentication Type to Credential Based Authentication or Windows Authentication. If you select Credential Based Authentication, you must provide the database user name and password to access the database.
Chapter 3 Configuring Administration Settings Option Description vCenter Server Password Password for the user name entered. Database URL URL to access the vCenter Server database. For Oracle Database, this URL must have the format: IP address/host name:TNS listener port For example: 123.123.123.123:1521 For Microsoft SQL Server, this URL can be in the following formats: IP address/host name\database instance name or IP address/host name For example: 123.123.123.123\chargeback_db 4 Database Name N
vCenter Chargeback User’s Guide Procedure 1 In the Settings tab, click vCenter Servers. A table listing all the vCenter Servers is displayed. 2 Select the vCenter Server that you want to remove and click Delete. If any of the entities of the vCenter Server are part of a chargeback hierarchy, the Manage linked entities screen is displayed. 3 (Optional) Click Delete all these entries to remove the entities from the hierarchy permanently. You can retain the entities by clicking Keep all these entries.
Chapter 3 Configuring Administration Settings View Data Collectors vCenter Chargeback stores and displays information about each data collector registered with the application. The data collectors registered with the application and their corresponding details can be viewed from the Settings tab. Procedure 1 Click the Settings tab. 2 Click Data Collectors. A table listing all the data collectors registered with the application and their corresponding details is displayed.
vCenter Chargeback User’s Guide Table 3-1. Information About Data Collectors Registered in the Application (Continued) Information Type Description Job Type The type of the synchronization job. n n n n n 50 Storage Synchronization: The data collector obtains the storage information for all the virtual machines managed by the VirtualCenter Server or vCenter Server. For vSphere 4.0 and later, the data collector fetches all the files of a virtual machine and the datastore information of each file.
Chapter 3 Configuring Administration Settings Modify Job Interval You can control the time interval between two consecutive job runs for jobs that do not run eternally. Procedure 1 Click Edit in the Job Interval column. The Change Job Interval screen is displayed. 2 Enter the new job interval. The specified job interval must be in minutes. 3 Click Save. The new job interval is displayed in the table.
vCenter Chargeback User’s Guide Procedure 1 In the Settings tab, click Data Collectors. A table listing all the data collectors registered with the application is displayed. 2 Select the data collector that you want to delete, and click Delete. A dialog box confirming you action is displayed. 3 Click OK to confirm deletion. The data collector is deleted and the synchronization jobs associated with the data collector are assigned to other registered data collectors, if any.
Chapter 3 Configuring Administration Settings What to do next After you modify a property value, you must restart the data collector for the change to take effect. You can test the connection to the Cloud Director database by clicking the Test VMware Cloud Director database connection link. Configure vShield Manager Data Collector If you have installed the vShield Manager Data Collector, you must specify the user name and password to access the vShield Manager instances.
vCenter Chargeback User’s Guide Modify Super User Password for Cloud Data Collectors If you change the password of the super user that was used when installing the VMware Cloud Director Data Collector and vShield Manager Data Collector, you must change the same from the Cloud Data Collectors page to ensure that the data collectors function correctly. You must have the Super User role to perform this task. Procedure 1 On the Settings tab, click Cloud Data Collectors.
Chapter 3 Configuring Administration Settings Procedure 1 In the Settings tab, click License. A table listing the details of the license added to the application is displayed. 2 Click Replace. The Replace License screen is displayed. 3 Enter a valid license key and click Replace. The new license replaces the existing license. The details of the new license is displayed in the table. Delete the Application License An existing license can be removed from the application.
vCenter Chargeback User’s Guide 4 Select an option from the Header Settings section to display the required information in the selected subsection. Option Description Text The text that you want the report header to contain. For example, the name of the organization. Image An image that you want the header section to display. For instance, the company logo. Ensure that the image size does not exceed 1MB. Report Name The name of the report entered when generating the report.
Chapter 3 Configuring Administration Settings In each section, the configured sub-sections will use the space available in the adjacent empty sub-sections. A configured sub-section will first try to expand and use the unused space in the sub-section to its right, then to its left, then to its bottom, and lastly in the sub-section above it. The content of a sub-section is center-aligned. Also, the images are stretched to fit into the available space.
vCenter Chargeback User’s Guide Manage System Health Thresholds The System Health tab provides information about the status of the entire system based on the response time of the various servers and databases in the system. The response time limits can be set in the application. You must have the Super User role to perform this task. You can set the response time limits in milliseconds for vCenter Chargeback, vCenter Chargeback database, vCenter Server, and vCenter Server database.
Authenticating and Managing Users, Roles, and Permissions 4 vCenter Chargeback provides user management features that enable you to manage the various users, roles, and permissions defined in the application. The application defines various permissions and also provides some predefined roles. In addition, it lets you create new roles and users as per your requirements. Starting with vCenter Chargeback 1.5, the application defines resource-based authorization.
vCenter Chargeback User’s Guide Table 4-1. Resource Types Defined in vCenter Chargeback (Continued) Resource Type Description Attribute This resource type refers to any attribute created or imported in vCenter Chargeback. Only users with the Administrator role and Super User role have create permission for this resource type. Tier This resource type refers to the storage tiers created in vCenter Chargeback. A user must have read permission on the vCenter Server to access storage tiers.
Chapter 4 Authenticating and Managing Users, Roles, and Permissions Table 4-2. Permissions Applicable for Each Resource Type (Continued) Resource Type Create Read Update Delete Entity Cost Modify Schedule Yes Yes Yes Yes No Role Yes Yes Yes Yes No Billing Policy Yes Yes Yes Yes No You can assign permissions on a resource type to a user only through a role.
vCenter Chargeback User’s Guide Table 4-3.
Chapter 4 Authenticating and Managing Users, Roles, and Permissions Table 4-4. Permissions Defined on the Administrator Role (Continued) Resource Type Create Read Update Delete Entity Cost Modify Role Yes Yes Yes Yes No Billing Policy Yes Yes Yes Yes No Hierarchy Manager Role Table 4-5 lists the permissions defined in the Hierarchy Manager role for each of the resource type. Table 4-5.
vCenter Chargeback User’s Guide Table 4-6.
Chapter 4 Authenticating and Managing Users, Roles, and Permissions Create a Role Apart from the system-defined roles, you can define your own custom roles in vCenter Chargeback. These roles can then be assigned to the users created in the application. Only users having the Super User role or the Administrator role assigned to them can perform this task. Procedure 1 In the Users & Roles tab, click Roles. A table listing all the roles defined in the application is displayed. 2 Click Create.
vCenter Chargeback User’s Guide Delete a Role You can delete any of the existing custom roles in the application. The system-defined roles cannot be deleted. You must have the Administrator role or the Super User role to perform this task. If you have the Administrator role, you can delete only the roles that you have created. A user with the Super User role can delete any roles other than the system-defined roles. Procedure 1 In the Users & Roles tab, click Roles.
Chapter 4 Authenticating and Managing Users, Roles, and Permissions Creating Users You can create multiple users and groups in vCenter Chargeback as per your requirements. You must have the Super User role or the Administrator role to create users. The application lets you create the following types of users and groups: Local User This is a vCenter Chargeback user whose details are defined in vCenter Chargeback. LDAP User This is a Windows Active Directory user.
vCenter Chargeback User’s Guide What to do next The role assigned to the user defines the permission that the user has in the application. You must, however, assign roles to the user on the individual resources for him to access those resources. Create a LDAP User You can add Windows Active Directory users to vCenter Chargeback. The account detail of such users are originally defined in the Windows Active Directory.
Chapter 4 Authenticating and Managing Users, Roles, and Permissions Create a LDAP Group Like LDAP users you can also add LDAP groups to vCenter Chargeback. You must have the Super User role or the Administrator role to perform this task. NOTE Only a user with the Super User role can assign a role when creating a user. Prerequisites Before you add a LDAP group, ensure that the LDAP server is configured in the application.
vCenter Chargeback User’s Guide Modify a User After a user is created, you can change the password for the user by using the Modify User feature of the application. You can modify the password of only a Local user. You must have the Super User role or the Administrator role to perform this task. If you have the Administrator role, then you can reset the password for only the users that you have created.
Chapter 4 Authenticating and Managing Users, Roles, and Permissions You can assign only a single role to a user on vCenter Chargeback. If the user already has a role assigned to it, the same is removed and the new role is set on the user. Only a user with the Super User role can assign the Super User role or the Administrator role to a user on vCenter Chargeback. You must have the Super User role or the Administrator role to perform this task.
vCenter Chargeback User’s Guide A user not having the Super User role or the Administrator role can assign a role to other users only on the resources that he has access to. This user can assign only the roles he has access to and have the same or a subset of the privileges that are defined in the role assigned to him. The role that users can assign to other users on a resource depends on: n The permissions that the user has on the resource. n The roles that the user has access to.
Chapter 4 Authenticating and Managing Users, Roles, and Permissions 4 Select the user from the table listing the users. If any role has already been assigned to the user on the selected resources, the same is displayed under Currently Assigned Role. 5 Click Unassign this role under Current Assigned Role. The role is revoked from the user for the selected resources. The user can no longer access the selected resources.
vCenter Chargeback User’s Guide 3 Option Description Login in to The user type. LDAP Code If you select LDAP for Login in to, you must specify the LDAP Code for the LDAP server. Click OK. On successful log in, the Getting Started tab of the application is displayed. What to do next You can also access the application from the VI Client as a vCenter Server user, provided the application is registered with vCenter Server.
Managing Chargeback Hierarchies 5 vCenter Chargeback interacts with the vCenter Server to determine the utilization of the computing resources by various virtual machines that are created in the vCenter Server hierarchy. vCenter Chargeback enables you to create multiple chargeback hierarchies, which can be different from the vCenter Server hierarchies. A chargeback hierarchy is an organization of vCenter Server entities and vCenter Chargeback entities.
vCenter Chargeback User’s Guide 3 Select Custom Hierarchy (default). 4 Click Create. An empty chargeback hierarchy with the given name is created. What to do next To add entities to this hierarchy and manage the hierarchy, see “Managing a Chargeback Hierarchy,” on page 78. Synchronize a Chargeback Hierarchy with a vCenter Server You can create a chargeback hierarchy and synchronize it with a vCenter Server. This chargeback hierarchy will be same as the vCenter Server hierarchy.
Chapter 5 Managing Chargeback Hierarchies Prerequisites Before you begin, you must ensure that the .csv file entries are in the correct format. To know more about the format of the .csv file entries, refer to “Format of the CSV File,” on page 77. Procedure 1 In the Manage Hierarchy tab, click Create Hierarchy. The Create Hierarchy screen is displayed. 2 Enter a name and description for the hierarchy. The name must not exceed 255 characters and the description must not exceed 512 characters in length.
vCenter Chargeback User’s Guide The following sample is an example of the contents of such a file: #version 1.5.0 1,CB-folder,-1,101 2,CB-folder-1,1,101,vCenter Chargeback entity 3,cbm-vc,1,0,12.123.123.123,vm-203,1 4,CBM_1.5_B2,2,0,23.123.123.123,vm-218,2 The first line of the CSV file specifies the version of vCenter Chargeback. If this line is not present, the format defaults to that for vCenter Chargeback 1.0. Starting with the vCenter Chargeback 1.0.
Chapter 5 Managing Chargeback Hierarchies Add a vCenter Chargeback Entity You can add vCenter Chargeback entities to a chargeback hierarchy to logically group vCenter Server entities in the hierarchy. A vCenter Chargeback entity can represent the departments, cost centers, and business units in an organization. To add a vCenter Chargeback entity to a chargeback hierarchy, you must have update privilege on the chargeback hierarchy and the parent entity.
vCenter Chargeback User’s Guide 3 Right-click the entity to which you want to add a vCenter Server entity and select New vCenter Server Entity from the pop-up menu. You can add a vCenter Server entity to the hierarchy or to a vCenter Chargeback entity in the hierarchy. You cannot add a vCenter Server entity to another vCenter Server entity in the chargeback hierarchy. 4 Select the required vCenter Server from the drop-down menu on the right pane.
Chapter 5 Managing Chargeback Hierarchies Rename a Chargeback Hierarchy or a Chargeback Entity You can edit the names of chargeback hierarchies and the vCenter Chargeback entities in them. To perform this task, you must have update privilege on the hierarchy and the chargeback hierarchical entity. Procedure 1 In the Manage Hierarchy tab, select the required chargeback hierarchy from the drop-down menu on the left pane of the page. The collapsed view of the chargeback hierarchy is displayed.
vCenter Chargeback User’s Guide Delete a Chargeback Hierarchy You can remove invalid or unwanted chargeback hierarchies from the application. You must have delete privilege on the hierarchy to delete it. CAUTION You cannot undo a delete hierarchy operation. If a hierarchy is deleted, all the information associated with the hierarchy is lost. Procedure 1 In the Manage Hierarchy tab, select the required chargeback hierarchy from the drop-down menu on the left pane of the page.
Chapter 5 Managing Chargeback Hierarchies Move Entities Within a Hierarchy You can move the entities within a chargeback hierarchy. This is particularly useful if you want to rearrange the entities within a chargeback hierarchy. You cannot, however, rearrange the entities that are under a vCenter Server entity. You must have the update privilege on the hierarchy, the chargeback hierarchical entity, and the current and new parent chargeback hierarchical entity to move entities within a hierarchy.
vCenter Chargeback User’s Guide Procedure 1 In the Manage Hierarchy tab, select the required chargeback hierarchy from the drop-down menu on the left pane of the page. The collapsed view of the chargeback hierarchy is displayed. 2 Expand the hierarchy by clicking the plus sign (+) to the left of the hierarchy name. The first-level entities in the hierarchy are displayed. You can view all the entities in the hierarchy by clicking the plus sign to the left of the entities that have sub-entities.
Chapter 5 Managing Chargeback Hierarchies 3 Right-click the virtual machine whose cost has to be shared and select Manage cost sharing from the popup menu. NOTE This menu option is available only for the virtual machines that are individually added to the hierarchy. 4 Click OK on the information dialog box. 5 Right-click the vCenter Chargeback entity that shares this virtual machine and select Share Cost in this folder from the pop-up menu. The Set cost sharing screen is displayed.
vCenter Chargeback User’s Guide Procedure 1 In the Manage Hierarchy tab, select the required chargeback hierarchy from the drop-down menu on the left pane of the page. The collapsed view of the chargeback hierarchy is displayed. 2 Expand the hierarchy by clicking the plus sign (+) to the left of the hierarchy name. The first-level entities in the hierarchy are displayed. You can view all the entities in the hierarchy by clicking the plus sign to the left of the entities that have sub-entities.
Managing and Configuring vCenter Chargeback Cost Elements 6 vCenter Chargeback provides various cost-related elements. These elements enable you to define the cost to be charged for each computing resource, fixed costs, and the cost calculation formula. You must set the various cost-related elements in vCenter Chargeback to successfully generate the required cost reports.
vCenter Chargeback User’s Guide Chargeable Computing Resource A chargeable computing resource is any computing resource that must be accounted for when calculating the IT operational costs. The usage of the computing resources is measured and the corresponding charge is calculated. vCenter Chargeback accounts for the following computing resources: CPU The CPU usage is measured in GHz. Memory The memory usage is measured in GB.
Chapter 6 Managing and Configuring vCenter Chargeback Cost Elements Rate Factor Rate factor is the multiplication factor to be used along with the base rate to calculate the charge for a unit of chargeable computing resource used or allocated for a specified duration. Rate factors are useful when you want to charge the entities in a hierarchy differently. The rate factors enable you to apply a cost that is a multiple or a fraction of the base rate. The rate factor value can be between 0 and 999.99.
vCenter Chargeback User’s Guide Billing Policy A billing policy determines the cost types and the amount of chargeable computing resources units to be considered for calculating the chargeback cost. vCenter Chargeback provides the following billing policies: 90 Fixed Cost Only the fixed costs associated with each entity in the chargeback hierarchy is considered for billing. The actual usage of the chargeable computing resources is ignored.
Chapter 6 Managing and Configuring vCenter Chargeback Cost Elements Fixed Cost and CPU Reservation This policy takes into account the fixed costs associated with the entity, the reserved capacity of CPU, and the actual utilization of other chargeable computing resources for calculating the total cost.
vCenter Chargeback User’s Guide external network receive computing resources. For all other resources, the userdefined allocation units is considered for cost calculation. This billing policy is set in the VMware Cloud Director Pay As You Go - Resource Based Charging Cost Model. VMware Cloud Director Billing Policy - Networks This billing policy is available only if the VMware Cloud Director Data Collector is installed.
Chapter 6 Managing and Configuring vCenter Chargeback Cost Elements n Create a Cost Model on page 93 You can create multiple cost models in vCenter Chargeback. Defining multiple cost models enables you to charge different sets of entities or hierarchies differently. It also enables you to compare the costs calculated using different cost models for a hierarchy or a set of entities. n Modify a Cost Model on page 95 After a cost model is created, you can modify it as and when required.
vCenter Chargeback User’s Guide 7 Set the base rate and the corresponding duration for the computing resources. The duration specifies how often the specified rate is charged for the corresponding computing resource. The duration can be Hourly, Daily, Weekly, Monthly, Quarterly, Half-yearly, or Yearly. In vCenter Chargeback, a duration value of Monthly is equal to 30 days, Quarterly is equal to 91 days, Half-yearly is equal to 182 days, and Yearly is equal to 365 days.
Chapter 6 Managing and Configuring vCenter Chargeback Cost Elements 7 Click Calculate Metrics. The calculated costs are displayed in the Suggested Metrics page of the screen. 8 Specify the number of virtual machines in the Number of VM field. 9 Specify the total number of hours to be considered for a month. 10 Set the attribution percentages for the CPU and memory. The attribution percentages must add up to 100 percent. The annual, monthly, and hourly rates are displayed.
vCenter Chargeback User’s Guide 5 In the Base Rates tab, modify the base rates for the chargeable computing resources, the duration, and the effective time period. a (Optional) To fetch the historical base rate values, select the Update for the effective period option, specify the required time period, and click Get. b Click the Show link next to Historical values. The historical base rate values for the specified period is displayed for each of the computing resources.
Chapter 6 Managing and Configuring vCenter Chargeback Cost Elements n Modify a Fixed Cost on page 98 You can modify the fixed costs as and when required. n Delete a Fixed Cost on page 98 You can delete invalid or unwanted fixed costs from the application. Create a Fixed Cost You must create the fixed costs that you want to charge on the entities and hierarchies. These costs can include periodically charged costs and one time costs.
vCenter Chargeback User’s Guide Modify a Fixed Cost You can modify the fixed costs as and when required. You must have update privilege on the fixed cost to modify it. Procedure 1 In the Manage Cost tab, click Fixed Cost. A table listing all the fixed costs created in the application is displayed. You can view the details of the fixed cost by clicking the plus sign (+) in the Details column of the table.
Chapter 6 Managing and Configuring vCenter Chargeback Cost Elements Procedure 1 In the Manage Cost tab, click Fixed Cost. A table listing all the fixed costs created in the application is displayed. 2 Select the fixed cost that you want to delete, and click Delete. A dialog box confirming the action is displayed. 3 Click OK. The fixed cost is deleted from the application and, consequently, from the table listing the fixed costs.
vCenter Chargeback User’s Guide 4 In the Rate Factors tab, set the rate factors for the chargeable computing resources. The rate factor value can be between 0 and 999.99. The application considers a precision of up to two decimal places. 5 Click the Fixed Costs tab. 6 Select the required fixed cost and click Add to the list. The fixed cost is added to the list of fixed costs displayed in the List Of fixed costs to be applied to the cost template section.
Chapter 6 Managing and Configuring vCenter Chargeback Cost Elements Procedure 1 In the Manage Cost tab, click Cost Template. A table listing all the cost templates created in the application is displayed. 2 Select the cost template that you want to delete, and click Delete. A dialog box confirming the action is displayed. 3 Click OK. The cost template is deleted from the application and, consequently, from the table listing the cost templates.
vCenter Chargeback User’s Guide 5 Select a resource and define an expression for it. a To include only an attribute, select the required attribute from the Attribute drop-down menu. b To obtain a maximum of a set of attribute values, click MAX and then select the required attributes from the Attribute drop-down menu. c To calculate the resource units only for the powered-on virtual machine, first select the VM Power On/Off option and then define the required expression for the selected resource.
Chapter 6 Managing and Configuring vCenter Chargeback Cost Elements 3 (Optional) Modify the name and description on the General tab. 4 Select the Expression tab and modify the required expressions. 5 a To modify only the expression for a resource, select the resource, click Clear selected expression, and define the new expression. b If you want to delete a resource from the list of resources and corresponding expression, select the resource from the list and click Delete row.
vCenter Chargeback User’s Guide The entity-specific cost configuration details for the selected entity and cost model and the specified duration are displayed. If the entity is not configured for the specified duration or cost model, a message stating the same is displayed on the page. Edit Cost Configuration of an Entity The entity-specific cost configuration details can be set from the Configure Cost tab. The cost configuration is applied on an entity for the specified cost model and time period.
Chapter 6 Managing and Configuring vCenter Chargeback Cost Elements 8 In the Fixed Costs tab, select the required fixed cost from the Apply a Fixed Cost drop-down menu and click Add to the list. The fixed cost is added to the list of fixed costs displayed in the table. For each fixed cost that you want to include, repeat this step.
vCenter Chargeback User’s Guide Set Rate Factors at the Hosts and Clusters Level vCenter Chargeback lets you set rate factors at the hosts and clusters level. You can charge all the virtual machines in a cluster or on an ESX host uniformly by setting rate factors at the hosts and clusters level. NOTE You cannot set the rate factor for the storage resource at the hosts and clusters level.
7 Generating Reports After you have configured the application, created and configured chargeback hierarchies, and defined cost models, you can generate various cost reports, usage reports, and cost comparison reports. The reports provide you with valuable information such as the usage of resources, the charge to levied on each entity, and the total cost.
vCenter Chargeback User’s Guide Table 7-1. Report Summary (Continued) Field Description Hierarchy The name of hierarchy on which the report is generated. If the report is generated for an entity, then the name of the hierarchy in which the entity exists is included. Chargeback Model The vCenter Chargeback cost models used to compute to the costs when generating the report. The cost model names are separated by a semi-colon (;).
Chapter 7 Generating Reports A cost comparison report enables you to compare the costs for two different cost models. The report structure is similar to the cost report with the following exceptions: n Report summary section does not display the total cost. n No graphs are available in the resource summary. Generate a Cost Report You can generate cost reports for an hierarchy and for individual entities in a hierarchy.
vCenter Chargeback User’s Guide Option Description Select a cost model Select the cost model to be used for generating the report. If you are generating a report for multiple entities, you can choose to use different cost models for each entity by selecting the Use different cost models for entities option and then select the required cost models for each entity. Ensure that the selected cost models have the same currency type.
Chapter 7 Generating Reports Procedure 1 In the Reports tab, click Create Reports. 2 Select the required chargeback hierarchy from the drop-down menu on the left pane of the page. The collapsed view of the chargeback hierarchy is displayed. You can expand the hierarchy by clicking the plus sign (+) to the left of the hierarchy name. The first level entities of the hierarchy is displayed. To further expand, click the plus sign to the left of the entities that have sub-entities.
vCenter Chargeback User’s Guide 7 8 In the Details tab, select the usage-related details and other information to be displayed in the report. Option Description Show these details in report Select this option if you want to include information about the selected cost model or the entity attributes, or some information messages in the Usage Details section of the report.
Chapter 7 Generating Reports 5 Option Description Compare Cost Models Select the cost models to be used for generating the comparison report. Ensure that the selected cost models have the same currency type. Computation Resources Select the resources to be considered for calculating the costs and to be reported. You can either select Disk Read and Disk Write to be reported individually or to be reported in total as Disk Read and Write.
vCenter Chargeback User’s Guide n Email a Scheduled Report on page 116 A scheduled report can be automatically sent through an email to the required recipients when the report gets generated. n Advanced Search for Scheduled Reports on page 117 You can search for specific scheduled reports by using the advanced search feature of vCenter Chargeback. Scheduling Parameters You can set various scheduling parameters while scheduling a report.
Chapter 7 Generating Reports Range of Recurrence n Yearly: This option is similar to the Monthly option. You can select the month and day starting from which the billing has to be done. You can also define a schedule policy that defines when the report has to be generated. For example, suppose you want to generate a yearly report for the earlier year on the second Sunday of January.
vCenter Chargeback User’s Guide Reschedule Report Generation A report generation schedule can be modified to define a new schedule. You must have update privilege on the report schedule to perform this task. Prerequisites Before you reschedule a report, refer to “Scheduling Parameters,” on page 114 to learn about the scheduling parameters in vCenter Chargeback. Procedure 1 In the Reports tab, click Scheduled Reports. A table listing all the report generation schedules is displayed.
Chapter 7 Generating Reports Prerequisites Before you perform this task, ensure that the SMTP server is configured on the application. Procedure 1 In the Reports tab, click Scheduled Reports. A table listing all the reporting schedules created in the application is displayed. 2 Select the required schedule. 3 Click the mail icon above the table. The screen with the emailing details is displayed. 4 5 Provide the email details. Option Description To The email address of the recipients.
vCenter Chargeback User’s Guide 3 Parameter Description Report scheduling policy This is reporting duration. The permissible values are daily, weekly, monthly, quarterly, half-yearly, yearly, and custom. Auto-email enable Whether or not automatic email of the scheduled report is configured. Specify the filters to sort the search results. You can specify two filter levels. The results can be sorted based on the report name, hierarchy name, entity name, or cost model name. 4 Click Search.
Chapter 7 Generating Reports Procedure 1 To display only the virtual machines in the report, click the VM View icon, which is the first icon from left side, above the report. The default view is the Tree view. You can revert to the Tree view by clicking the Tree View icon, which is to the right-side of the VM View icon. You can view informational messages related to a entity by selecting the entity.
vCenter Chargeback User’s Guide Procedure 1 Click the Schedule Report icon above the generated report. The Schedule Report screen is displayed. 2 3 Enter relevant values for the scheduling parameters. Option Description Report Creation Time When the report has to be generated. Recurrence Pattern How often the report has to be generated. Range of Recurrence Till when the report has to be generated periodically. Click Schedule.
Chapter 7 Generating Reports Export Report After a report is generated, you can export it to .rtf, .pdf, and .csv formats. Procedure 1 Select the output type. n To export the report to the .rtf format, click the Microsoft Word document icon. n To export the report to the .pdf format, click the Adobe PDF icon. n To export the report to the .csv format, click the Microsoft Excel icon. The Convert Report Format screen is displayed. 2 Click the Click to download link.
vCenter Chargeback User’s Guide Procedure 1 In the Reports tab, click Archived Reports. A table listing all the archived reports is displayed. 2 Select the report that you want to view. 3 Select the output type. n To export the report to the .rtf format, click the Microsoft Word document icon. n To export the report to the .pdf format, click the Adobe PDF icon. n To export the report to the .csv format, click the Microsoft Excel icon. The Convert Report Format screen is displayed.
Chapter 7 Generating Reports The report in the PDF format is attached to the email and sent to the marked recipients. If the report size is less than attachment size limit set when configuring the SMTP server in the application, only then the report is attached to the email. Else, a link to the report is included in the email. NOTE Anybody can access the report link sent through email. vCenter Chargeback does not authenticate a user when the report link is clicked.
vCenter Chargeback User’s Guide 3 Parameter Description Number of entities The number of entities for which the report is generated. This is a value range. The search result includes reports that have total number of entities in the specified range. Total cost in report The value of total cost in the archived reports. This is a value range. The search result includes reports that have total cost in the specified range. Specify the filters to sort the search results.
Chapter 7 Generating Reports 4 Select Show this hierarchy in the Report Dashboard against the Cost Model. 5 Select a cost model. 6 Set the time of the day when the report in the dashboard has to be updated. The time must be specified in the hh:mm:ss format. 7 Click Update. 8 Click OK in the information dialog box. What to do next The report dashboard displays the usage and cost statistics for the hierarchy after the time specified during configuration.
vCenter Chargeback User’s Guide 126 VMware, Inc.
Monitoring System Health 8 The System Health tab acts as a dashboard, providing you with information about and status of the entire system. Only a user with Super User role has access to this tab. The dashboard shows colored status indicators next to the URL for each server and service. The significance of the colors is as is described in the table Table 8-1. Table 8-1. Significance of Dashboard Status Indicator Colors Color Significance Green Normal The response time within the acceptable range.
vCenter Chargeback User’s Guide Table 8-2. Section in the System Health Tab (Continued) Section Information General Info This section provides information about the number of vCenter Servers added to the application and the number of vCenter Chargeback hierarchies and entities created. It also displays the URL and port details for the SMTP server and the URL of the vCenter Chargeback database. This section displays the date and time when the page was last updated.
Administration Utilities 9 vCenter Chargeback interacts with various servers and databases. It also stores information about users and various components, such as hierarchies and entities. To ensure that the application and the corresponding components are working properly, one must monitor the health of the entire system periodically. vCenter Chargeback provides a few utilities and database management scripts that enable you to manage the application efficiently.
vCenter Chargeback User’s Guide Procedure 1 Run the database password change utility from the command prompt. cd Installation_Directory\vCenter-CB-Tools\database-update\bin UpdateChargebackDatabaseCredentials.bat You can also run this utility by selecting Update Chargeback Database Credentials from the Start > Programs > VMware > VMware vCenter Chargeback > vCenter Chargeback Tools menu. 2 3 Enter the existing and new passwords.
Chapter 9 Administration Utilities Table 9-1. Generic SQL Scripts Script Name Description countActiveConns This script returns the number of active connections to the database. countRows This script returns the number of rows in each of the tables in the database. dbSize This script return the space occupied by the tables in the database.
vCenter Chargeback User’s Guide Table 9-3. Data Purging Scripts Script Description purgeCostData This script removes the cost-related data that is older than the specified number of months. The number of months is specified using the MONTHS_IN_HISTORY parameter in the Oracle script and the @MONTHS_IN_HISTORY parameter in the SQL Server script. You can set this parameter appropriately before running the script.
Troubleshooting vCenter Chargeback 10 VMware provides a troubleshooting utility and few troubleshooting tips for some of the common issues that you might face when using vCenter Chargeback. This chapter includes the following topics: n “Troubleshooting Utility,” on page 133 n “Troubleshooting Issues in vCenter Chargeback,” on page 134 Troubleshooting Utility vCenter Chargeback is bundled with a troubleshooting utility that can be used to collect event and system logs.
vCenter Chargeback User’s Guide 3 You can choose to collect the system event logs. The Application log and System log is collected. 4 Enter the number of stand-alone data collector instances (not embedded) installed on the same machine. 5 If you have any standalone data collector instance running, you must provide the path of each such data collector installation.
Chapter 10 Troubleshooting vCenter Chargeback Solution u Click the refresh button next to the vCenter Server hierarchy in vCenter Chargeback. The refresh button is displayed only if there is a change in the vCenter Server hierarchy and the Hierarchy Manager tab is refreshed. The tab can be refreshed by user actions, such as clicking another tab of the application and then clicking the Manage Hierarchy tab.
vCenter Chargeback User’s Guide Non-English Characters Are Not Correctly Stored in the vCenter Chargeback Database You can store data with non-English characters in the vCenter Chargeback database. Problem The vCenter Chargeback database might be deployed in a non-English locale or synchronized with a vCenter Server database that contains non-English data. However, the vCenter Chargeback database does not store the non-English characters correctly.
Chapter 10 Troubleshooting vCenter Chargeback Solution u On the vCenter Server, check whether the statistics collection level is correctly set. For vCenter Server 2.5 Update 3 and Update 4, the statistics collection level must be set to 2 or above for the average memory consumed counter to be available. For vCenter Server shipped with vSphere 4.0, the statistics collection level can be set to 1 or above.
vCenter Chargeback User’s Guide Cause The data collector heart beat is set to 30 seconds. If the data collector fails, vCenter Chargeback waits for at least 90 seconds before updating the status of the data collector in the application. Therefore, the System Health tab does not reflect the failed status of the data collector immediately. Solution There is no workaround or solution for this issue. Storage Synchronization Job Fails The storage synchronization job run by the data collector fails.
Chapter 10 Troubleshooting vCenter Chargeback Cause The issue might occur due to multiple reasons. n The application-related services are not started or not running. n Windows Firewall is enabled on the machine on which vCenter Chargeback and the load balancer is installed and running. Solution 1 Check whether all the relevant services are running.
vCenter Chargeback User’s Guide Solution 1 Check whether the vCenter Server is started and running. 2 Check whether the vCenter Server is reachable over the network. 3 Check whether the proxy settings on the Web browser are correct.
Chapter 10 Troubleshooting vCenter Chargeback Solution 1 Stop all the VMware Cloud Director Data Collector instances. 2 Modify the host and database information for the VMware Cloud Director setup in the VMware Cloud Director tab on the Cloud Data Collectors page in vCenter Chargeback.
vCenter Chargeback User’s Guide 3 If you are using SQL Server for the vCenter Chargeback database and using the port number of the named database instance to connect to it, ensure that the port is a dedicated or static port for the database instance. a Modify the database configuration to use dedicated ports for the named database instances. In SQL Server, the default configuration is to use dynamic ports for named database instances.
Chapter 10 Troubleshooting vCenter Chargeback 3 If you are using SQL Server for the vCenter Server database and using the port number of the named database instance to connect to it, ensure that the port is a dedicated or static port for the database instance. In SQL Server, the default configuration is to use dynamic ports for named database instances. You must modify it to use dedicated ports. You must also configure the database named instance with the formerly configured port number.
vCenter Chargeback User’s Guide Cause A probable reason might be that the primary group does not come under the provided base DN. Solution Modify the base DN of the LDAP server added to the application such that the primary group is defined under it in the Active Directory hierarchy. Unable to Use Custom SSL Certificates vCenter Chargeback can be accessed through a Web browser using either the HTTP protocol or HTTPS protocol. Problem Prior to vCenter Chargeback version 1.
Chapter 10 Troubleshooting vCenter Chargeback n The VI Client was open and connected to the vCenter Server when the application was registered with the vCenter Server instance. n You logged in to the VI Client by specifying localhost as the IP address of the vCenter Server. Solution 1 Check whether the application has been registered as a plug-in with the vCenter Server. This information can be obtained from the vCenter Servers page of the Settings tab of the application.
vCenter Chargeback User’s Guide 146 VMware, Inc.
Index A application accessing 29 activate 39 authenticate in to 73 configure log level 41 configuring generic settings 39 configuring settings 39 managing users, roles, and permissions 59 permissions defined in 60 resource-based authorization 59 archived reports delete 123 email 122 manage 121 search 123 view 121 attributes add 57 assign 82 delete 57 manage 57 B base rate 88 base rate calculator 94 billing policy create 101 delete 103 managing 101 modify 102 C chargeable computing resource 88 chargeback
vCenter Chargeback User’s Guide enable 51 information about 49 install vCenter Chargeback Data Collector 31 install VMware Cloud Director Data Collector 33 install vShield Manager Data Collector 35 manage 48 modify job interval 51 modify super user password for 54 upgrade 36 view 49 data collectors configure VMware Cloud Director Data Collector 52 configure vShield Manager Data Collector 53 database management scripts about 130 data purging scripts 131 generic scripts 130 space calculation scripts 131 defi
Index report generation schedules 113 schedule 119 types 107 view in interactive report view 118 resource, permissions defined for 60 roles assign user role for a resource 71 assign user role on vCenter Chargeback 70 create 65 delete 66 managing 61 modify 65 predefined roles 61 revoke role for a resource 72 revoke role on vCenter Chargeback 73 change keystore password for secure LDAP 140 custom SSL certificate 144 data collector status 137 database connection failure 141, 142 email report failure 143 fetc
vCenter Chargeback User’s Guide V vCenter Chargeback about 7 architectural overview 8 authenticate in to 73 chargeback in virtual environment 7 cluster 19 cluster installation 19 configuring costs 87 configuring settings 39 cost elements 87 events 128 generate SSL certificate for 18 hardware requirements 11 150 installing 11 managing users, roles, and permissions 59 monitor system health 127 permissions defined in 60 related services 28 resource-based authorization 59 software requirements 12 upgrading 2