
User`s guide
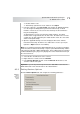


Table Of Contents
- Table of Contents
- Introducing Quest NetVault Backup Plug-in for VMware
- Installing the Plug-in
- Configuring the Plug-in
- Defining a Backup Strategy
- Performing Image-Level Backups
- Performing File-Level Backups
- Restoring Image-Level Backups
- Restoring File-Level Backups
- Troubleshooting

Quest NetVault Backup Plug-in
for VMware User’s Guide
73
Important: The plug-in will restore the data to the shared network folder on the
virtual machine. You must manually move the restored files to the final target
destination.
8.3.0 Restoring File-Level Backups Using the Native
Plug-in
for FileSystem
The procedure for restoring the file-level backups using the native Plug-in for
FileSystem includes the steps outlined in the following steps:
Prerequisites
Restoring Data
8.3.1 Prerequisites
Before you restore the data, make sure that the following requirements are met:
Install the NVBU Client software inside the target virtual machine. For more
information, refer to the Quest NetVault Backup Installation Guide.
Add the client to NVBU Server. For more information, refer to the Quest
NetVault Backup Administrator’s Guide.
8.3.2 Restoring Data
To restore data to a virtual machine, follow these steps:
1. Open the NVBU Restore window on the NVBU Server. To open this window:
Click Restore on the toolbar or Large Buttons panel.
Alternatively, on the Operations menu, click Restore.
2. On the Selections tab, open the NVBU Client. To open any node on the
Selections tab:
Double-click the node
Alternatively, right-click the node, and then select Open
3. In the list of plug-ins, open File System. (The Plug-in for VMware internally
uses the Plug-in for FileSystem to perform file-level backups of virtual
machines. Therefore, the savesets for these backups are listed under the
Plug-in for FileSystem.)
To distinguish the savesets generated for virtual machines, the virtual
machine name is appended to the Job Title. Thus, the label for the savesets
contains the Job Title, followed by the virtual machine name, the saveset ID,
and the backup timestamp.
4. Open the applicable backup saveset to display the directories and files
included in the backup. From this level, double-click a node to open it (the
right-click + Open method is not available).