
User`s guide
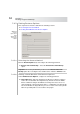
Table Of Contents
- Table of Contents
- Introducing Quest NetVault Backup Plug-in for VMware
- Installing the Plug-in
- Configuring the Plug-in
- Defining a Backup Strategy
- Performing Image-Level Backups
- Performing File-Level Backups
- Restoring Image-Level Backups
- Restoring File-Level Backups
- Troubleshooting

Chapter 8
Restoring File-Level Backups
70
8.2.0 Restoring File-Level Backups Using Shared
Network Drives
The procedure for restoring file-level backups to a shared folder on the virtual
machine includes the steps outlined in the following sections:
Setting Up a Network Share
Selecting Data for a Restore
Setting Restore Options
Finalizing and Submitting a Job
8.2.1 Setting Up a Network Share
To create a network share between the NVBU Client and the target virtual
machine, follow these steps:
1. On the target virtual machine, configure the sharing properties for a folder.
2. Open the NVBU Backup window on the NVBU Server.
3. On the Selections tab, open the NVBU Client.
4. In the list of plug-ins, open File System.
5. Right-click Network Shares, and select Add Network Share.
6. In the Add New Network Share window, enter the path for the shared drive
in the following format:
\\<IP Address or Resolvable Network Name>\<Share Name>\
7. Click Add. This adds the shared folder to the Network Shares node.
8. Right-click the shared folder, and select Connect As.
9. In the Connection Details window, configure the login details:
Domain – Enter the Windows domain for the virtual machine.
Username – Enter a user name with necessary privileges to
write/change files on the shared folder.
Password – Enter the password associated with the configured user.
10.Click OK.
8.2.2 Selecting Data for a Restore
To select data for a restore, follow these steps:
1. Open the NVBU Restore window on the NVBU Server. To open this window:
Click Restore on the toolbar or Large Buttons panel.
Alternatively, on the Operations menu, click Restore.
2. On the Selections tab, open the NVBU Client. To open any node on the
Selections tab: