
User`s guide
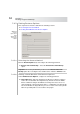

Table Of Contents
- Table of Contents
- Introducing Quest NetVault Backup Plug-in for VMware
- Installing the Plug-in
- Configuring the Plug-in
- Defining a Backup Strategy
- Performing Image-Level Backups
- Performing File-Level Backups
- Restoring Image-Level Backups
- Restoring File-Level Backups
- Troubleshooting

Quest NetVault Backup Plug-in
for VMware User’s Guide
65
7.5.2.b Setting Virtual Machine File Restore Options
Under VM File Restore Options, configure the following parameter:
Target Directory – Enter the full path to the directory to which you want to
restore the virtual disk and configuration files. The target directory must be
local to the NVBU Client on which the Plug-in for VMware is running. This
release does not support mapped or mounted network shares, or UNC paths.
The plug-in will not check whether the target directory is local or remote. The
restore job will fail if the specified path is not accessible to the plug-in.
7.5.3 Finalizing and Submitting a Job
To finalize and submit a restore job, follow these steps:
1. Click the Source, Schedule, and Advanced Options tabs, and configure the
required options. These options are common to all NetVault Backup Plug-ins.
For more information about these options, refer to the Quest NetVault Backup
Administrator’s Guide.
2. In Job Title, enter a title for the job. Specify a detailed title that allows you to
easily identify the job for monitoring its progress.
3. Click Submit on the toolbar. Alternatively, on the Accept menu, click Submit
Restore.
You can monitor the job progress from the NVBU Jobs window, and view the
logs from the NVBU Logs window. For more information about these
functions, refer to the Quest NetVault Backup Administrator’s Guide.
7.5.4 Recovering a Virtual Machine From the Restored Files
After restoring the virtual machine disk and configuration files, you can use the
VMware vCenter Converter Standalone Client to create a new virtual machine
using the restored .vmx and .vmdk files. After a VADP Recovery, you must modify
the .vmx file so that it matches the disk paths of the restored vmdks. For more
information, refer to the relevant VMware vCenter Converter Standalone Client
documentation.
7.5.4.a Recovering a Virtual Machine from a VCB Backup
To recover the virtual machine files to the destination VMware Server, launch the
VMware vCenter Converter Standalone Client Wizard. Follow the wizard as it
takes you through the various steps. When the “Select source type:” prompt
appears, select “Backup image or third-party virtual machine”. For the
“Virtual machine file” parameter, select the restored .vmx file.