
Specifications


Installing on RHEL or CentOS
11
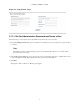
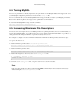
1. Select the Autodiscover devices option.
Figure 2.4. Setup Wizard: Step 2 (Autodiscover Devices)
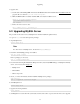
2. For each network or IP range in which you want Zenoss Core to discover devices, enter an address or range. For
example, you might enter a network address in CIDR notation:
10.175.211.0/24
or as a range of IP addresses:
10.175.211.1-50
3. If you want to enter multiple addresses or ranges, click +. For each network, you must enter a netmask or IP range.
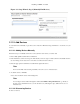
4. For each network or IP range, specify the Windows, SSH, or SNMP credentials you want Zenoss Core to use on
the devices it discovers. You can enter only one of each. Zenoss Core attempts to use the same credentials on each
device it discovers within the networks or IP ranges specified.
5. Click Submit.
Zenoss Core schedules jobs to discover devices in the networks and IP ranges you specified. (To see job status,
navigate to Advanced > Settings, and then select Jobs in the left panel.)
When discovery completes, a notification message appears in the Messages portlet on the Dashboard.