
6.0

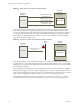

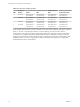

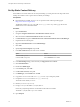


Table Of Contents
- View Agent Direct-Connection Plug-In Administration
- Contents
- View Agent Direct-Connection Plug-In Administration
- Installing View Agent Direct-Connection Plug-In
- View Agent Direct-Connection Plug-In Advanced Configuration
- Setting Up HTML Access
- Setting Up View Agent Direct Connection on Remote Desktop Services Hosts
- Troubleshooting View Agent Direct-Connection Plug-In
- Index

Set Up Static Content Delivery
If the HTML Access client needs to be served by the desktop, you must perform some setup tasks on the
desktop. This enables a user to point a browser directly at a desktop.
Prerequisites
n
Download the View HTML Access portal.war zip file from the VMware product page at
http://www.vmware.com/products/.
The filename is VMware-Horizon-View-HTML-Access-y.y.y-xxxxxx.zip, where y.y.y is the version
number and xxxxxx is the build number.
Procedure
1 Open Control Panel.
2 Navigate to Programs and Features > Turn Windows features on or off.
3 Select the check box Internet Information Services and click OK.
4 In Control Panel, navigate to Administrative Tools > Internet Information Services (IIS) Manager.
5 Expand the items in the left pane.
6 Right-click Default Web Site and select Edit Bindings....
7 Click Add.
8 Specify https, All Unassigned, and port 443.
9 In the SSL certificate field, select the correct certificate.
Option Action
Certificate vdm is present. Select vdm and click OK.
Certificate vdm is not present. Select vdmdefault and click OK.
10 In the Site Bindings dialog, remove the entry for http port 80 and click Close.
11 Click Default Web Site.
12 Double-click MIME Types.
13 In the Actions pane, click Add....
14 For File name extension, enter .json.
15 For MIME type, enter text/h323 and click OK.
16 Copy VMware-Horizon-View-HTML-Access-y.y.y-xxxxxx.zip to a temporary folder.
17 Unzip VMware-Horizon-View-HTML-Access-y.y.y-xxxxxx.zip.
The result is a file named portal.war.
18 Rename portal.war to portal.zip.
19 Unzip portal.zip to the folder C:\inetpub\wwwroot.
If necessary, adjust the permissions on the folder to allow files to be added.
The folder C:\inetpub\wwwroot\portal is created.
20 Open Notepad.
View Agent Direct-Connection Plug-In Administration
18 VMware, Inc.