
7.0
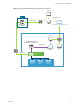


Table Of Contents
- Deploying and Configuring Access Point
- Contents
- Deploying and Configuring Access Point
- Introduction to Access Point
- System Requirements and Deployment
- Configuring Access Point
- Collecting Logs from the Access Point Appliance
- Setting Up Smart Card Authentication
- Setting Up Two-Factor Authentication
- Index

n
Determine how many network interfaces and static IP addresses to configure for the Access Point
appliance. See “Networking Requirements,” on page 18.
IMPORTANT If you use the vSphere Web Client, you can also specify the DNS server, gateway, and
netmask addresses for each network. If you use the native vSphere Client, verify that you have assigned
an IP pool to each network. To add an IP pool, in vCenter Server, if you are using the native vSphere
Client, go to the IP Pools tab of the data center. Alternatively, if you are using the vSphere Web Client,
you can create a network protocol profile. Go to the Manage tab of the data center and select the
Network Protocol Profiles tab. For more information, see Configuring Protocol Profiles for Virtual
Machine Networking.
n
Verify that you can log in to vSphere Client or vSphere Web Client as a user with system administrator
privileges. For example, you might log in as the user administrator@vsphere.local.
If you use vSphere Web Client, use a supported browser. See the "Client Integration Plug-In Software
Requirements" topic in the vSphere documentation center for your version of vSphere.
n
Verify that the data store you plan to use for the appliance has enough free disk space and meets other
system requirements. The download size of the virtual appliance is 2.5GB. By default, for a thin-
provisioned disk, the appliance requires 2.5GB, and a thick-provisioned disk requires 20GB. Also see
“Access Point System Requirements,” on page 17.
n
Download the .ova installer file for the Access Point appliance from the VMware Web site at
https://my.vmware.com/web/vmware/downloads, or determine the URL to use (example:
http://example.com/vapps/euc-access-point-Y.Y.0.0-xxxxxxx_OVF10.ova), where Y.Y is the version
number and xxxxxxx is the build number.
n
If you plan to use the vSphere Web Client, verify that the Client Integration plug-in is installed. For
more information, see the vSphere documentation. For example, for vSphere 6, see Install the Client
Integration Plug-in. If you do not install this plug-in before you start the deployment wizard, the
wizard prompts you to install the plug-in, which requires closing your browser and exiting the wizard.
Procedure
1 Use the native vSphere Client or the vSphere Web Client to log in to a vCenter Server instance.
2 Select a menu command for launching the Deploy OVF Template wizard.
Option Menu Command
vSphere Client
Select File > Deploy OVF Template.
vSphere Web Client
Select any inventory object that is a valid parent object of a virtual
machine, such as a datacenter, folder, cluster, resource pool, or host, and
from the Actions menu, select Deploy OVF Template.
3 On the Select Source page of the wizard, browse to the location of the .ova file that you downloaded or
enter a URL and click Next.
A details page appears, which tells how much disk space the appliance requires.
Deploying and Configuring Access Point
20 VMware, Inc.