
6.2
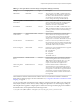
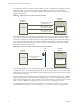

Table Of Contents
- View Agent Direct-Connection Plug-In Administration
- Contents
- View Agent Direct-Connection Plug-In Administration
- Installing View Agent Direct-Connection Plug-In
- View Agent Direct-Connection Plug-In Advanced Configuration
- View Agent Direct-Connection Plug-In Configuration Settings
- Disabling Weak Ciphers in SSL/TLS
- Replacing the Default Self-Signed SSL Server Certificate
- Authorizing Horizon Client to Access Desktops and Applications
- Using Network Address Translation and Port Mapping
- Add a Certificate Authority to the Windows Certificate Store
- Setting Up HTML Access
- Setting Up View Agent Direct Connection on Remote Desktop Services Hosts
- Troubleshooting View Agent Direct-Connection Plug-In
- Index

Table 2‑2. NAT and Port Mapping Values
VM#
Desktop IP
Address HTTPS RDP
PCOIP (TCP and
UDP) Framework Channel
0 192.168.0.0 10.20.30.40:1000 ->
192.168.0.0:443
10.20.30.40:1001 ->
192.168.0.0:3389
10.20.30.40:1002 ->
192.168.0.0:4172
10.20.30.40:1003 ->
192.168.0.0:32111
1 192.168.0.1 10.20.30.40:1005 ->
192.168.0.1:443
10.20.30.40:1006 ->
192.168.0.1:3389
10.20.30.40:1007 ->
192.168.0.1:4172
10.20.30.40:1008 ->
192.168.0.1:32111
2 192.168.0.2 10.20.30.40:1010 ->
192.168.0.2:443
10.20.30.40:1011 ->
192.168.0.2:3389
10.20.30.40:1012 ->
192.168.0.2:4172
10.20.30.40:1013 ->
192.168.0.2:32111
3 192.168.0.3 10.20.30.40:1015 ->
192.168.0.3:443
10.20.30.40:1016 ->
192.168.0.3:3389
10.20.30.40:1017 ->
192.168.0.3:4172
10.20.30.40:1018 ->
192.168.0.3:32111
In this example, Horizon Client connects to IP address 10.20.30.40 and an HTTPS destination port number of
(1000 + n * 5) where n is the desktop number. To connect to desktop 3, the client would connect to
10.20.30.40:1015. This addressing scheme significantly simplifies the configuration setup for each desktop.
All desktops are configured with identical external address and port configurations. The NAT and port
mapping configuration is done within the NAT and port mapping device with this consistent pattern, and
all desktops can be accessed on a single public IP address. The client would typically use a single public
DNS name that resolves to this IP address.
Add a Certificate Authority to the Windows Certificate Store
For smart card authentication, the certificate authority (CA) that signs the smart card certificate must exist in
the Windows certificate store. If not, you can add the CA to the Windows certificate store.
Prerequisites
Verify that Microsoft Management Console (MMC) has the Certificates snap-in. See "Add the Certificate
Snap-In to MMC" in the View Installation document.
Procedure
1 Start MMC.
2 In the MMC console, expand the Certificates (Local Computer) node and go to the Trusted Root
Certification Authorities > Certificates folder.
If the root certificate is present and there are no intermediate certificates in the certificate chain, exit
MMC.
3 Right-click the Trusted Root Certification Authorities > Certificates folder and click All Tasks >
Import.
4 In the Certificate Import wizard, click Next and browse to the location where the root CA certificate is
stored.
5 Select the root CA certificate file and click Open.
6 Click Next, click Next, and click Finish.
7 If the smart card certificate is issued by an intermediate CA, import all intermediate certificates in the
certificate chain.
a Go to the Certificates (Local Computer) > Intermediate Certification Authorities > Certificates
folder.
b Repeat steps 3 through 6 for each intermediate certificate.
View Agent Direct-Connection Plug-In Administration
18 VMware, Inc.