
6.0
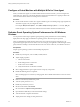

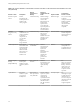

Table Of Contents
- Setting Up Desktop and Application Pools in View
- Contents
- Setting Up Desktop and Application Pools in View
- Introduction to Desktop and Application Pools
- Preparing Unmanaged Machines
- Creating and Preparing Virtual Machines
- Creating Virtual Machines for Remote Desktop Deployment
- Install View Agent on a Virtual Machine
- Install View Agent Silently
- Configure a Virtual Machine with Multiple NICs for View Agent
- Optimize Guest Operating System Performance for All Windows Versions
- Optimize Windows 7 and Windows 8 Guest Operating System Performance
- Optimizing Windows 7 and Windows 8 for Linked-Clone Virtual Machines
- Benefits of Disabling Windows 7 and Windows 8 Services and Tasks
- Overview of Windows 7 and Windows 8 Services and Tasks That Cause Linked-Clone Growth
- Disable Scheduled Disk Defragmentation on Windows 7 and Windows 8 Parent Virtual Machines
- Disable the Windows Update Service on Windows 7 and Windows 8 Virtual Machines
- Disable the Diagnostic Policy Service on Windows 7 and Windows 8 Virtual Machines
- Disable the Prefetch and Superfetch Features on Windows 7 and Windows 8 Virtual Machines
- Disable Windows Registry Backup on Windows 7 and Windows 8 Virtual Machines
- Disable the System Restore on Windows 7 and Windows 8 Virtual Machines
- Disable Windows Defender on Windows 7 and Windows 8 Virtual Machines
- Disable Microsoft Feeds Synchronization on Windows 7 and Windows 8 Virtual Machines
- Preparing Virtual Machines for View Composer
- Prepare a Parent Virtual Machine
- Activating Windows on Linked-Clone Virtual Machines
- Disable Windows Hibernation in the Parent Virtual Machine
- Configure a Parent Virtual Machine to Use Local Storage
- Keep a Record of the Parent Virtual Machine's Paging-File Size
- Increase the Timeout Limit of QuickPrep Customization Scripts
- Creating Virtual Machine Templates
- Creating Customization Specifications
- Creating Automated Desktop Pools That Contain Full Virtual Machines
- Creating Linked-Clone Desktop Pools
- Linked-Clone Desktop Pools
- Worksheet for Creating a Linked-Clone Desktop Pool
- Create a Linked-Clone Desktop Pool
- Desktop Pool Settings for Linked-Clone Desktop Pools
- View Composer Support for Linked-Clone SIDs and Third-Party Applications
- Keeping Linked-Clone Machines Provisioned and Ready During View Composer Operations
- Use Existing Active Directory Computer Accounts for Linked Clones
- Creating Manual Desktop Pools
- Setting Up Remote Desktop Services Hosts
- Remote Desktop Services Hosts
- Install Remote Desktop Services on Windows Server 2008 R2 SP1
- Install Remote Desktop Services on Windows Server 2012 or 2012 R2
- Restrict Users to a Single Session
- Install View Agent on a Remote Desktop Services Host
- Enable Time Zone Redirection for RDS Desktop and Application Sessions
- Enable Windows Basic Aero-Styled Theme for Applications
- Configure Group Policy to Start Runonce.exe
- RDS Host Performance Options
- Creating Farms
- Creating Application Pools
- Creating RDS Desktop Pools
- Provisioning Desktop Pools
- User Assignment in Desktop Pools
- Naming Machines Manually or Providing a Naming Pattern
- Manually Customizing Machines
- Desktop Pool Settings for All Desktop Pool Types
- Adobe Flash Quality and Throttling
- Setting Power Policies for Desktop Pools
- Power Policies for Desktop Pools
- Configure Dedicated Machines To Be Suspended After Users Disconnect
- How Power Policies Affect Automated Desktop Pools
- Power Policy Examples for Automated Pools with Floating Assignments
- Power Policy Example for Automated Pools with Dedicated Assignments
- Preventing View Power Policy Conflicts
- Configuring 3D Rendering on Windows 7 or Later Desktops
- Prevent Access to View Desktops Through RDP
- Deploying Large Desktop Pools
- Entitling Users and Groups
- Configuring Remote Desktop Features
- Configure Unity Touch
- Configure Flash URL Redirection for Multicast or Unicast Streaming
- Configure Real-Time Audio-Video
- Configuration Choices for Real-Time Audio-Video
- System Requirements for Real-Time Audio-Video
- Ensuring That Real-Time Audio-Video Is Used Instead of USB Redirection
- Selecting Preferred Webcams and Microphones
- Select a Default Microphone on a Windows Client System
- Select a Preferred Webcam on a Windows Client System
- Select a Default Microphone on a Mac OS X Client System
- Configuring Real-Time Audio-Video on a Mac OS X Client
- Configure a Preferred Webcam or Microphone on a Mac OS X Client System
- Select a Default Microphone on a Linux Client System
- Select a Preferred Webcam or Microphone on a Linux Client System
- Configuring Real-Time Audio-Video Group Policy Settings
- Real-Time Audio-Video Bandwidth
- Manage Access to Windows 7 Multimedia Redirection (MMR)
- Using USB Devices with Remote Desktops
- Limitations Regarding USB Device Types
- Overview of Setting Up USB Redirection
- Network Traffic and USB Redirection
- Automatic Connections to USB Devices
- Disabling USB Redirection
- Using Log Files for Troubleshooting and to Determine USB Device IDs
- Using Policies to Control USB Redirection
- Troubleshooting USB Redirection Problems
- Reducing and Managing Storage Requirements
- Managing Storage with vSphere
- Using Virtual SAN for High-Performance Storage and Policy-Based Management
- Reducing Storage Requirements with View Composer
- Storage Sizing for Linked-Clone Desktop Pools
- Storage Overcommit for Linked-Clone Virtual Machines
- Linked-Clone Data Disks
- Storing Linked Clones on Local Datastores
- Storing View Composer Replicas and Linked Clones on Separate Datastores
- Configure View Storage Accelerator for Desktop Pools
- Reclaim Disk Space on Linked-Clone Virtual Machines
- Using View Composer Array Integration with Native NFS Snapshot Technology (VAAI)
- Set Blackout Times for ESXi Operations on View Virtual Machines
- Configuring Policies for Desktop and Application Pools
- Setting Policies in View Administrator
- Using Active Directory Group Policies
- Using View Group Policy Administrative Template Files
- View ADM and ADMX Template Files
- View Agent Configuration ADM Template Settings
- View PCoIP Session Variables ADM Template Settings
- Using Remote Desktop Services Group Policies
- Add the Remote Desktop Services ADMX Files to Active Directory
- RDS Application Compatibility Settings
- RDS Connections Settings
- RDS Device and Resource Redirection Settings
- RDS Licensing Settings
- RDS Profiles Settings
- RDS Remote Session Environment Settings
- RDS Security Settings
- RDS Temporary Folders Settings
- Setting Up Location-Based Printing
- Active Directory Group Policy Example
- Configuring User Profiles with View Persona Management
- Providing User Personas in View
- Using View Persona Management with Standalone Systems
- Migrating User Profiles with View Persona Management
- Persona Management and Windows Roaming Profiles
- Configuring a View Persona Management Deployment
- Overview of Setting Up a View Persona Management Deployment
- Configure a User Profile Repository
- Install View Agent with the View Persona Management Option
- Install Standalone View Persona Management
- Add the View Persona Management ADM Template File
- Configure View Persona Management Policies
- Create Desktop Pools That Use Persona Management
- Best Practices for Configuring a View Persona Management Deployment
- View Persona Management Group Policy Settings
- Troubleshooting Machines and Desktop Pools
- Display Problem Machines
- Send Messages to Desktop Users
- Troubleshooting Desktop Pool Creation Problems
- Pool Creation Fails if Customization Specifications Cannot Be Found
- Pool Creation Fails Because of a Permissions Problem
- Pool Provisioning Fails Due to a Configuration Problem
- Pool Provisioning Fails Due to a View Connection Server Instance Being Unable to Connect to vCenter
- Pool Provisioning Fails Due to Datastore Problems
- Pool Provisioning Fails Due to vCenter Server Being Overloaded
- Virtual Machines Are Stuck in the Provisioning State
- Virtual Machines Are Stuck in the Customizing State
- Removing Orphaned or Deleted Linked Clones
- Troubleshooting Machines That Are Repeatedly Deleted and Recreated
- Troubleshooting QuickPrep Customization Problems
- Finding and Unprotecting Unused View Composer Replicas
- Windows XP Linked Clones Fail to Join the Domain
- View Composer Provisioning Errors
- Troubleshooting Network Connection Problems
- Troubleshooting USB Redirection Problems
- Troubleshooting GINA Problems on Windows XP Machines
- Manage Machines and Policies for Unentitled Users
- Further Troubleshooting Information
- Index

Table 3‑5. MSI Command-Line Options and MSI Properties
MSI Option or Property Description
/qn
Instructs the MSI installer not to display the installer wizard pages.
For example, you might want to install View Agent silently and use only default setup
options and features:
VMware-viewagent-y.y.y-xxxxxx.exe /s /v"/qn"
Alternatively, you can use the /qb option to display the wizard pages in a
noninteractive, automated installation. As the installation proceeds, the wizard pages
are displayed, but you cannot respond to them.
The /qn or /qb option is required to run a silent installation.
INSTALLDIR
Specifies an alternative installation path for the View component.
Use the format INSTALLDIR=path to specify an installation path. You can ignore this
MSI property if you want to install the View component in the default path.
This MSI property is optional.
ADDLOCAL
Determines the component-specific features to install. In an interactive installation, the
View installer displays custom setup options to select and automatically installs other
features. The ADDLOCAL property lets you specify these options and features on the
command line. You can use ADDLOCAL to selectively install individual setup options and
features. Features that you do not explicitly specify are not installed.
Type ADDLOCAL=ALL to install all features that are installed automatically (on supported
guest operating systems) and all custom setup options that are installed by default.
For example: VMware-viewagent-y.y.y-xxxxxx.exe /s /v"/qn ADDLOCAL=ALL"
If you do not use the ADDLOCAL property, the default setup options and automatically
installed features are installed. Typing ADDLOCAL=ALL and not using the ADDLOCAL
property have the same effect.
To specify individual setup options and features, type a comma-separated list of setup
option names. Do not use spaces between names. Use the format
ADDLOCAL=value,value,value.... In contrast to an interactive installation, this
method installs only the specified features.
For example, you might want to install View Agent in a guest operating system with the
View Composer Agent and PCoIP features:
VMware-viewagent-y.y.y-xxxxxx.exe /s /v"/qn
ADDLOCAL=Core,SVIAgent,PCoIP"
IMPORTANT The Core feature is required if you specify individual features with
ADDLOCAL=value,value,value....
The ADDLOCAL MSI property is optional.
REBOOT You can use the REBOOT=ReallySuppress option to allow system configuration tasks to
complete before the system reboots.
This MSI property is optional.
/l*v log_file
Writes logging information into the specified log file with verbose output.
For example: /l*v ""%TEMP%\vmmsi.log""
This example generates a detailed log file that is similar to the log generated during an
interactive installation.
You can use this option to record custom features that might apply uniquely to your
installation. You can use the recorded information to specify installation features in
future silent installations.
The /l*v option is optional.
Silent Installation Properties for View Agent
You can include specific properties when you silently install View Agent from the command line. You must
use a PROPERTY=value format so that Microsoft Windows Installer (MSI) can interpret the properties and
values.
Table 3-6 shows the View Agent silent installation properties that you can use at the command-line.
Chapter 3 Creating and Preparing Virtual Machines
VMware, Inc. 31