
User manual
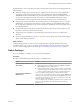

Table Of Contents
- Using VMware Horizon View Client for Windows
- Contents
- Using VMware Horizon View Client for Windows
- System Requirements and Setup for Windows-Based View Clients
- System Requirements for Windows Clients
- System Requirements for Real-Time Audio-Video
- Requirements for Using Multimedia Redirection (MMR)
- Requirements for Using Flash URL Redirection
- Requirements for Using Microsoft Lync with Horizon View Client
- Smart Card Authentication Requirements
- Client Browser Requirements for View Portal
- Supported Desktop Operating Systems
- Preparing View Connection Server for Horizon View Client
- Horizon View Client Data Collected by VMware
- Installing View Client for Windows
- Configuring Horizon View Client for End Users
- Managing Server Connections and Desktops
- Working in a View Desktop
- Feature Support Matrix
- Internationalization
- Using Multiple Monitors
- Connect USB Devices
- Using the Real-Time Audio-Video Feature for Webcams and Microphones
- Copying and Pasting Text and Images
- Printing from a Remote Desktop
- Control Adobe Flash Display
- Using the Relative Mouse Feature for CAD and 3D Applications
- Troubleshooting Horizon View Client
- Index

To determine which mode to use, see “Certificate Checking Modes for Horizon View Client,” on
page 30.
Procedure
1 Double-click the VMware Horizon View Client desktop shortcut or click Start > Programs > VMware >
VMware Horizon View Client.
2 (Optional) To set the certificate checking mode, click the Options button in the upper-left corner of the
window and select Configure SSL.
As was mentioned in the prerequisites to this procedure, you can configure this option only if your
administrator has allowed it.
3 (Optional) To log in as the currently logged-in Windows domain user, click the Options button in the
upper-left corner of the window and select Log in as current user.
This option is available if the Log in as current user module is installed on your client system, and if
your administrator has enabled the global setting for this feature. Some companies choose not to enable
this feature.
4 Click the + Add Server button, enter the name of View Connection Server or a security server, and click
Connect.
Connections between Horizon View Client and View Connection Server always use SSL. The default
port for SSL connections is 443. If View Connection Server is not configured to use the default port, use
the format shown in this example: view.company.com:1443.
You might see a message that you must confirm before the login dialog box appears.
5 If you are prompted for RSA SecurID credentials or RADIUS authentication credentials, enter the user
name and passcode and click Continue.
6 Enter the credentials of a user who is entitled to use at least one desktop pool, select the domain, and
click Login.
If you type the user name using the format user@domain, the name is treated as a user principal name
(UPN) because of the @ sign, and the domain drop-down menu is disabled.
For information about creating desktop pools and entitling users to pools, see VMware Horizon View
Administration document.
7 (Optional) To configure display settings, either right-click a desktop icon or select a desktop icon and
click the Settings button in the upper-right corner of the screen.
Option Description
Display protocol
If your administrator has allowed it, you can use the Connect Via list to
choose between PCoIP and Microsoft RDP display protocols. PCoIP
provides an optimized PC experience for the delivery of images, audio,
and video content on the LAN or across the WAN.
Display layout
Use the Display list to select a window size or to use multiple monitors.
8 Double-click a remote desktop icon to connect.
After you are connected, the View desktop window appears. If you had more than one desktop icon to
choose from, the desktop selector window also remains open, so that you can connect to multiple desktops
at the same time.
Using VMware Horizon View Client for Windows
48 VMware, Inc.