
Installation and Setup Guide

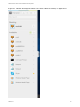
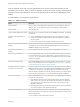
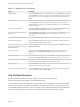

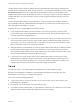
Table Of Contents
- VMware Horizon HTML Access Installation and Setup Guide
- Contents
- VMware Horizon HTML Access Installation and Setup Guide
- Setup and Installation
- System Requirements for HTML Access
- Preparing Connection Server and Security Servers for HTML Access
- Configure View to Remove Credentials From Cache
- Prepare Desktops, Pools, and Farms for HTML Access
- Requirements for the Session Collaboration Feature
- Configure HTML Access Agents to Use New SSL Certificates
- Configure HTML Access Agents to Use Specific Cipher Suites
- Configuring iOS to Use CA-Signed Certificates
- Upgrading the HTML Access Software
- Uninstall HTML Access from View Connection Server
- Data Collected by VMware
- Configuring HTML Access for End Users
- Using a Remote Desktop or Application
- Feature Support Matrix
- Internationalization
- Connect to a Remote Desktop or Application
- Connect to a Server in Workspace ONE Mode
- Use Unauthenticated Access to Connect to Remote Applications
- Shortcut Key Combinations
- International Keyboards
- Screen Resolution
- H.264 Decoding
- Setting the Time Zone
- Using the Sidebar
- Use Multiple Monitors
- Using DPI Synchronization
- Sound
- Copying and Pasting Text
- Transferring Files Between the Client and a Remote Desktop
- Using the Real-Time Audio-Video Feature for Webcams and Microphones
- Using the Session Collaboration Feature
- Log Off or Disconnect
- Reset a Remote Desktop or Published Applications
- Restart a Remote Desktop

Beginning with HTML Access Web client 4. 5, the per device DPI synchronization is applied when the
multiple-monitor feature is enabled. If you are using two monitors that have different DPI settings, the DPI
settings on the HTML Access agent are set to the same DPI setting value used by the monitor of the
client machine that was used to start the HTML Access Web client session.
Procedure
1 Start Horizon Client and log in to a server.
2 In the desktop and application selection window, click the icon for the remote desktop that you want to
access.
3 To display the sidebar, click the sidebar tab.
4 Click the Open Menu toolbar button at the top of the sidebar, select Display Settings.
5 In the Display Settings dialog box, click Add Display.
Note If the Display Selector browser window does not appear, add your Horizon server's FQDN
address into the Pop-up exceptions section of your browser's Content settings window.
6 Drag the Display Selector window so that it appears in the other monitor display that you want to use.
The message in the Display Selector browser window changes and a gray rectangular icon is added.
7 In the Display Selector browser window, click the + monitor icon to confirm that you want to use the
current monitor display.
The Waiting for other displays message appears on the current monitor display and the gray
monitor icon in the Display settings window in your primary display changes to a green color.
8 Click OK in the Display Settings window when you are done adding the monitor displays that you
want to use for the session.
The Display Settings window is dismissed, the Waiting for other displays message is cleared
in the non-primary monitor display and displays the remote desktop window.
9 To exit the multiple displays mode, press Esc and click Yes in the Exit the multiple displays mode
dialog box to confirm.
Note Each time you have to use the Esc key in the remote desktop, open the sidebar tab, click the
Open Menu toolbar button at the top of the sidebar, and select Send ESC.
Using DPI Synchronization
The DPI Synchronization feature ensures that the DPI setting in a remote session matches the client
machine's DPI setting. When you start a new remote session, Horizon Agent sets the DPI value in the
session to match the DPI value of the client machine.
The DPI Synchronization feature cannot change the DPI setting for active remote sessions. If you
reconnect to an existing remote session, the Display Scaling feature scales the remote desktop or
application appropriately.
VMware Horizon HTML Access Installation and Setup Guide
VMware, Inc. 48