
Installation and Setup Guide

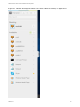
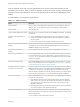
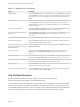

Table Of Contents
- VMware Horizon HTML Access Installation and Setup Guide
- Contents
- VMware Horizon HTML Access Installation and Setup Guide
- Setup and Installation
- System Requirements for HTML Access
- Preparing Connection Server and Security Servers for HTML Access
- Configure View to Remove Credentials From Cache
- Prepare Desktops, Pools, and Farms for HTML Access
- Requirements for the Session Collaboration Feature
- Configure HTML Access Agents to Use New SSL Certificates
- Configure HTML Access Agents to Use Specific Cipher Suites
- Configuring iOS to Use CA-Signed Certificates
- Upgrading the HTML Access Software
- Uninstall HTML Access from View Connection Server
- Data Collected by VMware
- Configuring HTML Access for End Users
- Using a Remote Desktop or Application
- Feature Support Matrix
- Internationalization
- Connect to a Remote Desktop or Application
- Connect to a Server in Workspace ONE Mode
- Use Unauthenticated Access to Connect to Remote Applications
- Shortcut Key Combinations
- International Keyboards
- Screen Resolution
- H.264 Decoding
- Setting the Time Zone
- Using the Sidebar
- Use Multiple Monitors
- Using DPI Synchronization
- Sound
- Copying and Pasting Text
- Transferring Files Between the Client and a Remote Desktop
- Using the Real-Time Audio-Video Feature for Webcams and Microphones
- Using the Session Collaboration Feature
- Log Off or Disconnect
- Reset a Remote Desktop or Published Applications
- Restart a Remote Desktop

Setting the Time Zone
The time zone used in a remote desktop or application is automatically set to the time zone in your local
system. However, when using the HTML Access client, if the time zone cannot be correctly determined
due to certain daylight saving policies, you might need to set the time zone manually.
To manually set the correct time zone information to use before you connect to a remote desktop or
application, click the Settings toolbar button in the upper-right corner of the desktop and application
selector screen. Turn off the Set Time Zone Automatically option in the Settings window and select one
of the time zones from the drop-down menu.
The value you selected is saved as your preferred time zone to use when connecting to a remote desktop
or application.
If you are already connected to a remote desktop or application, return to the desktop and application
selector screen to change the current time zone setting.
The Set Time Zone Automatically option is not available from the Settings window that is accessible
from the sidebar.
Note When using the Chrome browser on an Android system, if the Set Time Zone Automatically
option is set to true and you change the Android system's time zone, the new time zone is not
automatically synchronized with the remote desktop. This is a Chrome limitation on the Android system.
You must restart the Android and the Chrome browser to synchronize the selected time zone.
Using the Sidebar
After you connect to a remote desktop or hosted application, you can use the sidebar to launch other
applications and desktops, switch between running desktops and applications, and perform other actions.
When you access a remote application or desktop, the sidebar appears on the left side of the screen.
Click the sidebar tab to display or hide the sidebar. You can also slide the tab up and down.
VMware Horizon HTML Access Installation and Setup Guide
VMware, Inc. 44