TM Dear VIZIO Customer: Congratulations on your new VIZIO VMM26 F20I LCD monitor purchase. To get the maximum benefit from your monitor, read these instructions before making any adjustments, and retain them for future reference. We hope you will experience many years of enjoyment from your new monitor. For assistance, call (877) 698-4946 or e-mail us at techsupport@VIZIO.com. To purchase or inquire about accessories and installation services for your monitor, visit our website at www.VIZIO.
VIZIO VMM26 F20I User Guide Important safety instructions Your monitor is designed and manufactured to operate within defined design limits, and misuse may result in electric shock or fire. To prevent your monitor from being damaged, read and follow these safety instructions for installing, using, and maintaining your monitor. Keep these instruction for future reference. • To reduce the risk of electric shock or component damage, turn off the power before connecting other components to your monitor.
VIZIO VMM26 F20I User Guide • • • • • • • • • • • • • • • The exclamation point within an equilateral triangle is intended to alert the user to the presence of important operating and servicing instructions in the literature accompanying your monitor. Do not overload power strips and extension cords. Overloading can result in fire or electric shock. The power outlet should be installed near your monitor and easily accessible. Only power of the marked voltage can be used for your monitor.
VIZIO VMM26 F20I User Guide Contents Important safety instructions ..................................................... 2 Features 6 Opening the Package . . . . . . . . . . . . . . . . . . . . . . . . . . . . . . . . . . . . . . . . . . . . . . . . . . . . . . . . . . . . . . . Front . . . . . . . . . . . . . . . . . . . . . . . . . . . . . . . . . . . . . . . . . . . . . . . . . . . . . . . . . . . . . . . . . . . . . . . . . . . . . . . . . . . Side . . . . . . . . . . . . . . . . . . . . . . . . .
VIZIO VMM26 F20I User Guide Index 19 VIZIO Limited Product Warranty 20 VIZIO Return Policy 21 On-Site Warranty Repair Procedure . . . . . . . . . . . . . . . . . . . . . . . . . . . . . . . . . . . . . . . . . . . . . . . . . . . 22 Warranty Replacement Procedure . . . . . . . . . . . . . . . . . . . . . . . . . . . . . . . . . . . . . . . . . . . . . . . . . . . . 22 Mail-In Warranty Repair Procedure . . . . . . . . . . . . . . . . . . . . . . . . . . . . . . . . . . . . . . . . . . . . . . . . . . .
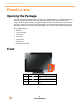
VIZIO VMM26 F20I User Guide Features Opening the Package Your monitor and its accompanying accessories are carefully packed in a cardboard carton that has been designed to protect it from transportation damage. After you have opened the carton, check that your monitor is in good condition and that all of the contents are included.
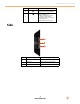
VIZIO VMM26 F20I User Guide # Button Description Touch to go to a previous menu or to exit the on-screen display (OSD). Touch to turn your monitor on or off. When the VIZIO logo is: • White—Monitor is on and receiving a video signal. • Orange—Monitor is on and in standby mode. • Off—Monitor is turned off. 4 5 Side 1 2 3 # 1 2 3 Port Description USB Plug USB devices into these ports. Headphone Plug headphones into this port. HDMI-2 Plug an HDMI device into this port. 7 www.VIZIO.
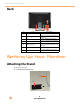
VIZIO VMM26 F20I User Guide Back 7 # 6 2 3 4 1 5 Port Description 1 2 3 4 Power Connect the power cord to this port. HDMI-1 Connect a computer an HDMI device to this port. DVI Connect a DVI device to this port. VGA 5 USB IN (upstream) Connect a computer with a VGA port to this port. Connect the upstream USB cable to your monitor and to a USB port on the computer. 6 7 USB Connect a USB device to this port. AUDIO IN Connect a computer’s audio to this port.
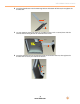
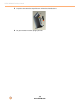
VIZIO VMM26 F20I User Guide 2 Insert the thumbscrew into the mounting hole on the bottom of the base, then tighten the thumbscrew. Arm Thumbscrew 3 Lay your monitor screen face-down on a padded surface, such as a towel, then slide the arm into the mounting bracket on the back of the screen. Screen Arm 4 Insert the thumbscrew into the mounting hole on the back of the arm, then tighten the thumbscrew to secure your monitor to the arm. Thumbscrew Arm 9 www.VIZIO.
VIZIO VMM26 F20I User Guide 5 Snap the cover onto the top of the arm where the thumbscrew is. Arm Cover 6 Set your monitor into the upright position. ™ 10 www.VIZIO.
VIZIO VMM26 F20I User Guide Connecting to a Computer Your monitor has several types of ports for connecting a computer. For more information, see “Back” on page 8 or “Side” on page 7. HDMI Connection Warning: Make sure that your monitor and the device you are connecting are turned off and the power cords are unplugged. To connect a computer using HDMI: 1 Connect one end of an HDMI cable to the HDMI1 port on the back of your monitor.
VIZIO VMM26 F20I User Guide To adjust the tilt: • Grasp the top and bottom of the screen, then push or pull the top of the screen backward or forward. To adjust the swivel: • Grasp each side of the screen, then swivel the screen left or right. Connecting the Power Cord To connect the power cord: 1 Plug the power cord into the power connector on the back of your monitor. 2 Plug the other end of the cord into a power outlet. Wall-mounting your monitor Wall-mounting kits are sold separately.
VIZIO VMM26 F20I User Guide Adjusting Monitor Settings Your monitor has an on-screen display (OSD) that lets you adjust monitor settings. You monitor retains the settings even if you turn it off. To adjust monitor settings: 1 Touch the area above the power button LED indicator. This area lights up with the Auto Adjust option selected. 2 Press the or arrow to select the option you want to adjust, then press OK. 3 If a submenu opens, press the arrow to select the option you want to adjust, then press OK.
VIZIO VMM26 F20I User Guide OSD Option Description THEME MODE Lets you select a display mode. You can select GENERAL, PICTURE, MOVIE, or GAME. COLOR SETTING COLOR TEMPERATURE—Adjusts the screen color. A high color temperature has more blue. A low color temperature has more red and yellow. AUTO ADJUST—Automatically adjusts the color for the best image. SCREEN SETTING VERTICAL POSITION—Moves the screen image up or down. HORIZONTAL POSITION—Moves the screen image right or left.
VIZIO VMM26 F20I User Guide Maintaining and Troubleshooting Maintaining Warning: To avoid the risk of electric shock or damage to your monitor, make sure that the power cable is unplugged before cleaning your monitor. Caution: Do not use volatile solvents (such as toluene, rosin, alcohol, or benzine) to clean your monitor. These types of chemicals can damage the case or screen.
VIZIO VMM26 F20I User Guide Problem Wrong or abnormal colors appear You see a distorted picture Solution • If any colors (red, green, or blue) are missing, check the video cable to make sure it is securely connected and that no pins on the cable connector are bent or broken. • Adjust the color temperature by using the OSD. You may be getting interference from electrical appliances, cars, motorcycles, or fluorescent lights. • Try moving your monitor to a different location.
VIZIO VMM26 F20I User Guide Specifications and Regulations Specifications Size Pixel/Native resolution Color Gamut Brightness Pixel Pitch (mm) Number of Colors Response Time Response Time with OD Open (Gray to Gray) Contrast Ratio DCR Viewing Angles Aspect Ratio Monitor Surface Treatment Connections and Inputs USB 2.
VIZIO VMM26 F20I User Guide Humidity Altitude Operating: 20% ~ 80% Storage: 5% ~ 90% Operating: 12,000 feet Storage: 40,000 feet Regulations FCC warning Changes or modifications not expressly approved by the party responsible for compliance with the FCC Rules could void the user’s authority to operate this equipment. ™ 18 www.VIZIO.
VIZIO VMM26 F20I User Guide Index A H adjusting monitor settings 13 screen height 11 screen tilt 11 adjusting screen swivel 11 ANALOG option 14 AUDIO ADJUST option 13 AUTO ADJUST option 13, 14 AUX IN port 8 HDMI connection 11 HDMI-1 port 8 HDMI-2 port 7 headphone port 7 height adjusting 11 HORIZONTAL POSITION option B INPUT options back view 8 BRIGHTNESS option I LUMINANCE options C D DDC/CI option 14 DIGITAL option 14 DVI connection 11 DVI port 8 S L 13 cleaning case 15 screen 15 COLOR SETTI
VIZIO VMM26 F20I User Guide VIZIO Limited Product Warranty VIZIO provides a “ONE-YEAR LIMITED WARRANTY” against manufacturing defects in materials and workmanship to the original purchaser of a new VIZIO display purchased from an authorized VIZIO U.S. reseller and used in the fifty (50) United States or Puerto Rico. VIZIO's Responsibility VIZIO displays purchased new from an authorized VIZIO U.S.
VIZIO VMM26 F20I User Guide Not Covered This limited warranty does not cover the following: cosmetic defects; damage, malfunctions or failures resulting from shipping or transit, improper or faulty installation, abuse, operation contrary to furnished instructions, operation on incorrect power supplies, products not supplied by VIZIO, modification, alteration, improper servicing or tampering; damage from fire, water, lightning, power surges, abnormal environmental conditions or other acts of nature; normal w
VIZIO VMM26 F20I User Guide Products must be returned to the address specified by VIZIO Customer Service and must be shipped in the original packaging, with freight prepaid to VIZIO, and must be received in new and unused condition. The return authorization number must be included in the packaging. VIZIO reserves the right to assess fees for any damaged or missing parts in addition to the ten percent (10%) restocking fee. Return authorization numbers are valid for only fifteen (15) days from issuance.
VIZIO VMM26 F20I User Guide Mail-In Warranty Repair Procedure Mail-In Warranty Repair generally is performed on displays which are smaller than 30 inches. If VIZIO Technical Support determines that a problem with a display unit may be within the terms and conditions of the VIZIO Limited Product Warranty and that a mail-in repair may be performed, the customer will be provided with a return authorization number and mail-in repair instructions.