VIZIO VSB210WS User Manual Dear VIZIO Customer, Congratulations on your new VIZIO High Definition Sound Bar System purchase. Thank you for your support. For maximum benefit, please read these instructions before making any adjustments, and retain them for future reference. We hope you will experience many years of enjoyment from your new VIZIO HD Sound Bar System. For assistance, please call (877) 668-8462 or visit us at www.vizio.
VIZIO VSB210WS User Manual Important Safety Instructions I nstructions The HD Sound Bar System is designed and manufactured to operate within defined design limits, and misuse may result in electric shock or fire. To prevent the HD Sound Bar System from being damaged, the following rules should be observed for its installation, use, and maintenance. Please Read the following safety instructions before operating the HD Sound Bar System. Keep these instructions in a safe place for future reference.
VIZIO VSB210WS User Manual • • • • • • • • • • • • Do not touch the power cord during lightning. To avoid electric shock, avoid handling the power cord during electrical storms. Unplug the HD Sound Bar System during a lightning storm or when it will not be used for long periods of time. This will protect the HD Sound Bar System from damage due to power surges. Do not attempt to repair or service HD Sound Bar System yourself.
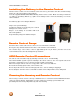
VIZIO VSB210WS User Manual Opening the Package IMPORTANT: Save the carton and packing material for future shipping. Package Contents VIZIO High Definition Sound Bar and Wireless Subwoofer 2x AC/DC Power Adapter 2x Power Cord Remote Control and Battery 2x Stand/Mount Base (Pre-installed) 2x Stand/Mount screws (Pre-installed) 1X RCA Stereo Cable This manual 4 www.VIZIO.
VIZIO VSB210WS User Manual Table of Contents Important Safety Instructions ................................................................................................................................2 Chapter 1 Installation...................................................................................................................................................6 Chapter 2 Basic Controls and Connections ..............................................................................................
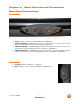
VIZIO VSB210WS User Manual Chapter 1 Installation Preparing the HD Sound Bar System for Wall Mounting The VIZIO HD Sound Bar System can either be kept on the stand base or mounted on the wall for viewing. If you choose to mount the TV on the wall, please follow the instructions below for removing the stand. The two feet provided with the HD Sound Bar System can be used as brackets if it is to be wall mounted. Using a screwdriver, remove the stands from their original configuration as shown in Fig.
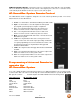
Chapter 2 Basic Controls and Connections Rear Panel Connections Connections Sound Bar 1. DC IN – Plug the connector from the AC/DC Power Adapter here. 2. OPTICAL AUDIO IN – SPDIF Optical connector for connection from a device such as a home theatre system, Amplifier, Receiver, Set Top Box or DVD Player. 3. ANALOG AUDIO IN 1 – (ANALOG L/R) Connect the analog audio from a device such as a TV, Home Theatre System, Amplifier, Receiver, Set Top Box or DVD Player. 4.
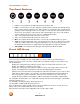
VIZIO VSB210WS User Manual Top Panel Buttons 1. Power – Use this button to turn HD Sound Bar System ON or OFF. 2. Input – Use this button to select the input desired. Repeated pressing will cycle through Analog Input 1, Analog Input 2 or Optical In. This button doubles as a Link button when used during the pairing procedure. Holding the button for more than 3 seconds activates the pairing mode for the wireless link.
REMOTE CONTROL SENSOR – The Remote Sensor is located at the lower right side of the Sound Bar. This is the window through which all of the remote control signals pass to the sensor. Point the remote control directly at this window for the best response to the remote signal. HD Sound Bar System Remote Control The VIZIO Remote Control supplied is designed to be used exclusively with this product. The remote button functions are described below: 1.
VIZIO VSB210WS User Manual Installing Installing the Battery Battery in the Remote Control Turn the remote control over. Press inward to release the lock (1), and at the same time, slide the battery holder out of the remote with your fingernail (2). Insert the supplied CR2025 Lithium Button Battery into the remote control. Make sure that you match the (+) symbol on the battery with the (+) symbol on the battery holder. Re-insert the battery cover in the same orientation.
Chapter 3 Connecting Equipment Connecting a TV *Digital Connection: If your TV has a SPDIF (optical) digital audio output, you can connect it to the OPTICAL AUDIO IN on the HD Sound Bar System 1. Turn off the power to the HD Sound Bar System and TV. 2. Connect one end of the Optical (SPDIF) cable to the digital audio output on the TV. 3. Connect the other end of the Optical (SPDIF) cable to the Digital audio input on the HD Sound Bar System. 4. Turn on the power to the HD Sound Bar System and TV. 5.
VIZIO VSB210WS User Manual Connecting a Cable or Satellite Box *Digital Connection: 1. Turn off the power to the HD Sound Bar System and Set-Top Box. 2. Connect one end of the Optical (SPDIF) cable to the digital audio output on the Satellite or Cable Set-Top Box. 3. Connect the other end of the Optical (SPDIF) cable to the Digital audio input on the HD Sound Bar System. 4. Turn on the power to the HD Sound Bar System and Set-Top Box. 5.
Connecting a CD or DVD Player *Digital Connection: 1. Turn off the power to the HD Sound Bar System and CD or DVD Player. 2. Connect one end of the Optical (SPDIF) cable to the digital audio output on the CD or DVD Player 3. Connect the other end of the Optical (SPDIF) cable to the Digital audio input on the HD Sound Bar System. 4. Turn on the power to the HD Sound Bar System and CD or DVD Player. 5.
VIZIO VSB210WS User Manual Connecting an MP3 Player 1. Turn off the power to the HD Sound Bar System and MP3 Player. 2. Connect one end of the audio cable to the analog audio output on the MP3 Player Docking Unit*. 3. Connect the other end of the audio cable (white and red connectors) to one of the analog audio inputs on the HD Sound Bar System. 4. Turn on the power to the HD Sound Bar System and MP3 Player. 5.
settings of the product. Connecting an external Receiver/Amp *Digital Connection: 1. Turn off the power to the HD Sound Bar System and Receiver/Amp. 2. Connect one end of the Optical (SPDIF) cable to the digital audio output on the Receiver/Amp 3. Connect the other end of the Optical (SPDIF) cable to the Digital audio input on the HD Sound Bar System. 4. Turn on the power to the HD Sound Bar System and Receiver/Amp. 5.
VIZIO VSB210WS User Manual Connecting a Computer *Digital Connection: If your Computer has a SPDIF (optical) digital audio output, you can connect it to the OPTICAL AUDIO IN on the HD Sound Bar System 1. Turn off the power to the HD Sound Bar System and Computer. 2. Connect one end of the Optical (SPDIF) cable to the digital audio output on the Computer. 3. Connect the other end of the Optical (SPDIF) cable to the Digital audio input on the HD Sound Bar System. 4.
Chapter 4 Setting Setting Up HD Sound Bar System System/W /Wireless /W ireless S ubub - W oofer Setup and Pairing The HD Sound Bar System operates in unison with the Wireless Sub-Woofer. They come already paired from the factory. Please follow the procedure below if pairing the units is needed: Figure 1 - Power and Input connections - HD Sound Bar System 1.
VIZIO VSB210WS User Manual Chapter 5 Operation Overview of SRS Audio Processing Features SRS TruVolume™ SRS TruVolume™ is an advanced, intelligent volume control solution that delivers a remarkable TV viewing experience by eliminating irritating fluctuations in volume all too common in today’s television broadcasts. To ensure the technology functions properly, enable it by pressing the ‘TVOL’ button on the remote control. Then set the volume to the desired listening level. SRS TruVolume will do the rest.
SRS TruSurround HD™ H D™ SRS TruSurround HD™ is the latest generation from the TruSurround® family. TruSurround was invented to ensure all listeners would be able to experience “surround sound.” SRS TruSurround HD builds upon its patented predecessor by providing clear dialog, crisp highs and explosive lows. Since many of today’s broadcasts are encoded in 5.1 surround sound, TruSurround HD enables listeners to experience up to 5.1 channels of audio over 2 channels or in this case 2.1 channels.
VIZIO VSB210WS User Manual Audio Adjustments Adjustment s Input - Pressing this button on the Remote Control or on the Sound Bar will sequence the input selection through Analog1, Analog 2 and Optical. Vol+ – Pressing this button on the Remote Control or on the Sound Bar will increase the volume level. Hold for one-half second to continuously increase volume Vol - – Pressing this button on the Remote Control or on the Sound Bar will decrease the volume level.
TM volume fluctuations occur. This SRS TruVolume provides the listener with a comfortable and consistent volume level Pressing this button on the Remote Control or on the Sound Bar will set the HD Sound Bar System to have control over the level of the audio output, preventing commercials on regular programming to become louder than the volume of the program being viewed. Pressing this button will toggle SRS TruVolume ON and OFF.
VIZIO VSB210WS User Manual A = SPDIF compressed format detected. B = SPDIF rate unsupported. C = Overcurrent error occurred. D = Thermal shutdown occurred. The other indicators are not currently used for error indication. When an error occurs, the volume strip goes on solid except that the active error condition is flashing. Corrective Action - If Error A, SPDIF compressed format detected error occurs, configure the DVD player (or audio source device) audio output format setting to PCM or PCM stream.
from penetrating into the housing. Wipe the housing with a dry cloth after cleaning. Troubleshooting Guide If the HD Sound Bar System fails to operate, or the performance changes dramatically, check the operation in accordance with the following instructions. Remember to check the peripherals to pinpoint the source of the problem. If the HD Sound Bar System still fails to perform as expected, contact the VIZIO for assistance by calling 1-877-MYVIZIO (1-877-698-4946) or e-mail us at techsupport@vizio.
VIZIO VSB210WS User Manual Please have your VIZIO model number, serial number, and date of purchase available before you call. VIZIO Address: 39 Tesla Irvine, CA 92618, USA Telephone: (949) 428-2525 Fax: (949) 585-9514 Web: www.vizio.com 24 www.VIZIO.
Compliance Caution: Always use a power cable that is properly grounded. Please use the AC cords listed below for each area. USA Canada Germany UK Japan UL CSA VDE BASE/BS Electric Appliance Control Act FCC Class B Radio Interference Statement NOTE: This equipment has been tested and found to comply with the limits for a Class B digital device, pursuant to Part 15 of the FCC Rules. These limits are designed to provide reasonable protection against harmful interference in a residential installation.
VIZIO VSB210WS User Manual Chapter 8 Miscellaneous Information Specifications Model Number VSB210WS HD Sound Bar System Speakers 4 x 3" High Efficiency mid/bass transducers / 2 x 3/4" High Performance Aluminum Dome Tweeters Frequency Response 80Hz to 20 kHz Amplifier Integrated Class D @ 15x2 channel w/ .01% THD Wireless Subwoofer 6.
Power Input Power Adapter, AC-DC inverter type, Output: 24VDC, 2.7A 65W Max. Voltage 110V at 60 Hz Dimensions HD Sound Bar System 39.95” W x 4.82” H x 4.33” D (1015mm x 122mm x 110mm) Dimensions Subwoofer 11.18” W x 12.30” H x 11.87” D (284mm x 312mm x 301mm) Net Weight (HD Sound Bar System) 7.8lbs (3.48Kg) Net Weight (Subwoofer) 15.5lbs (6.92Kg) Gross Weight 30lbs (13.
VIZIO VSB210WS User Manual Limited Product Warranty VIZIO LIMITED PRODUCT WARRANTY VIZIO provides a “ONE-YEAR LIMITED WARRANTY” against manufacturing defects in materials and workmanship to the original purchaser of new VIZIO audio equipment purchased from an authorized VIZIO U.S. reseller and used in the fifty (50) United States or Puerto Rico. VIZIO’s Responsibility VIZIO audio equipment purchased new from an authorized VIZIO U.S.
maintenance and cleaning, are not covered by this limited warranty. THERE ARE NO EXPRESS WARRANTIES OTHER THAN THOSE LISTED OR DESCRIBED ABOVE. ANY IMPLIED WARRANTIES, INCLUDING ANY IMPLIED WARRANTY OF MERCHANTABILITY AND FITNESS FOR A PARTICULAR PURPOSE, SHALL BE LIMITED IN DURATION TO THE PERIOD OF TIME SET FORTH ABOVE.
VIZIO VSB210WS User Manual the repair, is typically completed within approximately 3 to 5 business days, pending availability replacement parts and other factors. WARRANTY REPLACEMENT PROCEDURE Warranty Replacement generally is performed on audio equipment which is determined to be economically unrepairable.
Index A R Amplifier Connection…………………….14 Audio Adjustments………………………..18 Receiver Connection…………………..…14 Remote Control……………………………...9 Battery……………………………………10 C Cable Box Connection……………………11 CD Connection……………………………12 Computer Connection……………………16 Connections Rear Panel……………………………..…..7 Controls…………………………………..…..8 Range……………………………………10 Programming VIZIO Universal Remote…………………………………….9 S Home Theater Connection……………….14 Safety Instructions……………………..…2, 3 Satellite Box Connection………………….