
User Manual
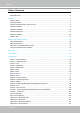
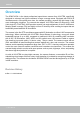
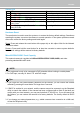
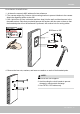
Table Of Contents
- Read Before Use
- Overview
- Hardware Installation
- Accessing the Network Camera
- Using VIVOTEK Recording Software
- Main Page
- Client Settings
- Configuration
- System > General settings
- System > Homepage layout
- System > Logs
- System > Parameters
- System > Maintenance
- Media > Image
- Media > Video
- ■ Smart stream III
- Media > Audio
- Network > General settings
- Network > Streaming protocols
- Network > DDNS
- Network > SNMP (Simple Network Management Protocol)
- Network > FTP
- Security > User accounts
- Security > HTTPS (Hypertext Transfer Protocol over SSL/TLS)
- Security > Access List
- PTZ > PTZ settings
- Event > Event settings
- Applications > Motion detection
- Applications > DI and DO
- Applications > Tampering detection
- Applications > Audio detection
- Applications > VADP (VIVOTEK Application Development Platform)
- Recording > Recording settings
- Local storage > SD card management
- Local storage > Content management
- Appendix

VIVOTEK
User's Manual - 9
Status LED
Item LED status Description
1 Steady red Power on and system booting
Red LED OFF Power off
2 Steady red & Green blinking every 1 sec. Network normal (heartbeat)
Steady red & Green LED OFF Network failed
3 Red blinking every 0.15 sec. & Green blinking
every 1 sec.
Upgrading rmware
4 Red blinking every 0.15 sec. & Green blinking
every 0.15 sec.
Restoring default
Hardware Reset
The reset button is used to reset the system or to restore the factory default settings. Sometimes
resetting the system can return the camera to normal operation. If the system problems remain
after reset, restore the factory settings and install again.
Reset: Press and release the reset button with a paper clip or thin object. Wait for the Network
Camera to reboot.
Restore: Press and hold the reset button for at least ten seconds to restore system defaults.
Note that all settings will be restored to factory defaults.
MicroSD/SDHC/SDXC Card Capacity
This network camera is compliant with MicroSD/SDHC/SDXC 32GB, 64GB, and other
preceding standard MicroSD cards.
1. If you forget the root (administrator) password for the camera, you can restore the camera
defaults by pressing the reset button for longer than 5 seconds.
2. If DHCP is enabled in your network, and the camera cannot be accessed, run the Shepherd
utility to search the network. If the camera has been congured with a xed IP that does not
comply with your local network, you may see its default IP 169.254.x.x. If you still cannot nd
the camera, you can restore the camera to its factory defaults. The factory default is DHCP
client.
3. If you change your network parameters, e.g., added a camera via a connection to a LAN card,
re-start the Shepherd utility.
Tips:
NOTE:
1. This equipment is only to be connected to PoE networks without routing to outside plants.
2. For PoE input, use only UL listed I.T.E. with PoE output.