
User Manual
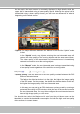
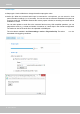
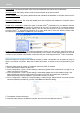
Table Of Contents
- Read Before Use
- Overview
- Hardware Installation
- Accessing the Network Camera
- Using VIVOTEK Recording Software
- Main Page
- Client Settings
- Configuration
- System > General settings
- System > Homepage layout
- System > Logs
- System > Parameters
- System > Maintenance
- Media > Image
- Media > Video
- ■ Smart stream III
- Media > Audio
- Network > General settings
- Network > Streaming protocols
- Network > DDNS
- Network > SNMP (Simple Network Management Protocol)
- Network > FTP
- Security > User accounts
- Security > HTTPS (Hypertext Transfer Protocol over SSL/TLS)
- Security > Access List
- PTZ > PTZ settings
- Event > Event settings
- Applications > Motion detection
- Applications > DI and DO
- Applications > Tampering detection
- Applications > Audio detection
- Applications > VADP (VIVOTEK Application Development Platform)
- Recording > Recording settings
- Local storage > SD card management
- Local storage > Content management
- Appendix

VIVOTEK
78 - User's Manual
Audio clips
■ Output gain: Use the slide bar to change the audio output gains value.
■ Audio clip: When the camera's audio input is connected to a microphone, you can record a short
period of audio recordings (1 to 10 seconds). You can also use the camera's embedded microphone to
record an audio clip, if available. Because the memory space is limited, a recording count down will be
available on screen.
You can also upload an audio file to the camera's flash memory. With amplified speakers, you can
playback the audio, e.g., to deter an intruder. A maximum of 2 audio clips in wav format are supported.
The maximum size of the audio le to be uploaded is 2,000Kbytes.
The voice alert is enabled in the Event settings > action > Play Audio Clip. The action c a n b e
associated with triggering conditions.