
User Manual
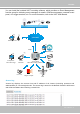
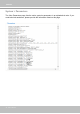
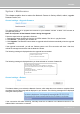
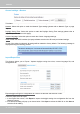
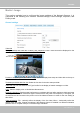
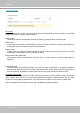

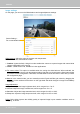
Table Of Contents
- Read Before Use
- Overview
- Hardware Installation
- Accessing the Network Camera
- Using VIVOTEK Recording Software
- Main Page
- Client Settings
- Configuration
- System > General settings
- System > Homepage layout
- System > Logs
- System > Parameters
- System > Maintenance
- Media > Image
- Media > Video
- ■ Smart stream III
- Media > Audio
- Network > General settings
- Network > Streaming protocols
- Network > DDNS
- Network > SNMP (Simple Network Management Protocol)
- Network > FTP
- Security > User accounts
- Security > HTTPS (Hypertext Transfer Protocol over SSL/TLS)
- Security > Access List
- PTZ > PTZ settings
- Event > Event settings
- Applications > Motion detection
- Applications > DI and DO
- Applications > Tampering detection
- Applications > Audio detection
- Applications > VADP (VIVOTEK Application Development Platform)
- Recording > Recording settings
- Local storage > SD card management
- Local storage > Content management
- Appendix

VIVOTEK
User's Manual - 57
Media > Image
This section explains how to configure the image settings of the Network Camera. It is
composed of the following four columns: General settings, Picture settings, Exposure, and
Privacy mask.
General settings
Video title
Show_timestamp and video title in videos_and_snapshots: Enter a name that will be displayed on the
title bar of the live video as the picture shown below.
Video Title
Title and Time
Video 17:08:56 2019/03/09
2019/03/09 17:08:56
Position of timestamp and video title on image: Select to display time stamp and video title on the top or
at the bottom of the video stream.
Timestamp and video title font size: Select the font size for the time stamp and title.
Video font (.ttf): You can select a True Type font le for the display of textual messages on video.
Color: Select to display color or black/white video streams.
Power line frequency: Set the power line frequency consistent with local utility settings to eliminate image
flickering associated with fluorescent lights. Note that after the power line frequency is changed, you
must disconnect and reconnect the power cord of the Network Camera in order for the new setting to
take effect.
Video orientation: Flip - vertically reflect the display of the live video; Mirror - horizontally reflect the
display of the live video. Change the settings if the Network Camera is installed in a different orientation
(which is rare for a speed dome) to correct the image orientation.