
User Manual

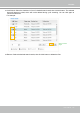
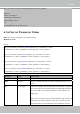
Table Of Contents
- Read Before Use
- Overview
- Hardware Installation
- Accessing the Network Camera
- Using VIVOTEK Recording Software
- Main Page
- Client Settings
- Configuration
- System > General settings
- System > Homepage layout
- System > Logs
- System > Parameters
- System > Maintenance
- Media > Image
- Media > Video
- ■ Smart stream III
- Media > Audio
- Network > General settings
- Network > Streaming protocols
- Network > DDNS
- Network > SNMP (Simple Network Management Protocol)
- Network > FTP
- Security > User accounts
- Security > HTTPS (Hypertext Transfer Protocol over SSL/TLS)
- Security > Access List
- PTZ > PTZ settings
- Event > Event settings
- Applications > Motion detection
- Applications > DI and DO
- Applications > Tampering detection
- Applications > Audio detection
- Applications > VADP (VIVOTEK Application Development Platform)
- Recording > Recording settings
- Local storage > SD card management
- Local storage > Content management
- Appendix

VIVOTEK
User's Manual - 151
this page. When the system begins recording, it will send the recorded les to a networked storage or SD
card. The new recording name will appear on the recording page as shown below.
To remove a recording setting from the list, select it and click Delete.
■ Video (Name): Click to open the Recording settings page to modify its details.
■ ON (Status): Click to manually adjust the Status. (ON: start recording; OFF: stop recording)
■ NAS or SD (Destination): Click to open the le list of recordings as shown below. For more information
about folder naming rules, please refer to page 134 or page 119 for details.