
User Manual
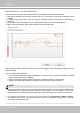
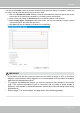
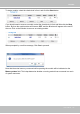
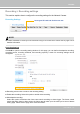
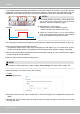
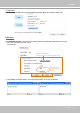

Table Of Contents
- Read Before Use
- Overview
- Hardware Installation
- Accessing the Network Camera
- Using VIVOTEK Recording Software
- Main Page
- Client Settings
- Configuration
- System > General settings
- System > Homepage layout
- System > Logs
- System > Parameters
- System > Maintenance
- Media > Image
- Media > Video
- ■ Smart stream III
- Media > Audio
- Network > General settings
- Network > Streaming protocols
- Network > DDNS
- Network > SNMP (Simple Network Management Protocol)
- Network > FTP
- Security > User accounts
- Security > HTTPS (Hypertext Transfer Protocol over SSL/TLS)
- Security > Access List
- PTZ > PTZ settings
- Event > Event settings
- Applications > Motion detection
- Applications > DI and DO
- Applications > Tampering detection
- Applications > Audio detection
- Applications > VADP (VIVOTEK Application Development Platform)
- Recording > Recording settings
- Local storage > SD card management
- Local storage > Content management
- Appendix

VIVOTEK
User's Manual - 143
IMPORTANT:
• If the Alarm level and the received volume are set within a range of 20% on the wave
diagram, frequent alarms will be triggered. It is recommended to set the Alarm level farther
apart from the detected sound level.
• To configure and enable this feature, you must not configure video stream #1 into motion
jpeg. If an external microphone input is connected and recording of audio stream is
preferred, audio stream is transmitted between camera and viewer/recording station along
with stream #1.
• Refer to page 77 for Audio settings, and page 69 for video streaming settings.
You can use the Prole window to congure a different Audio detection setting. For example, a place can
be noisy in the day time and become very quiet in the night.
1. Click on the Enable this prole checkbox. Once the Audio detection window is opened, the current
sound input will be interactively indicated by a uctuating yellow wave diagram.
2. Use a mouse click to drag the Alarm level tab to a preferred location on the slide bar.
3. Select the Day, Night, or Schedule mode check circles. You may also manually congure a period
of time during which this prole will take effect.
4. Click Save and then click Close to complete your conguration.