
User Manual

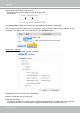
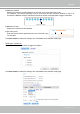
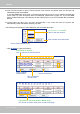
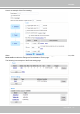
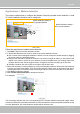
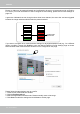
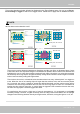
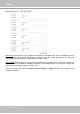
Table Of Contents
- Read Before Use
- Overview
- Hardware Installation
- Accessing the Network Camera
- Using VIVOTEK Recording Software
- Main Page
- Client Settings
- Configuration
- System > General settings
- System > Homepage layout
- System > Logs
- System > Parameters
- System > Maintenance
- Media > Image
- Media > Video
- ■ Smart stream III
- Media > Audio
- Network > General settings
- Network > Streaming protocols
- Network > DDNS
- Network > SNMP (Simple Network Management Protocol)
- Network > FTP
- Security > User accounts
- Security > HTTPS (Hypertext Transfer Protocol over SSL/TLS)
- Security > Access List
- PTZ > PTZ settings
- Event > Event settings
- Applications > Motion detection
- Applications > DI and DO
- Applications > Tampering detection
- Applications > Audio detection
- Applications > VADP (VIVOTEK Application Development Platform)
- Recording > Recording settings
- Local storage > SD card management
- Local storage > Content management
- Appendix

VIVOTEK
134 - User's Manual
■ View: Click this button to open a file list window. This function only apllies when an SD card and
networked storage are available.
If you click View button of SD card, a Local storage page will pop up for you to manage recorded les
on SD card. For more information about Local storage, please refer to page 152. If you click View
button of Network storage, a le directory window will pop up for you to view recorded data on Network
storage.
■ Create folders by date, time, and hour automatically: If you check this item, the system will
automatically create sub-folders named by the date.
The following is an example of a le destination with recorded video clips:
Click 20190320 to open the directory:
Video Clip_59.mp4
Video Clip_58.mp4
2019/03/20
2019/03/20
Click to delete
selected items
Click to delete all
recorded data
Click to go back to the previous
level of the directory
The format is: HH (24r)
Click to open the le list for that hour
Video Clip_59.mp4
Video Clip_58.mp4
2019/03/20
2019/03/20
The format is: File name prex + Minute (mm)
You can set up the le name prex on Add media page.
20190320
20190321
20190322
Click to delete selected items
Click to delete all recorded data
The format is: YYYYMMDD
Click to open the directory