
User Manual

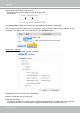
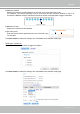
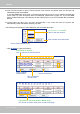
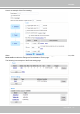
Table Of Contents
- Read Before Use
- Overview
- Hardware Installation
- Accessing the Network Camera
- Using VIVOTEK Recording Software
- Main Page
- Client Settings
- Configuration
- System > General settings
- System > Homepage layout
- System > Logs
- System > Parameters
- System > Maintenance
- Media > Image
- Media > Video
- ■ Smart stream III
- Media > Audio
- Network > General settings
- Network > Streaming protocols
- Network > DDNS
- Network > SNMP (Simple Network Management Protocol)
- Network > FTP
- Security > User accounts
- Security > HTTPS (Hypertext Transfer Protocol over SSL/TLS)
- Security > Access List
- PTZ > PTZ settings
- Event > Event settings
- Applications > Motion detection
- Applications > DI and DO
- Applications > Tampering detection
- Applications > Audio detection
- Applications > VADP (VIVOTEK Application Development Platform)
- Recording > Recording settings
- Local storage > SD card management
- Local storage > Content management
- Appendix

VIVOTEK
132 - User's Manual
■ Add date and time sufx to the le name
Select this option to add a date/time sufx to the le name.
For example:
Click Save media to enable the settings, then click Close to exit the Add media page.
After you set up the rst media server, a drop-down menu of existing medias will be available on the
Media list. If you wish to add more media options, click Add media again.
Media type -
Video clip
Select to send video clips when a trigger is activated.
■ Media name: Enter a name for the media setting.
■ Source: Select the source of video clip.
■ Pre-event recording
The Network Camera has a buffer area; it temporarily holds data up to a certain limit. Enter a number
to decide the duration of recording before a trigger is activated. Up to 9 seconds can be set.
Snapshot_20190320_100341
Date and time suffix
The format is: YYYYMMDD_HHMMSS
File name prefix