
User Manual
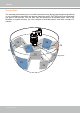
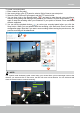
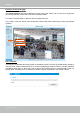
Table Of Contents
- Read Before Use
- Overview
- Hardware Installation
- Accessing the Network Camera
- Using VIVOTEK Recording Software
- Main Page
- Client Settings
- Configuration
- System > General settings
- System > Homepage layout
- System > Logs
- System > Parameters
- System > Maintenance
- Media > Image
- Media > Video
- ■ Smart stream III
- Media > Audio
- Network > General settings
- Network > Streaming protocols
- Network > DDNS
- Network > SNMP (Simple Network Management Protocol)
- Network > FTP
- Security > User accounts
- Security > HTTPS (Hypertext Transfer Protocol over SSL/TLS)
- Security > Access List
- PTZ > PTZ settings
- Event > Event settings
- Applications > Motion detection
- Applications > DI and DO
- Applications > Tampering detection
- Applications > Audio detection
- Applications > VADP (VIVOTEK Application Development Platform)
- Recording > Recording settings
- Local storage > SD card management
- Local storage > Content management
- Appendix

VIVOTEK
116 - User's Manual
1
1
2
3
4
5
6
7
8
NOTE:
The navigation buttons here also
support the continuous move. You
can click and hold down the button
to move across the screen until you
release the button.
Preset positions and patrol settings
In the PTZ settings page, you can congure preset positions for the camera to travel through. A total of
256 preset positions can be congured. 40 of them can be congured into one patrol.
Please follow the steps below to congure preset positions and arrange them in a pan/tilt/zoom tour:
1. Adjust the shooting area to the desired position using the keypad on the upper right side of the
window. The default Home position refers to the center position defaulted in the factory. You might as
well select another area of interest as the “Home“ position. You should also select the speeds for the
actions that occur during the patrol; i.e., pan, tilt, zoom, focus, and the auto pan/patrol.
2. Enter a name for a new preset position, which can contain up to forty characters. Click Add to enable
the settings. The preset positions will be listed on the User preset locations. (To add positions you
wish, please repeat steps 1~2.)
3. Select the preset positions and click on the Save button at the bottom of the screen.
4. Click on the move button (>>)
to move positions to the Patrol locations window.
5. You may select some or all of the imported positions as the stop points during the tour.
6. Enter a preferred dwell time before the camera lens moves to the next position.
7. Select a speed level for the auto patrol tour.
8. Click on the Save button to preserve your conguration.
To remove a preset position from the list, select it and click Remove.
You can re-arrange the patrol order of the positions on the list using the
buttons.
Preset Patrol