Important Statement 1 FCC Warning This product has undergone tests in pursuance of Part 15 of the FCC Regulations and has been found to meet the regulations for Class B devices, which are provided for reasonable protections while keeping the product from hazardous interference when installed and used. This product may emit radioactive energy while in use.
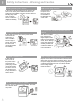
1 Important Statement Maintenance Clear methods For the reason of safety, please make sure to unplug the power cord before start to do the cleaning. Cleaning for the case ■ To mop the outside of the case with soft and clean cloth. Follow the instruction if use any cloth containing certain chemical materials. ■ Do not use alcohol or other material inflammable, which will result in the decay of the case or paint fading. ■ Do not use robber or other clue-related material to interface with the case.
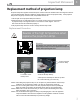
Important Statement 1 Replacement method of projection lamp Projection lamps are supplies and have life span. Please contact the resellers when the image turns dark or color gets deteriorated. When this happens, please replace it with a new projection lamp. If the projection lamp could not light up and have noise, the possible reasons are: 1.The life span for the projection lamp are ended or 2.Shutting down the TV right after the turn-on of power.
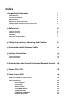
Index 1.Important Statement 1 2.Before Use 6 3.Safety Instructions - Warning and Caution 8 4.Connection with Antenna Cable 12 5.System Connection 13 FCC Warning Accessories Check Maintenance Method to replace the filter Replacement method of projection lamp Correct viewing Remote Control Handling Moisture Condensation Front Connector Rear Connector 1 1 2 2 3 6 6 7 7 13 14 6.
9.Programming the universal remote control 29 10.Display Modes 40 11.Specifications 41 12.Troubleshooting 42 13.LED Status 43 14.
2 Before Use Correct viewing Distance The most appropriate viewing distance varies between 5~7 times the height of the screen. ight 5-7 Times the he n of the scree Viewing Angle and Height Suitable viewing angle and height will avoid fatigue. Volume As a courtesy to others, be sure to keep the volume down (especially in the evening).
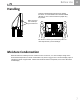
Before Use 2 Handling Find the indicated hand positions before lighting the device. To ensure balance and avoid accidental damage, be sure to have at least two people carry the product. When move this unit. Please put your hands here Be careful not to bump or scratch the product on other objects when you are handing it.
3 Safety Instructions - Warning and Caution Smoking emitting from device In the case of smoke emitting from the product, be sure to turn off the power switch and remove the power plug immediately. Using the product while it is smoking may cause a fire or electric shock. Contact the dealer immediately. No image or sound In this case, be sure to turn off the power switch and remove the power plug. In case of sudden loss of image or sound, stop using the device and contact the dealer immediately.
Safety Instructions - Warning and Caution Do not place flower vases, glasses, cosmetics, chemical solutions, liquids or small metal objects on this device Liquid or small objects inside the device may cause fire or electric shock. In this case, turn off the power supply and remove the power plug before contacting the dealer. Keep this device from high temperature or direct sunshine High temperature may cause overheating and fire.
3 Safety Instructions - Warning and Caution Keep the ventilation grill free *Do not let the screen face up, to the side or up side down. *Do not keep this device in a closet or bookshelf with poor ventilation. *Do not place this device on a rug or flammable objects. *Do not cover this device with curtains or tablecloths. Doing any above may cause a fire. Install this device in a flat and solid place Be sure to allow for proper ventilation around the device.
Safety Instructions - Warning and Caution Do not remove back cover, case front panel or any other cover The high-voltage components inside the unit may cause electrical shock if mishandled. For all adjustments and servicing to interior circuitry please contact the dealer. 3 When you will not use this device for a long period of time, be sure to remove the power plug When you are away for long periods of time be sure to unplug the device to avoid any fire due to electrical storms or power surges.
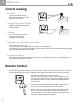
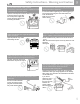
4 Connecting and Checking the Antenna Connection Cable E. Connection withwith Antenna Antenna Cable 1. Cable without a CATV Converter 2. VHF/UHF Combination Antenna Cable TV lead-in Back of Rear Projection TV $)')4!, VHF, UHF or VHF/UHF combination antenna !.!,/' ANTENNA IN 75 ohm coaxial cable (round) or 300 ohm twin-lead (flat) 300-75 ohm ADAPTOR (Not supplied) 3.
System Connection 5 Please unplug the power cord of the machine and other devices attached before start to connect the device on the side of the machine. Front Connector Use the Remote control or Machine front "Input" key to select the Input source to Front AV Only digital camera with Video channel output function can be connected directly to the machine. There’re still few digital cameras that require PCs in order to function properly. V8, Game, Digital Camera....etc.
5 System Connection Rear Connector - 1 Use the Remote control or Machine front "Input" key to select the Input source to AV1 IN or AV2 IN VCR, Stereo, VCD, DVD Player Video : Please use S-Video as the first priority for Video input, thus having a better image quality. Machines in early days, however, do not support S-Video; these devices only have Video for output. Please attach the Video output cable to the machine’s video input.
System Connection Rear Connector -2 5 Use the Remote control or Machine front "Input" key to select the Input source to DVI/HDCP IN The DVI port supports High-bandwidth Digital Content Protection (HDCP). HDCP encrypts the transmission between the video source and the digital Display for added security and protection.
6 Introduction the Control Panel and Remote Control 6/, ß 1 !$*534 2 -%.5 #( !$*534 3 /+ %8)4 4 5 0/7%2 ).054 ,!-0 34!453 6 7 1.IR Sensor This is a windorw which receivers infrared signal from the remote controller 2.VOL When OSD disappear. Thess buttoms is used for adjust volume ◄Volume decreases ►Volume increases When OSD display. These are used for OSD menu ◄► item select 3.CH If the source of image is TV. These buttons are for selecting channels.
Introduction the Control Panel and Remote Control 6 Button name Function Starts all programming sequences. Blinks when the remote is being programmed or is sending a signal to your RP TV Power Turns your RP TV or other selected device on and off. Programs the remote control to recognize a device. For programming instructions, see “Programming the universal remote control” on page 29 " Setup Remote LED TV DVD VCR TV2 CBL/SAT AMP CD AUX 1, 2, 3....
7 Power ON / OFF Power on Operation status Machine status Lamp LED POWER LED Not display Not display Lamp is active Orange light flash Green Display status Not display Green Operation status Machine status Lamp LED POWER LED 1.Push the power button on the front panel Warm up Orange light flash Not display Warm up Orange light flash Not display Not display Orange 1.Connect the power cord into 110V~240V Plug -%.5 2.Push the power button on the front panel 0/7%2 ).
How to use OSD 8 Before use OSD, You must know: Recommended ways to learn about operations Before starting, please follow the suggested steps to understand the fundamentals of operating the display, and then you will be able to learn the operations in a short time: 1.Please first learn to power on and power off the display. Refer to page 18 for the descriptions of the operations. 2.Please learn how to operate the OSD. 3.Understand what each OSD menu is.
8 How to use OSD OSD explanation Picture Adjust For other input source (Except Front RGB, RGB, DVI) Only for Input source Mode: Front RGB, RGB, DVI Original image 1.CONTRAST Adjust the contrast of the screen image ◄ Reduce contrast ► Increase contrast 20 2.BRIGHTNESS Adjust the brightness of the screen image ◄ Reduce brightness ► Increase brightness 3.COLOR Adjust the color saturation of the screen image ◄ Reduce saturation ► Increase saturation 4.
How to use OSD 6.COLOR TEMPERATURE Use ◄ ►to adjust the color temperature ♦ NEUTRAL General neutral setting ♦ WARM To increase the red tone of the display, obtain the white and more vivid red colors among warm ones. ♦ COOL To increase the blue tone of screen images, obtain the white color among soft colors. Generally suitable for offices with fluorescent lamps. 8 ♦ Side Bar Suitable for viewing conventional 4:3 programs in their normal format. ♦ S.
8 How to use OSD ♦ Stretch An image fully fills the screen. 12.AUTO CONFIG Press ok to auto get the input signal again. 13.ADC CLOCK ♦ Dot by Dot Detects the resolution of the signal and displays an image with the same number of pixels on the screen. Use◄ ►to change the clock value Adjusting the image interference. When the screen shows interference caused by disturbing wave, please adjust the clock. 14.ADC PHASE Notes: * Wide Format is not available when using the POP, SPLIT functions.
How to use OSD PIP SETUP 8 2.WIDE FORMAT (PIP, POP only) =remote control key "PIP WIDE" Use ◄ ► to change sub-piecure scale 4:3 or 16:9 WIDE FORMAT, SIZE, H POSITION, V POSITION, TRANSPARENCY these function are only available for PIP STYLE. POP, SPLIT mode can't use. 1.PIP STYLE =remote control key "STYLE" PIP 4:3 PIP 16:9 3.
8 How to use OSD INPUT SETUP TV TUNER SETUP 1.MAIN INPUT =remote control key "INPUT" Press OK first, then use ◄ ► to change the Main picture input source signal. such as TV, FRONT RGB, RGB, DVI, AV1, AV2, FRONT AV, COMP1, COMP2 1.CLOSE CAPTION Use ◄ ► to ON or OFF the Cloase caption function. If your local TV system station not provide this service. This function will not work. Change main picture's input signal source 2.ANALOG TV SETUP 2.
How to use OSD 3.DIGITAL TV SETUP 8 ●CAPTION SIZE Adjust caption size. Such as, Default, small, standard, larger. ●FONT STYLE Change font to different style. e.g.: ●FOREGROUND COLOR Change froeground color. e.g.: ♦ CHANNEL SETUP(DTV) ●FOREGROUND OPACITY Change foreground opacity. ●BACKGROUND COLOR Change background color. e.g.: ●BACKGROUND OPACITY Change background opacity. ●AUTO SEARCH(DTV) Press OK to let machine auto search the whole channels.
8 How to use OSD AUDIO ADJUST ♦BBE High Definition Sound ♦VIVA HD3D Replace traditional live sound stereo with more natural and clearer sound. Features: a.Increase the horizontal sound field, depth, and vertical sound field while maintaining clear sense of directions. b.Highly stable central sound track c.Compatible with news channels, theatrical performances, movies, music, sports, and games. No audio mode switching is needed every time when you change programs 1.
How to use OSD PARENTAL CONTROL The parental controls feature prevents viewers from watching programs that are not age-appropriate, such as programs containing violence or adult language. The factury default access code is 0000. Just use remote control keyin the number to enter the parental controls sub-menu. When enter the parental controls sub-menu. It will display the OSD as below: 1.MPAA RATING 8 2.TV RATING U -> Unblock , B -> Block ♦TV-Y → For all children.
8 How to use OSD SPECIAL FEATURE 4.LANGUAGE Set OSD display language, there are three language options: ENGLISH FRANÇAIS ESPAÑOL 5.SYSTEM INFO Display some information about the display, may also be displayed by pressing the hotkey INFO on the remote control. 1.OSD H POSITION Use ◄►to move OSD horizontal position. 2.OSD V POSITION Use ◄►to move OSD vertical position.
9 Programming the universal remote control The TV device button has been preset to work with your RPTV TV (program code 0080). You can program the remote control to work with as many as seven other devices. To program the remote to control other devices: 1 Turn on the device. 2 Press the matching device button on the remote control. 3 Press and hold the SETUP button until the LED flashes twice. 4 Enter the programming code for the device and manufacturer.
9 Programming the universal remote control CD Player codes Manufacturer Program Code Manufacturer Program Code Aiwa Burmester California Audio Labs 0157 0420 0029 Parasound Philips Pioneer Carver DKK Denon Emerson Fisher 0157, 0179 0000 0003, 0873 0305 0179 Polk Audio Proton QED Quasar RCA Garrard Genexxa Harman/Kardon Hitachi JVC Kenwood 0420 0032, 0305 0157, 0173 0032 0072 0028, 0190, 0826, 0037, 0626, 0681 0157 0305 0157 0029 0420 0157, 0305 0157, 0626, 0029 0157 0157 0101, 0868 0032, 0468, 04
Programming the universal remote control DVD Player codes Manufacturer Program Code Manufacturer Program Code Apex Denon Fisher Gateway GE Gradiente Hitachi Hiteker JVC Kenwood Konka Magnavox Marantz Mitsubishi Onkyo 0672 0490 0670 0081 0522 0651 0573, 0664 0672 0623, 0558 0682, 0534 0719, 0711, 0720, 0721 0503, 0675 0539 0521 0503 Optimus Oritron Panasonic Philips Pioneer Proscan RCA Samsung Sharp Sony Technics Theta Digital Toshiba Yamaha Zenith 0571 0651 0490, 0677, 0632 0539, 0503 0571, 0525, 063
9 Programming the universal remote control Satellite set-top box codes Manufacturer Program Code Manufacturer Program Code AlphaStar Chaparral Echostar 0772 0216 0775, 1005 Next Level Panasonic Philips Expressvu GE General Instrument HTS Hitachi Hughes Network Systems JVC Magnavox Memorex Mitsubishi 0775 0566 0869 0775 0819 0749, 1142, 1749 Proscan RCA Radio Shack Samsung Sony Star Choice 0869 0247, 0701 1076, 1142, 0722 0724, 0749 0392 0566, 0392, 0143, 0855 0869 1109 0639 0869 0775 0722, 0724 0
Programming the universal remote control Manufacturer Program Code Manufacturer Program Code Crown 0180 RCA Curtis Mathes 0060, 0030, 0016, 0047 0051, 0054, 0056, 0093 0145, 0154, 0166, 0451 1147, 1347 0092, 0623, 0019 0624, 0451 0019 0145 0017, 0019 0000 Radio Shack 0047, 1347, 1147, 1047 0679, 1247, 0019, 1447 0051, 0090, 0093 0180, 0030, 0178 0154, 0019, 0047 0056 Sansei Envision Fisher Fujitsu Funai Futuretech 0236, 0180, 0178 0179, 0463, 0624 0623, 0019, 0154 0030 0154 0179, 0683 0180, 017
9 Programming the universal remote control Manufacturer Program Code Manufacturer Program Code Luxman MGA MTC 0056 0150, 0019, 0030, 0178 0060, 0030, 0019 0056 0054, 0030, 0179 1254 Victor Vidikron Vidtech 0053 0054 0019, 0178 Wards Majestic Marantz Matsushita 0016 0054, 0030 0250 Whit Westinghouse Yamaha Zenith 0054, 0178, 0016 0019, 0030, 0056 0179 0624, 0623, 0463 0019, 0030 0017, 0624, 0016 0092,0463 Megatron 0145, 0178 Magnavox VCR codes 34 Manufacturer Program Code Manufacturer Pr
Programming the universal remote control Manufacturer Program Code Manufacturer Program Code Emerson 0184, 0002, 0209 0278, 0121, 0479 0000, 0037, 0043 0047, 0104 0000 0035, 0060, 0048, 0240 0000 0432 0037, 0038 0000 Replay TV 0614, 0616 Runco Samsung Sanky Sansui Sanyo Scott Sears 0047 0000 0038, 0081 0072 0042, 0000 0042 Semp Sharp Shintom Shogun Singer Sony 0067 0037, 0278 0072 0067, 0038 0035, 0037 0037 0000 0072 0035 0043, 0240 0240 0000, 0240 0278 0035, 0081, 0563 0000, 0039, 0149 0240 0081
9 Programming the universal remote control Searching for device codes If you cannot find your manufacturer in the device list or the program code does not work, you can use the remote control to search for the correct device code. To search for a device code: 1 Turn on the device. 2 Press the matching device button on the remote control. 3 Press and hold the SETUP button until the LED flashes twice. 4 Press 991. The LED flashes twice.
Programming the universal remote control 9 Teaching the remote control new functions The remote control can learn up to 25 additional functions from the device’s original remote control. Example: Your DVD player remote control has a scan function that you may use frequently. There is not a scan button on the remote control. You can assign a button and use the DVD remote to teach the remote control the scan function.
9 Programming the universal remote control Using picture-in-picture (PIP) mode When the picture-in-picture (PIP) mode is active, one picture is displayed on the full screen (main picture) and the other picture is displayed in a small window (sub-picture). To control PIP mode using the universal remote control: 1 Press the TV device button. 2 Press the PIP button on the remote control once to turn on PIP mode. A small window appears in one corner of the screen.
Programming the universal remote control 9 Troubleshooting Use the following information to solve common problems. The LED doesn’t blink when a button is pressed. Replace the batteries. Insert two AA batteries into the remote control. Make sure that you match the + and – on the batteries with the + and – symbols inside the battery compartment. The LED blinks when a device mode is pressed, but the device does not respond. Make sure that you are less that 15 feet (4.
10 Display Modes Video Input Format Input Format Aspect Ratio Pixel Clock(MHz) 480i 4:3 480p 4:3 / SMPTE 293M 720p / SMPTE 296M 1080i / SMPTE 274M 700x480 700x480 1280x720 1290x1080i 13.5MHz 27.000 74.25/1.001 74.25/1.001 Horizontal Frequecy(kHz) 15.734/1.001 31.469/1.001 45.0/1.001 33.750/1.001 Vertical Frequecy(Hz) 30.0/1.001 60/1.001 60.0/1.001 30.0/1.001 Default PC Input Mode The display automatically detects: 1) Horizontal sync signal frequency between 30.0 ~ 60.
Specifications Number T. M. D. S Headphone TV System Received Channels Image output / input terminals(video, audio) 190.5 Component Input 514mm Power Power Consumption Weight Viewable Area Physical Dimensions Speaker Audio Output Simulated RGB input Multimedia digital projector display / TV Main system Remote Control AC 110V/220V 50 Hz / 60 Hz 3V (two AA batteries) 220W --------40Kg 155.
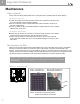
12 Troubleshooting Sometime the set up problems or other reasons will result in the false impression of display malfunctions. Please check before sent for repair: /+ If-%.5 following situations 0/7%2 ).
13 LED Status There are two status LEDs on the front of your Micro Chip Display Projection RP TV. You may obtain the display’s related status through the LED in the front panel. Their meanings are explained as follows: 0/7%2 ).054 Power LED ,!-0 34!453 Lamp LED Normal Operation States Power LED Lamp LED Status Description AC off Not lit Not lit AC power not connected Standby mode Orange Not lit AC power is connected and your RPTV is in standby mode.
14 Service Information and Announcement Service Information If troubleshooting information does not resolve your problem or if you have other questions relating to you Micro Chip Display Projection, visit www.vivitek.us You can also call our Service Center. Announcement All Rights Reserved. Vivitek Corp 48017 Fremont Blvd. Fremont, CA 94538 All Rights Reserved This publication is protected by copyright and all rights are reserved.
www.vivitek.us Vivitek Corp. 48017 Fremont Blvd.