51" RPTV www.vivitekcorp.
DEAR CUSTOMER Thank you for your purchase of this Rear Projection Television. To ensure safety and many years of trouble-free operation of your product, please read the Important Safety Instructions carefully before using this product. IMPORTANT INFORMATION WARNING: TO REDUCE THE RISK OF FIRE OR ELECTRIC SHOCK, DO NOT EXPOSE THIS PRODUCT TO RAIN OR MOISTURE.
WARNING: The cooling fan in the REAR PROJECTION TV continues to run for about 150 seconds before the REAR PROJECTION TV enters the standby mode. During normal Operation, when putting the REAR PROJECTION TV into standby mode always use the POWER button on the REAR PROJECTION TV or on the remote control. Ensure the cooling fan has stopped before disconnecting the power cord. DURING NORMAL OPERATION, NEVER TURN THE TELEVISION OFF BY DISCONNECTING THE POWER CORD.
WARING: FCC Regulations state that any unauthorized changes or modifications to this equipment not expressly approved by the manufacturer could void the users authority to operate this equipment. CAUTION: This product satisfies FCC regulations when shielded cables and connectors are used to connect the unit to other equipment. To prevent electromagnetic interference with electric appliances such as radios and televisions, use shielded cables and connectors for connections.
IMPORTANT SAFETY INSTRUCTIONS CAUTION : Please read all of these instructions before you operate this product and save these instruction for later use. Electricity is used to perform many useful functions, but it can also cause personal injuries and property damage if improperly handled. This product has been engineered and manufactured with the highest priority on safety. However, improper use can result in electric shock and/or fire.
IMPORTANT SAFETY INSTRUCTIONS Water and Moisture - Do not use this product near water-for example, near a bath tub, wash bowl, kitchen sink, or laundry tub; in a wet basement; or near a swimming pool; and the like. Selecting the location - Select a place with no direct sunlight and good ventilation. Ventilation - The vents and other openings in the cabinet are designed for ventilation.
Contents DEAR CUSTOMER IMPORTANT INFORMATION TRADEMARKS IMPORTANT SAFETY INSTRUCTIONS Contents Main Features Supplied Accessories Before Operating Your Rear Projection Television Cleaning & Maintenance Antenna Connections Television Antenna Connection Protection Using The Video and Audio Input Terminals Connecting your Digital Video Equipment (HDMI & DVI) Connecting your DVD Player Connecting your GAME CONSOLE or CAMCORDER Connecting Your Computer Computer Compatibility Chart Using the Center Channel Input
Main Features Please enjoy your Rear Projection Television (RPTV) that features: Texas Instruments latest DLP TM (Digital Light Processing) third generation HD4 Digital Micromirror Device (DMD) which features Smooth Picture TM technology for the very best image quality. Built in ATSC and NTSC tuners for enjoying digital and analog "off air" broadcast signals.
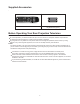
Supplied Accessories Size AA Dry Batteries (2pcs.) Multi-function Remote Control Before Operating Your Rear Projection Television Location For normal operation, your RPTV should be set up in the room where cool, adequate ventilation is provided. Do not position the back of the RPTV in a place where free airflow is restricted. Any magnetic force may disturb the color picture.
Viewing Your TV is best viewed by sitting directly in front of it about 10 to 18 feet from the screen. The brightness decreases as the viewer moves to the left or to the right of the set. During the daytime, reflections from light outside may appear on the screen. Drapes or screens can be used to reduce the reflection or the RPTV can be placed in a different location of the room.
Cleaning & Maintenance Cleaning the Screen The screen of the RPTV has been specially treated. To clean users should wipe the surface gently using only a cleaning or a soft, lint-free cloth. If the surface is particularly dirty, use a little water on the cloth (never directly on the screen), then wipe the screen with it. Reminders: Do not use substances such as glass cleaners, solvents and/or thinners. Do not scratch or hit the surface of the screen with fingers or any hard objects.
Antenna Connections To fully utilize the various features provided, such as the 2- Tuners Picture In Picture System, UNIVERSAL PLUS, and some connectors for high-quality VCR/DVD playback, set up this unit properly by following the procedures below. Remote Control The Remote Control is compatible with various VCR/DVD players and other manufacture's AV equipment by setting the correct control code.
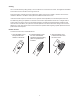
Antenna Connections Cable TV lead-in VHF, UHF or VHF/UHF combination antenna 75 ohm coaxial cable (round) or 300-75 ohm ADAPTOR (Not supplied) NOTICE: F-type connector F-type connector shold be finger-tightenned only. When connecting the RF cable to the TV set, do not tighten F-type connector with tools. If tools are used, it may cause damage to your TV set. (The breaking of internal circuit, etc.
Using The Video and Audio Input Terminals Using the Video and Audio Input Terminals Connecting video equipment for video playback. When the television is connected to video equipment as shown below , the material being played back on the video equipment can be seen on the television screen.
Connecting your Digital Video Equipment (HDMI & DVI ) Using Digital Video Digital video equipment and other devices that have a digital interface compliant with the HDMI & DVI (Digital Visual Interface) standard should be connected to the HDMI input of the RPTV. Note: 1. Turn off the power of the RPTV and digital video equipment. 2. Connect a HDMI cable to the output terminal of your digital video equipment and the other end to the HDMI input in the rear of your RPTV. 3.
Connecting your DVD Player Using S-Video or Composite video 1. Turn off the power of the RPTV and DVD player. 2. Connect the S-Video or video (yellow color) terminal from the rear of your DVD player to the S-Video or video (yellow color) terminal in the AV IN on the rear of your RPTV. 3. Connect the R (red color) and L (white color) audio connectors from the rear of your DVD player to the R (red color) and L (white color) audio input connectors in the AV IN 2 on the rear of your RPTV. 4.
Connecting your DVD Player Using Component Videoo 1. Turn off the power to the RPTV and DVD player. 2. Connect the PR or CR (red color) connector from the rear of your DVD player to the PR/CR (red color) connector in the COMPONENT IN 1 on the rear of your RPTV. 3. Connect the PB or CB (blue color) connector from the rear of your DVD player to the PB/CB (blue color) connector in the COMPONENT IN 1 on the rear of your RPTV. 4.
Connecting your GAME CONSOLE or CAMCORDER Using S-Video 1. Turn off the power of the RPTV and GAME CONSOLE or CAMCORDER. 2. Connect the S-Video terminal from your GAME CONSOLE or CAMCORDER to the S-Video terminal in AV IN 3 on the right side of your RPTV. 3. Connect the R (red color) and L (white color) audio connectors from your GAME CONSOLE or CAMCORDER to the R (red color) and L (white color) audio input connectors in AV IN 3 on the right side of your RPTV. 4.
Connecting Your Computer Using PC INPUT 1. Turn off the power of the RPTV and Computer. 2. Connect a VGA cable from the VGA CARD of your computer to the PC input in the rear of your RPTV. 3. Connect the Audio Out mini-jack from your computer to the VGA Audio ( L/R ) from the rear of your RPTV. 4. Turn on the power of the RPTV and your computer. 5. Select RGB using the INPUT button on the right side of the RPTV or on the remote control.
Computer Compatibility Chart Computer Compatible with sync on green signal XGA compatible in intelligent compression Intelligent Compression and Expansion System re sizing technology Multiple signal support Horizontal Frequency: 15-60 kHz, Vertical Frequency: 45-85 Hz, Pixel Clock: 12-80 MHz Sync signal: Compatible with TTL level Input mode RGB HDMI Signal Format 70Hz 640*400 85Hz 70Hz 720*400 85Hz 720*480 60Hz 60Hz 72Hz 75Hz 640*480 85Hz 56Hz 60Hz 70Hz 72Hz 75Hz 800*600 85Hz 60Hz 70Hz 1024*768 75Hz 128
Using the Center Channel Input You can use the RPTV speakers as a center speaker when using 5.1ch surround sound system. 1. Turn off the power of the RPTV and audio equipment which supports 5.1ch surround sound system. 2. Connect the center speaker connector from the rear of your audio equipment to the CENTER CHANNEL INPUT on the rear of your RPTV. 3. Turn on the power of the RPTV and audio equipment. 4. Press MENU button on the remote control and the "MAIN MENU" will be displayed on the screen. 5.
Using the Audio Output These terminals are used for connecting a stereo amplifier for Digital TV Audio Signals only. They relay (passthrough) the audio signals of all DTV programs displayed on the RPTV screen.
Side Control Section POWER Switch the TV "on" by pressing the POWER button once. To turn "off" the TV press the POWER button twice; the first time the button is pressed a message will appear on the screen warning that the second button press will power-off the TV. INPUT Repeated pressing of this button steps through the input sources in a circulatory sequence. Once you have selected all of the inputs you will return to the input you Started.
Status LED Front Panel Indicator READY LED Displays the status of the ready of your RPTV . POWER LED Lights green when powered on. Remote Control Sensor Point the Remote Control here as this is the window through which all of the remote signals pass to reach the remote sensor.
Remote Control Key Functions The Remote Control is a comprehensive remote that can be used to control up to eight different components. For ease of use with minimal room lighting the Remote Control has a back light that illuminates all of the buttons when any button is pressed. The light will automatically go off a few seconds after the last button is pressed. The Remote Control button functions are explained below.
Remote Control Key Functions VIEW MODE (WITH VIDEO) STRETCH 16:9 SIDE BAR 4:3 S.STRETCH ZOOM VIEW MODE (WITH PC) NORMAL STRET CH 16:9 DOT BY DOT ZOOM EXIT Exit the OSD, component or menus. Use these buttons to navigate the OSD menus. SEL Confirm an action on each menu item. and Select the main or sub (PIP) window to activate. INFO Display the current status of the video source, audio (and channel number when in TV mode), on the screen of your RPTV. MENU Activates the OSD Menu and Exit the OSD directly.
Remote Control Key Functions PIP Turn on or off the PIP (Picture In Picture) or POP (Picture On Picture) mode. PIP MODE Select the style of the PIP mode. AUDIO Selects audio effect mode. SWAP Swap the main picture and sub picture when the PIP or POP mode is on. Change the video source for the PIP or POP sub picture. When chosen with one of the Component buttons, tells the VCR, CD or DVD player to pause. MTS Selects stereo, sap and mono sound mode when input source is TV.
Remote Control Operation CAUTIONS : Do not drop or mishandle the remote control. Do not get the remote control wet. If the remote control gets wet, wipe it dry immediately. Avoid heat and humidity. When not using the remote control for a long period, remove the batteries. Do not take apart the batteries, heat them, or throw them into a fire. Using the PIP Feature on the Remote Control Press the PIP button on the Remote Control to activate the PIP (Picture-In-Picture) mode.
Remote Control Operation 1. Make sure that the component is turned on. 2. Press and hold the SETUP button on the Remote Control until the LED flashes twice. 3. Press 9 9 2, then press the component button on the Remote Control twice. Checking the Component Codes If you have set up the Remote Control using the Searching for Component Code procedure, you may need to find out which four-digit code is operating your equipment. To find out which code is operating your TV : 1. Press the TV button once. 2.
Menu Functions PICTURE ADJUST You can adjust the settings of the PICTURE( CONTRAST, BRIGHTNESS, COLOR, TINT, SHARPNESS, COLOR TEMP, NOISE REDUCTION, VIEW FORMAT.) AUDIO ADJUST You can adjust the AUDIO settings (TREBLE, BASS, BALANCE, EFFECT) for the internal SPEAKERS. PIP SETUP You can adjust the PICTURE IN PICTURE function. SETUP You can set LANGUAGE, SPEAKERS, CAPTION STYLE , DTV SETUP, HDMI and input source settings.
Using the On Screen Display (OSD) Menu Operations The OSD consists of a Main Menu of items and each of these items has a Sub Menu associated with it that the OSD will switch to when the item is selected. 1. Press the MENU button on right side of the RPTV or remote control : The Main Menu will be displayed on the screen, as shown below. 2. Press the ADJUST (CH+) or ADJUST (CH -) button on right side of the RPTV or the , button on the remote control to highlight the feature you wish to select. 3.
Using the On Screen Display (OSD) AUDIO ADJUST (DYNAMIC) 35 35 R15 TREBLE BASS BALANCE EFFECT DEFAULT OFF NG SELECT ENTER OK PIP SETUP PIP 4 : 3 15 65 65 35 SELECT ENTER OK TREBLE - Adjusts the treble. BASS - Adjusts the bass. BALANCE - Adjusts the balance level for two speakers. EFFECT - Adds simulated audio effects. Switch for OFF, BBE, SURROUND, SIM.STEREO. DEFAULT - Return to default value.
Using the On Screen Display (OSD) AUDIO (DTV) AUDIO 1. LANGUAGE STEREO - You can choose any language or any sound effects on this option. AUDIO SETUP - You can setup your Digital Audio Output. Sound effects to DOLBY DIGITAL or PCM. AUDIO (DTV) AUDIO 1. LANGUAGE STEREO AUDIO SETUP DOLBY DIGITAL SELECT ENTER OK BACK EXIT TV TUNER SETUP CABLE CH CH 3 ADD ANTENNA / CABLE AUTOPROGRAM CHANNEL FAVORITE1 FAVORITE 1(CABLE) - For DTV favorite channel memory and setup.
Using the On Screen Display (OSD) PARENTAL CONTROLS MPAA RATING PG TV RATING STATUS OFF NEW ACCESS CODE RECONFIRM 12. Press the SEL button to open the "TV RATING" Menu.
Setting a Password for Parental control You control access to the Parental Control features with a password. The default password is 0000. You can change the password to any four-digit number. To change the password: 1. Press the TV button on the remote control. 2. Press the MENU button on the Remote Control and the Main Menu will be displayed on the screen, Please refer to Page 27. 3. Press the or button to select "PARENTAL CONTROLS". 4.
Using Wide Modes: View Mode Wide screen mode allow you to change the aspect ratio on screen. You can press the Aspect button on the REMOTE CONTROL to change the aspect ratio on screen. Press Aspect 1. The View mode message displays. 2. The menu lists the Aspect options selectable for the type of video signal currently received. 3. Press Aspect button while the Aspect menu is still on the screen. 4. You can sequentially select an Aspect that has its own aspect ratio.
Replacing the Lamp The projection lamp has a limited life which illuminates the picture. If the screen becomes dark, the color looks unusual, or the Lamp LED indicator on the front of the RPTV lights the screen shows message of "PLEASE REPLACE THE LAMP", it is time to replace the lamp with a new one (not supplied). (Users should replace the lamp in the television approximately every 6,000 hours to maintain the best possible image quality. Do not use a lamp past the rated lamp life.
Replacing the Lamp When the "Lamp Replacement" warning appears on screen it is time to replace the lamp. (Lamp LED warming light will appear red). Press "OK" to make the warning disappear. After replacing the lamp please reset the lamp timer. Make sure to reset the lamp timer only when replacing the lamp. If you reset the lamp timer and continue to use the same lamp this may cause the lamp to explode. To Reset Lamp Timer please follow these steps: 1.
Troubleshooting Guide Use the following information to solve common problems. Symptom Possible Solutions No picture Make sure that the power cord is plugged into a grounded electrical outlet. Make sure that the Power button is turned on. Look in the left air vent to see if the lamp is on. Make sure that the selected input source is connected to a working component. If the other component is not working, correct the problem with the other component.
Symptom Possible Solutions Screen brightness is diminished. Video display components experience degradation of brightness over the life of the component. Normal brightness degradation is not covered by the warranty. Check brightness setting Check lamp timer Replace lamp The LED on the Remote Control does not blink when a button is pressed. Replace the batteries with two "AA" new alkaline batteries. See "Inserting batteries" on page 4.
Specifications Optical System Texas Instruments HD4 DLP TM DMD Screen size 51 inches Diagonally Channel Coverage VHF 2-13 UHF 14-69 DTV 1-999 CATV 2-125 Lamp UHP AC 120W Television System NTSC ATSC Input & Output Right Side Input : Audio/Video in: (S-Video, Video, Audio-L/R) x 1 Rear Side Inputs/Outputs : Antenna in: Analog x 1, Digital x 1 Component in: (Y, PB, PR, Audio-L/R) x 2 Audio/Video in: (S-Video, Video, Audio-L/R) x 2 Digital Audio Output (for ATSC only): Coaxial x 1, Optical x 1
Dimension UNIT : inch/[mm] 35.23 [894.80] 27.94 [709.80] 47.47 [1205.80] 16.53 [419.
Input / Output Terminals and Connectable Equipment HDMI TERMINAL Connecting video equipment with DVI and HDMI input terminal (DVD player, STB etc.). (See page 9) RGB TERMINAL Connecting the computer to display the PC MODE (See page 13) PC INPUT AUDIO(L/R) FOR SERVICE ONLY HDMI RGB CENTER CHANNEL INPUT L (RS-232C) AUDIO R CENTER CHANNEL INPUT (See page 15) Enter the S-VIDEO or the VIDEO terminal can be used, but the S-VIDEO overrides the VIDEO terminal.
APPENDIX: Remote Control IR Set Up Codes TELEVISION codes Manufacturer Program Code Addison Admiral Advent Aiko Aiwa Akai Albatron America Action Anam Anam National Anhua AOC Apex Digital Audiovox Baile Beijing Bell & Howell BenQ Bradford Broksonic Cailing Candle Carnivale Carver Celebrity Celera Changcheng Changhong Ching Tai Chun Yun Chung Hsin Cinema Citizen Clarion Commercial Solutions Conrowa Contec Craig Crosley Crown Curtis Mathes CXC Daewoo 10092 10093, 10463 10761, 10842 10092 11914 10812, 10702
TELEVISION codes Manufacturer Program Code Fujitsu Funai Furi Futuretech Gateway GE 10809, 10853 10180, 10171, 11904 10145 10180 11756, 11755 11447, 10047, 11454, 10051, 10451, 10180, 10030, 10178, 11917, 10092, 11907, 11922 10017, 10030 10154, 10030, 10178, 11926 10180 11034 10178 10180, 10030, 10178 11904 10054 10180 10093 10865 10451 10156, 10748, 10145, 11156, 10156, 10030, 10178, 11145, 10145, 10092, 11904, 11156 10093 10145 10145 10051 10661 10054 10017 10054 10000 10156, 10051, 10236, 10092 10761
TELEVISION codes Manufacturer Program Code Mitsubishi Monivision Motorola MTC Mudan Multitech NAD National NEC Newave Nikko Norcent NTC Onwa Optimus Optonica Orion Panasonic Panda Penney Philco Philips Pilot Pioneer Portland Prima Princeton Prism Proscan Proton Pulsar Qingdao Quasar RadioShack RCA 10154, 10250, 10093, 10236, 10180, 11250, 10150, 10030, 10178, 11917, 10836 10843, 10700 10093 10060, 10030 10051 10180 10156, 10178, 10866 10051 10154, 10156, 10051, 10053, 10030, 10178, 11704 10093, 10178, 10
TELEVISION codes Manufacturer Program Code Sowa Squareview SSS Starlite Studio Experience Supreme SVA Sylvania Symphonic Synco Tacico Tandy Tashiko Tatung Technics Techwood Teco Teknika Telefunken Tera Thomas Tiane TMK TNCi Tobo Toshiba Tuntex TVS V Inc.
VCR codes Manufacturer Program Code Bell & Howell Broksonic Calix Canon Carver CCE Changhong Citizen Colt Craig Curtis Mathes Cybernex CyberPower Daewoo Dell Denon DirecTV Durabrand Electrohome Electrophonic Emerex Emerson 20104 20184, 20121, 20209, 20002, 20479 20037 20035 20081 20072, 20278 20048, 20081 20037, 20278 20072 20037, 20047, 20240, 20072 20060, 20035, 20162 20240 21972 20045, 20104, 20278 21972 20042 20739 20039, 20038 20037 20037 20032 20035, 20037, 20184, 20240, 20045, 20121, 20043, 20249,
VCR codes Manufacturer Program Code Memorex MGA MGN Technology Microsoft Mind Minolta Mitsubishi Motorola MTC Multitech NEC Newave Nikko Noblex Northgate Olympus Optimus Orion Panasonic Penney Pentax Philco Philips Pilot Pioneer Polk Audio Profitronic Proscan Protec Pulsar Qisheng Quasar Radix Randex RCA Realistic ReplayTV Runco Sampo Samsung Sanky Sansui Sanyo Scott Sears Sharp Shintom Shogun Singer Sonic Blue Sony STS Sylvania Systemax Tagar Systems Tashiko Tatung 20035, 20162, 20037, 20048, 20039, 200
VCR codes Manufacturer Program Code Technics Teco Teknika Tivo TMK Toshiba Totevision Touch Unitech Vector Vector Research Victor Video Concepts Videomagic Videosonic Viewsonic Wards White Westinghouse XR-1000 Yamaha Zenith ZT Group 20035, 20162 20035, 20037, 20048, 20038 20035, 20037 20636, 20618, 21503, 20739 20240 20045, 20042, 20067, 20043, 21503, 21008, 21972 20037, 20240 21972 20240 20045 20038 20067 20045 20037 20240 21972 20060, 20035, 20048, 20047, 20081, 20240, 20042, 20072 20209, 20072 20035,
DVD codes Manufacturer Program Code Koss Lasonic LG Liquid Video Lite-On Loewe Magnavox Marantz Memorex Microsoft Mintek Mitsubishi Nesa Norcent Onkyo Oritron Panasonic Philips Pioneer Polaroid Polk Audio Portland Proscan Qwestar RCA Rio Rotel Sampo Samsung Sansui Sanyo Sharp Sharper Image Sherwood Shinco Shinsonic Sonic Blue Sony SVA Sylvania 20651, 21980 20798 20591, 20869, 20801 21980 21158, 21058 20511 20503, 20539, 21976, 21914, 20675 20539 20695 20522 20717 21521, 20521 20717 21003 20503, 20627, 21
Cable codes Manufacturer Program Code ClearMax Coolmax Daeryung Digi Director Dumont Gehua General Instrument GoldStar Hamlin Hitachi Jerrold KNC LG Memorex Motorola MultiVision Pace Panasonic Panther Paragon Philips Pioneer Pulsar Quasar RadioShack Regal Runco Samsung Scientific Atlanta Sony Starcom Supercable Supermax Tocom Torx Toshiba Trans PX Tristar TS V2 Viewmaster Vision Vortex View Zenith 00883 00883 01877, 00877, 00477, 00008 00637 00476 00637 00476 00476, 00810, 00276, 00003, 00014 00144 00009
Cable codes Manufacturer Program Code GE General Instrument GOI Goodmans Hisense Hitachi HTS Hughes Network Systems I-Lo JVC LG Magnavox Memorex Mitsubishi Motorola NEC Next Level Panasonic Paysat Philips Proscan Proton RadioShack RCA Samsung Sanyo SKY Sony Star Choice Tivo Toshiba UltimateTV Uniden US Digital USDTV Voom Zenith 00566 00869 00775 01246 01535 00819, 00222, 01250 00775 01142, 00749, 01749, 01442 01535 00775 01414, 01226 00724, 00722 00724 00749 00869 01270 00869 00247, 00701 00724 01142, 00
CD Players codes Manufacturer Program Code Aiwa Burmester California Audio Labs Carver Denon DKK DMX Electronics Dynamic Bass Fisher Garrard Genexxa Harman/Kardon Hitachi Integra JVC Kenwood Krell Linn Magnavox Marantz MCS Miro Mission MTC NSM Onkyo Optimus Panasonic Parasound Philips Pioneer Polk Audio Proton QED Quad Quasar RadioShack RCA Realistic Rotel SAE Sansui Sanyo SAST Sharp Silsonic Sonic Frontiers Sony Soundesign TAG McLaren Tascam Teac Technics Victor Wards Yamaha Zonda 30157 30420 30029 3015
Receivers codes Manufacturer Program Code ADC Aiwa Anam Audiotronic Bose Capetronic Carver Coby Denon Fonmix Glory Horse Harman/Kardon Hitachi Inkel Integra JBL JVC Kenwood KLH Magnavox Marantz MCS Onkyo Optimus Panasonic Philips Pioneer Proscan Qisheng Quasar RadioShack RCA Sharper Image Silsonic Sony Soundesign Stereophonics Sunfire Teac Technics Thorens Victor Wards Yamaha 30531 31405, 31243, 30121 31609, 31074 31189 31229 30531 31189 31263 31360, 31142, 30904 31360 31263 30110 31273 30027 30135 30110
Index D A Digital Audio Output ------------------------------------Digital Video -----------------------------------------------DISP.
Index OFF ------------------------------------------------------------ 26 OK button (Remote Control) ------------------------- 19 OK button (Side Control Section) ------------------- 16 On Screen Display (OSD) ------------------------------ 25 Optical Terminal ------------------------------------------- 15 OPTION ------------------------------------------------------ 24, 28 SIZE ----------------------------------------------------------SLEEP button (Remote Control) ------------------SLEEP TIMER ----------
www.vivitekcorp.