
Config Guide


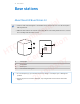
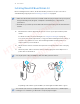
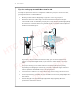
Table Of Contents
- Unboxing
- Headset and link box
- Headset
- About the VIVE Pro HMD
- Putting on the VIVE Pro HMD
- Adjusting the IPD on the headset
- Can I wear my prescription glasses while using VIVE Pro Eye?
- Adjusting the lens distance on the headset
- Replacing the face cushion
- Connecting a USB device to the VIVE Pro HMD
- Removing the headset earphones
- Replacing the headset earphones
- Reattaching the head pad on the headset strap
- Updating the headset firmware
- What does the status light on the headset mean?
- What is the dual camera used for?
- Link box
- Product care and repair
- Troubleshooting
- What can I do to troubleshoot the headset?
- What can I do when the status light on the headset indicates an error?
- What should I do if the headset is not tracked?
- My headset display is blurry. What should I do?
- What can I do to resolve the "headset not found" error?
- My headset can't be detected due to a USB port issue. What should I do?
- After upgrading to Windows 10, VIVE shows as the computer's main monitor. What should I do?
- I'm experiencing skipped frames. What could I do?
- I'm seeing drifting motion or floating objects in VR. What could I do?
- Can I use the type-C USB earphones that came with my HTC phone?
- Is there a way to also hear from the computer what's in VR?
- What can I do if the headset's dual camera won't turn on?
- What should I do if there's cracking noise from the headset earphones?
- What can I do if the headset connection status is unstable?
- The headset display suddenly turns blank. What can I do?
- How do I install the driver updates for the VIVE Pro Eye dual camera on Windows 7?
- Headset
- Base stations
- About SteamVR Base Station 2.0
- Installing SteamVR Base Station 2.0
- Tips for setting up SteamVR Base Station 2.0
- How many SteamVR Base Stations 2.0 can I use in a single setup?
- What things should I consider when installing more than two SteamVR Base Stations 2.0?
- Setting up additional base stations
- What are the minimum and maximum play area when using more than two SteamVR Base Stations 2.0?
- My available space has an irregular shape. Can I still set up more than two SteamVR Base Stations 2.0?
- Can I use an odd number of SteamVR Base Stations 2.0?
- Configuring the base station channels
- How can I check which base stations are currently in use?
- Using the mounting kit
- Cleaning the base stations
- Updating base station firmware via Bluetooth
- What does the status light on the base stations mean?
- What should I do if any of the base stations is not detected?
- Can I use the older version of the base stations together with SteamVR Base Station 2.0?
- Which VIVE hardware are compatible with my base stations?
- Are the base stations covered by warranty if accidentally damaged?
- Controllers
- About the VIVE Controllers (2018)
- Charging the controllers
- Turning the controllers on or off
- Pairing the controllers with the headset
- Attaching the lanyards to the controllers
- Updating controller firmware
- What does the status light on the controllers mean?
- What should I do if any of the controllers is not tracked?
- How do I know which of the controllers is not being tracked?
- What can I do if the controller's trackpad is oversensitive?
- What should I do if my controller won't turn on?
- The controller automatically turns off. What should I do?
- My controller won't turn on after I accidentally unplugged it during firmware update. What should I do?
- Play area
- What is the play area?
- Planning your play area
- Choosing the play area
- Setting up VIVE Pro Eye for the first time
- Setting up a standing-only play area
- Setting up a room-scale play area
- Resetting the play area
- Verifying your setup
- After setting up, how do I turn the VIVE system on?
- What is the recommended space for the play area?
- Can I include space occupied by furniture for the play area?
- Will VR apps for seated/standing-only experiences work with room-scale setup?
- How do I resolve download errors during VIVE Setup installation?
- I can't complete the room setup. What should I do?
- Settings
- Audio settings
- System Dashboard settings
- VIVEPORT app settings
- Phone notifications
- Downloading and installing the VIVE phone app
- Pairing your phone with VIVE
- Choosing which notifications to receive on VR
- Receiving notifications while in VR
- Checking your notifications
- Editing or adding message replies (Android users)
- Unpairing your phone with VIVE
- What types of phone notifications can I receive on VIVE Pro Eye?
- Can I receive notifications from more than one phone on VIVE Pro Eye?
- What features of the VIVE phone app are not supported in the iOS version?
- SteamVR
- Trademarks and copyrights
- Index

Installing SteamVR Base Station 2.0
Before installing the base stations, decide first whether you want to set up a room-scale or
seated/standing-only play area. See Planning your play area on page 54.
§ Make sure that the base stations are installed outside the play area and securely set up from
being accidentally struck, dropped, or bumped to avoid damage or compromised
performance.
§ Remember to peel off the protective film from the front panel after you've mounted the base
stations.
1. Mount the base stations diagonally at opposite corners of your space and near power
outlets.
For details on how to use the mounting kit, see Using the mounting kit on page 43.
You can also use tripods, light stands, or cargo poles when mounting the base stations, or
even place it on stable book cases. Just avoid using unstable mounting solutions or
surfaces that are prone to vibration.
2. Adjust the base stations so that the front panels are facing toward the center of the play
area.
3. Attach the power cables to the base stations, and then plug each of the adapter into a
power outlet to turn them on.
Use only the power cables and adapters that came with your base stations.
Depending on the variant of your hardware, the status lights should be white or green.
Once turned on, do not move or adjust the angles of the base stations as it could disrupt the
tracking process. Otherwise, you will need to set up the play area again.
38 Base stations
HTC Confidential
For Certification
2019/03/07