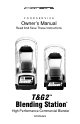
F O O D S E R V I C E Owner’s Manual Read And Save These Instructions TM T&G 2 Blending Station ® High Performance Commercial Blender All Models
IMPORTANT SAFEGUARDS 1. Read all instructions. 2. To protect against risk of electrical shock, do not put motor base in water or other liquid. 3. Close adult supervision is necessary when appliance is used by or near children. 4. Unplug the power cord from the wall outlet when the T&G 2 Blending Station ® is not in use, before putting on or taking off parts, and before cleaning other than washing the container. 5. Never contact moving parts. 6.
13. Always operate with the lid in place. 14. Display window area will scratch when contacted with a scouring pad or sharp object. Use a soft cloth to wipe the control panel area clean. 15. The T&G 2 Blending Station® cannot be cleaned with a water jet. 16. Installation for a 120 VAC unit requires you to have at least one 20 amp outlet per machine, available within six feet of the T&G 2 Blending Station. 220 VAC and 100 VAC units require a dedicated line. Consult an electrician for proper electrical needs.
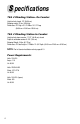
S pecifications T&G 2 Blending Station® On-Counter: Height of unit closed: 22” (54.56 cm) Shipping weight: 21 lbs. (9.534 kg) Dimensions: 22” High x 9-1/4” Wide x 10-1/2” Deep (54.56 cm x 23.45 cm x 25.86 cm) T&G 2 Blending Station In-Counter: Height of unit above counter: 17-1/2” (44.45 cm) closed Depth of unit below counter: 5-2/3” (13.3 cm) Shipping Weight: 18 lbs. (8.172 kg) Dimensions: 24” total height x 9” Width x 12-3/4” Depth (45.03 cm x 22.65 cm x 32.
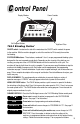
C ontrol Panel Display Window Owner Controls Six Program Buttons High/Low Pulse ® T&G 2 Blending Station ON/OFF switch - Located on the side of the motor base the ON/OFF switch controls the power to the machine. With the machine plugged in, switch the machine to ON to ready the machine for blending. SIX PROGRAM buttons - These buttons, numbered 1 thru 6, are pre-programmed blending cycles designed for the most commonly made drinks.
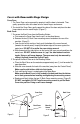
L id Assembly NOTE: Outside the United States and Canada, your T&G 2 Blending Station may come with a different container configuration. Two-part Lid 32 oz. (900 ml) Xtreme Performance Container The two part lid is easy to clean and easy to put on, take off & seal. • To remove a fully latched lid, lift the two tabs and pull upward and off. • Twist the center lid plug to fasten or remove. Figure A Older 48 oz (1.4 liter) and 64 oz (2.0 liter) Vita-Mix containers will work on the T&G 2.
Cover with Removable Hinge Design Cover Door: 1. The Cover Door can be removed by opening it until the door is horizontal. Then, gently spread the sides of the door over the round hinges and remove. 2. To reinstall the Cover Door, gently spread the sides of the door and place the door hinge cutouts over the round hinges. (Figure C) Back Cover: 1. To remove the Back Cover from the Blending Station: a. First remove the Cover Door from the unit, as described above. b.
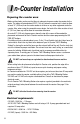
I n-Counter Installation Preparing the counter area: • Before cutting holes, make sure that there is adequate clearance under the counter for the motor. The motor will extend about 5-2/3" (14.4 cm) below the counter but it is best to allow at least 10" (25.5 cm) from the under-counter to shelves or any other equipment under the counter. Also, when using the removable cover design, the back of the hole must be at least 6” (15.2 cm) from any wall to allow for cover door clearance. • An extra 6.5” (16.
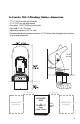
In-Counter T&G 2 Blending Station® dimensions: • 17-1/2” (44.45 cm) high with lid closed • 21-1/2” (54.7 cm) high with lid open • Case depth: 12-3/4” (32.39 cm) with handle • Case width: 9-1/2” (24.13 cm) • Depth below counter: 5-2/3” (14.4 cm) • Recommended distance between machines: 12” (30.48 cm) from the edge of each machine or as far apart as possible. 21-1/2” (54.7 cm) 6” (15.2 cm) 12-3/4” (32.39 cm) 12” (30.48 cm) 12” (30.
I n-Counter Gasket Gasket Installation Instructions: 1. Follow the instructions on page 8 on preparing the counter area for the installation of your In-Counter T&G 2 Blending Station.® Also, use the Template Sheet (provided in your machine’s original package) to assist you in the placement and ventilation of your machine. 2. Lay the blender on its back with the motor pointing toward you. Allow 1-2 in. (2.54 -5.
ustom Programming The T&G 2 Blending Station® advanced electronic control can be custom programmed by using the control panel. The two different programming instructions are explained below: Programming One of the Six T&G 2 Blending Station PRE-SET buttons 1. Press the OWNER CONTROL button (Vita-Mix Logo). 2. Press the PULSE High/Low buttons to scroll thru the ‘RECIPE’ numbers. 3. Press the number of the button for programming.
I nstructions How to operate your T&G 2 Blending Station® using the six Programmed Buttons. The following is the basic factory settings of the six PROGRAMMED buttons: • Press Button One for program - SMOOTHIE - Blends drinks with just juice and ice. • Press Button Two for program - SMOOTH 2 - Blends regular smoothies for an extended cycle. • Press Button Three for program - COFFEE - Blends light coffee drinks. • Press Button Four for program - SHAKES -This cycle is good for ice cream and milkshakes.
7. When the cycle is complete the blender stops. Wait until blade comes to a complete stop before removing the lid and/or container from the motor base. 8. Remove the container, pour, garnish and serve the drink. NOTE: On all units the built-in thermal sensor keeps track of how hot the motor gets and will warn the user and eventually shut down the motor if the motor is overheating. When overheated the display will instruct the user to remove the container and run the machine until cool.
P arts List Item# Part #15573 32 oz. (900 ml) - XP Container without lid assembly or blade assembly #15571 32 oz. (900 ml) - XP Container, blade assembly, no lid assembly #1159 32 oz. (900 ml) - Lid plug #15570 32 oz. (900 ml)- XP Container, blade assembly & lid assembly #15574 32 oz. (900 ml) - 2-piece lid assembly for XP Container #15575 32 oz.
#1159 #15574 #15575 #15603 #15573 #15570 #15571 #15598 #15585 #15576 One-Piece Lid (Sold Separately) #891 32 24 #15579 16 #15596 Retainer Nut Wrench (Sold Separately) 8 4 #18003 #18005 #18002 #18004 15
C are and Cleaning Care Note To ensure that you get the longest possible life from your Vita-Mix product, we recommend the following products, when used as directed by the supplier: Cleaning Product ..........................................................................Supplier Solid Supra, Solid Power, ..............................................................Ecolab, Inc., St. Paul, MN Guardian Acclaim, Solid Guardian Plus, ........................................
Motor Base 1. Unplug the power cord. 2. Wash outside surface with a damp soft cloth or sponge, which has been rinsed in a mild solution of liquid dish soap (Ivory Liquid® or equivalent) in warm water. NEVER IMMERSE MOTOR BASE IN WATER OR OTHER LIQUID. NEVER POUR WATER OR ANY OTHER LIQUID ON THE MOTOR BASE. 3. Polish with a soft cloth. Control Panel Gently wash the front panel with a soft cloth and a low pH balanced soap, being careful not to scratch the Display Window.
T roubleshooting Top nine problems you can fix on your own: 1. Problem: • Display Panel reads THERMAL SENSOR FAILURE Solution #1: Turn the machine off and on again to reset the programming. Solution #2: Call Vita-Mix Customer Service.* 2. Problem: • Loud noise from blender container blade area • Container blades do not spin • Increased vibration • Leaking from bottom of container Solution #1: Broken or worn Drive Socket. Replace (Item # 891). Instructions are included with part.
7. Problem: Solution #1: • Machine is running irregular • “NO PROGRAM” is displayed when a button is pushed • Button pressed starts the wrong program • Machine starts by itself • A specific program button is defective • Machine was turned off for a day, week or month and turned on, there was no power • Machine did not work right out of the box • Machine works but no information displayed on screen • Program buttons run the blender on the same speed 8.
B lade Agitator Assembly 32 24 Blade Agitator Assembly. Use caution when handling the blade; it is sharp. When inserting the blade assembly through the container bottom, grip the blades with a soft cloth, align the flat sides of the blade assembly with the flat sides of the container. Place the retainer nut back on the inserted blade assembly and tighten clockwise. Do not force. Do not attempt to disassemble blade assembly. 16 8 4 Drive Spline.
W arranty Limited Warranty Vita-Mix® Corporation warrants your Commercial T&G 2TM Blending Station® to be free from defects in materials and workmanship for a period of three years from the date of purchase when used in accordance with the accompanying instruction booklet.
S ervice Contract PLEASE NOTE: The Sevice Contract outlined in the following paragraph applies only to customers in the United States and Canada. Customers in all other countries should contact their local Vita-Mix distributor for service details. This T&G 2TM Blending Station® includes a 1-Year Service Contract effective from date of purchase. In the event your machine should need parts or repairs, covered under this Service Contract, call Vita-Mix® customer service immediately for instructions.
VITA-MIX® CORPORATION Foodservice Division 8615 Usher Road, Cleveland, Ohio 44138-2103 USA www.vitamix.com/foodservice ©2005 Vita-Mix Corporation. No part of this publication may be reproduced or transmitted in any form or by any means, electronic or mechanical, including photocopy, recording or any information storage and retrieval system without the written permission of the Vita-Mix Corporation. Printed in U.S.A.