
User manual


Installation Guide
22 Harmony 2ES and 4ES
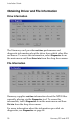
• Draw Desktop - does a screen capture of the computer’s
screen and displays it as an on screen display. This it a
way to test other on screen display settings such as
position and transparency.
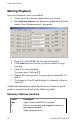
There are a number of functions for adjusting the appearance
of the on screen display.
•
Position - Set the specific location of the graphic over the
video using the
X (left-right) and Y (up-down)
coordinates or the
Center check box.
Setting
X = 0, Y = 0 positions the graphic overlay to the
the upper left corner of the screen.
•
Transparency - Set the level of transparency of an overlay
image using the
Color, All Colors, Mix, and Cutout controls.
Color selects a specific color, 0 - 255, from the .bmp
palette to be transparent.
All Colors used with Mix, this sets all of the colors to be
transparent.
Mix sets the amount, 0 - 255, of transparency: 0 =
invisible,
255 = totally opaque.
Cutout automatically selects the color of the pixel in the
graphic overlay’s lower left hand corner as the keyed
color and removes it from the image. Cutout is useful
when the image in the overlay is an irregular shape and
is surrounded by a solid color background.
•
Reduce Flicker - Set this control to make the display
appear sharper or reduce flickering. Flickering is
sometimes seen in images with sharp lines.
•
Fade to Black - Create an automatic fade-out for the
overlay.
Checking the box causes the display to slowly fade to
black.
Unchecking causes the image to reappear.
Other on screen display functions are:
•
Load - Copies the graphic image and it’s display
parameters to the Harmony onboard memory.
•
Show - Turns On the graphic overlay.
•
Hide - Turns Off the graphic overlay.