
Owner`s manual


28
Figure 40: Corner brackets for
trim.
Figure 41: Two pieces of
corner bracket.
2� Attach the other side trim piece to the
top trim, using the same method used
in Step 1�
3� Using three (3) T-20 screws on each side
attach the hinges on the side surround
panels to the unit’s side panels (refer to
Figure 35)�
4� Plug the wiring harness into the control
panel (see Figure 31)�
Surround
Panel
Installation
inStaLLation anD RemovaL of the SuRRounD PaneLS - inSeRt
1� Attach one side trim to the top trim, using a corner bracket (see Figure 33) to secure pieces together�
There are two (2) main pieces to each corner bracket (see Figure 34)� When installing the corner
pieces into the trim, the “B FACE” sides must face each other and the screw heads are to face out�
With the bracket in place and the top and a side trim snug together, use a flat head screwdriver to turn
the two (2) screws in the bracket to tighten it into the trim�
Figure 42: Panel placed on unit.
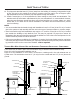
5� Loosen the front hopper lid screws and center the top surround
panel under the hopper lid�, tighten screws�
6� Insert each side panel anchor bolt through the top panel into
the corresponding side panel holes and tighten using a
7
/16”
wench or socket (refer to Figure 36)�
7� Place assembled trim over the surround assembly�
REMOVAL:
When maintenance is required on the unit the surround must be
removed� Follow steps 4 through 7 in reverse order�
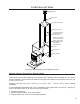
Figure 43: Assembling the Surround
Panel, back view.
Side surrounds
swing out
Figure 44: Side surround panel swings forward.
The side panel can
remain attached because
they swing forward for
easy access (refer to
Figure 37)�