
Owner`s manual


24
Installation
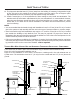
Figure 34: Outside Vertical Installation.
Refer to Figures 28 and 29�
1� Install the hearth pad�
2� Lock fireplace damper in the
open position�
3� Install a positive flue connector
at the fireplace dampers�
4� Connect a tee or a 90° elbow
to the exhaust pipe�
5� Install flexible stainless steel
liner or listed pellet vent to the
top of the chimney�
heaRth mount inStaLLation - fReeStanDing:
Figure 35: Freestanding hearth mount installation.
Non-combustible
floor protection.
Existing floor
(combustible)
6"
(15 cm)
Rain cap
Flashing
24"
(61 cm)
2"
(5 cm)
Tee with
cleanout
Fresh air
intake
3" (7.5 cm)
Clearance
Support
bracket
Type "L"
vent
Floor
Protection
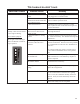
Combustible FloorMasonry Fireplace
Min 6"
(150 mm)
Rain Cap
Steel Plate or Flashing
Flexible or Rigid 6"
Stainless Steel Liner
10" (25.4 cm) Mantel
Minimum 8" (20 cm)
from top of stove
Damper Removed
or Fastened Open
Fresh-air intake
Clean-out tee
Fresh-air intake
should come from
chimney. If holes
already exist,
fresh-air intake can
be taken through
back of fireplace or
through ash dump.