
Owner`s manual


23
Installation
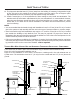
inSiDe veRticaL inStaLLationS - fReeStanDing
1� Choose a stove location that is ideal� See the section “deCIdIng Where to loCate your Pellet aPPlIanCe�”
Figure 33: Inside Vertical Installation.
2� Place a non-combustible hearth pad
where necessary�
3� Place the unit on the hearth pad (if
installed on a carpeted surface) and
space the unit in a manner so when
the pellet vent is installed vertically,
it will be 3” (7�6 cm) away from a
combustible wall�
4� Locate the center of the fresh air
intake pipe on the unit� Match that
center with the same point on the
wall and cut a hole about 1 ⅝” (41
mm) in diameter�
5� Install the fresh air intake pipe�
6� Install the tee with clean out�
7� Install the pellet vent upward from
there� When you reach the ceiling,
make sure that the vent goes through
the ceiling fire stop� Maintain a 3”
(7�6 cm) distance to combustibles
and keep attic insulation away from
the vent pipe� Maintain an effective
vapor barrier�
8� Finally, extend the pellet vent to go
through the roof flashing�
9� Ensure that the rain cap is
approximately 36” (900 mm) above
the roof�
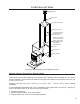
outSiDe veRticaL inStaLLationS - fReeStanDing
To accomplish a outside vertical pipe installation, follow steps 1 through 5 in the “InsIde VertICal InstallatIons
- freestandIng” section and then finish it by performing the following (refer to Figure 27)�
1� Install a tee with clean out on the outside of the house�
2� Install PL vent upward from the tee� Make sure that you install support brackets to keep the vent
straight and secure�
3� Install ceiling thimble and secure the flashing as you go through the roof�
4� Ensure that the rain cap is approximately 36” (91�5 cm) above the roof�
Non-combustible
floor protection.
Existing floor
(combustible)
6"
(15 cm)
3" (7.5 cm)
clearance
Use wall thimble
or ceiling firestop
Rain cap
Flashing
24"
(61 cm)
3"
(7.5 cm)
Tee with
cleanout
Fresh air
intake
6"
(15 cm)