Routing User Guide-DRAFT VistA Imaging V. 3.
Routing User Guide-DRAFT Patch 18 April 2006 Property of the US Government No permission to copy or redistribute the software described in this document is given. Use of unreleased versions of this software requires the user to execute a written test agreement with the VistA Imaging Development Office. This is a controlled document. No changes to this document may be made without the express written consent of VistA Imaging Development Office.
Contents Introduction........................................................................................................ v Terms of Use....................................................................................................................v About this Manual ............................................................................................................vi Related Documents .........................................................................................................
Routing User Guide Contents Troubleshooting Routing .................................................................................. 65 Basic Troubleshooting .....................................................................................................65 Getting Help ...................................................................................................................65 Additional Routing Considerations..................................................................................
Introduction This manual explains how to configure and use the routing capability of the VistA DICOM Gateway. This manual also explains how to use the on-demand routing capability of the VistARad diagnostic workstation software. This manual is intended for: Staff at VA Medical Centers who are responsible for setting up and maintaining Routing Gateways. Clinical staff who need to use VistARad for on-demand routing.
Introduction Routing User Guide About this Manual Using this Manual This document contains material of interest to different types of users. User Please read… All users The Routing Overview and the Glossary. The Index can also be used to find information about specific topics in this document. Clinical users The Using VistARad in a Routing System chapter. Users responsible for DICOM Gateway operation and maintenance The Using the Routing Gateway chapter.
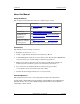
Routing User Guide Introduction Revision Table Date Rev. Notes 25 Jun 2002 .9 Draft. Based on 23 Sep 1999 “Autorouting Tutorial.” Updated for Patch 9, test 2 distribution. 20 Mar 2003 1.0 Final version for p9 release. A. McFarren, E. deMoel 22 Sep 2003 1.1 Minor p22 updates in VistARad chapter. Added info about routing rules and priority that was not included in original rev. Minor clarifications and corrections throughout. A. McFarren, J. Christensen. 30 Jul 2005 1.
Introduction Routing User Guide This page is intentionally blank. viii VistA Imaging V. 3.
Routing Overview This chapter explains how routing functions within the VistA Imaging system. It covers the following topics: Routing Explained How Autorouting Works How On-Demand Routing Works How Routing Priority Works Routing Explained In VistA Imaging, routing is the combination of methods and software used to identify and transmit exams produced at one site to a storage location at another site. Routing takes two forms: autorouting, and on-demand routing.
Routing Overview Routing User Guide What is a Routing Gateway? A Routing Gateway locates routable images, determines where the images are to be routed to, and sends copies of those images to other locations. Routing is a function of the DICOM Gateway software. When properly configured, any DICOM Gateway can function as a Routing Gateway. Typically, a Routing Gateway runs on a dedicated computer.
Routing User Guide Routing Overview Operational Requirements The medical and IT management at a site implementing the routing system will need to develop policies establishing: Locations to which the exams may and may not be routed Reporting / transcription requirements for routed exams Bandwidth utilization guidelines and priorities Storage of routed exams at receiving sites Management of patient confidentiality and privacy issues related to routed exams Methods for addressing performance is
Routing Overview Routing User Guide How Autorouting Works The following figure illustrates the transfer of automatically routed images to a VistARad workstation for remote reading. The processes outlined in this figure are explained in more detail below. (Apart from the destination, the same processes are used when autorouting images to a DICOM Storage SCP).
Routing User Guide Routing Overview Autorouting Images from Prior Exams Autorouting offers the option to include images from prior exams. When this option is used in a routing rule, the Routing software will use the VistARad prefetch logic defined at acquisition site to create a list of prior exams. Images from the prior exams will be routed using same priority as the newly acquired image and, when appropriate, will be purged based on the same retention period as the newly acquired image.
Routing Overview Routing User Guide determines if images at the destination are older than the number of days specified in 1 RETENTION PERIOD. Images older than the specified number of days are deleted from the destination’s storage location. For DICOM destinations, routed images are retained until they are deleted locally. The routing software will not delete images sent to DICOM destinations. Â Routed images are copies. The original image files are retained at the site where they were acquired.
Routing User Guide Routing Overview How On-Demand Routing Works On-demand routing uses the same infrastructure as autorouting. However, in on-demand routing, exams to be routed are manually selected by a VistARad user, rather than being identified automatically by a Routing Gateway. With the proper security keys, on-demand routing is available to any VistARad user in the routing system.
Routing Overview Routing User Guide How Routing Priority Works The following factors are used to determine the priority of a routed exam: Assigned priority Clinical urgency (autorouting only) Time in transmission queue Priority and Autorouting For automatically routed exams, the routing software uses the priority assigned in a routing rule and the clinical urgency of the exam to calculate a numeric value. Images with the highest priority value are transmitted first.
Defining Routing Rules This chapter explains how to define the rules used for autorouting. This chapter covers the following topics: Routing Rules Explained Rule Destinations Rule Conditions Routing Rule Priority Routing Rule Tips  Routing rules can be defined before the configuration of the routing system is complete, but cannot be tested until the setup of the routing system is finished.
Defining Routing Rules Routing User Guide Each routing rule must contain at least one destination and one condition. When the conditions in a rule are met, the image is sent to the specified destination. The destination specified in a rule must match an entry in either the NETWORK LOCATION File (#2005.2) or the DICOM TRANSMIT DESTINATION File (#2006.587). Routing rule destinations are described in detail on page 12.
Routing User Guide Defining Routing Rules Rules using Wildcards Wildcards can be used when you want a condition to be valid for more than one value. In the example below, all images, regardless of modality, will be routed. Send all images to Kansas City send("KANSASCITY") when MODALITY="*" Wildcards are described in detail on page 20. Rules using the “does not match” Operator A condition can use different types of operators.
Defining Routing Rules Routing User Guide Rule Destinations The first parameter in a routing rule contains either the send command or the balance command, and contains one or more destination names. The send and balance commands are described in detail below. Destination names are described on pages 26 and 37.
Routing User Guide Defining Routing Rules How Load Balancing Works When a rule incorporates the balance command, the routing software uses two things to determine which destination receives a given exam: the percentages specified in the rule and internal counters set by the routing software.
Defining Routing Rules Routing User Guide Rule Conditions In routing rules, a condition is a comparison between a particular property of an image and a user-supplied value. The results of the comparison determine if the rule will be applied to an image or not. A routing rule can contain multiple conditions. A single when statement precedes all conditions in a rule.
Routing User Guide Defining Routing Rules (continued) DD: Duplex Doppler DF: Digital Fluoroscopy (ret) DG: Diaphanography DM: Digital Microscopy DS: Digital Subtraction Angiography (ret) DX: Digital Radiography EC: Echocardiography ECG: Electrocardiography EPS: Cardiac Electrophysiology ES: Endoscopy FA: Fluorescein Angiography FS: Fundoscopy GM: General Microscopy HC: Hard Copy HD: Hemodynamic Waveform IO: Intra-oral Radiography IVUS: Intravascular Ultrasound LP: Laparoscopy LS: Laser Surface Scan PX: P
Defining Routing Rules Routing User Guide Other Properties ABSTRACT_REF The network storage location of the image abstract. ACQUISITION_DEVICE The name of the device that generated the image as defined in the ACQUISITION DEVICE File (#2006.04). BIG_JUKEBOX_PATH Full file path on jukebox for .BIG images. This field indicates whether this file is located on the jukebox. BIG_MAGNETIC_PATH Full file path for .BIG images. This field indicates on which magnetic server this file resides.
Routing User Guide Defining Routing Rules FILE_REF The unique image filename of the image, as stored on the magnetic server (and/or jukebox). IMAGE_SAVED The date and time the image was captured (as opposed to the date and time of the procedure or exam). For more information, see page 21. IMAGE_SAVED can be used to compare the save date/time of the “image at hand” to the provided value.
Defining Routing Rules Routing User Guide OBJECT_TYPE The object type (such as still image, black & white image, x-ray) as described in the OBJECT TYPE File (#2005.02). PACKAGE An abbreviation for the name of the package that the image is attached to, as defined in the PACKAGE INDEX field (#2005, 40). Possible values are: RAD, LAB, MED, NOTE, CP, SUR, PHOTOID, NONE, or CONS. PACS_PROCEDURE The name in the radiology reports file that identifies the procedure.
Routing User Guide Defining Routing Rules PROCEDURE_TIME The date/time of the procedure or the examination. For more information, see page 21. PROCEDURE_TIME can be used to compare the procedure date/time of the “image at hand” to the provided value. PROCEDURE_TIME_FIRST can be used to compare the procedure date/time of the earliest (oldest) image in the exam to the provided value.
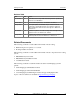
Defining Routing Rules Routing User Guide WORM_REF The network location of the jukebox platter where the image is stored (provided there is a jukebox in the Imaging system). Operators The following operators can be used in routing rule conditions: Operator Image property must… = Match value in rule. != Not match value in rule. < Be less than a numeric value in rule. For date/time values, this operator can be used for “earlier than.” > Be greater than a numeric value in rule.
Routing User Guide Defining Routing Rules Values for Date/Time Properties When condition based on date and time is used, the supplied value must adhere to VA-FileMan conventions. Values for date/time conditions are presented as a range enclosed in braces { }. The most frequently used date/time property is NOW. NOW can be used to select the times that a staff member will be present by specifying certain workdays and times of day.
Defining Routing Rules Routing User Guide Routing Rule Priority Automatically routed exams are assigned a default priority of ‘Medium.’ This priority can be changed by adding a priority statement after the conditions for the rule. Prioritize images based on destination send("KANSAS") when MODALITY="CT" priority HIGH send("BACKUP") when MODALITY="CT" priority LOW In addition to the priority that is derived from routing rules, the routing software takes the clinical urgency of an exam into account.
Routing User Guide Defining Routing Rules Routing Rule Tips The following tips may be useful while creating or editing routing rules: When defining multiple conditions for a rule, list the most restrictive condition first. This will reduce the amount of time needed to process the rule. The number symbol # can be used for comments, or to disable a rule. When disabling a rule, precede each line in the rule with #. Spaces and line breaks can be used as needed for legibility. Route.
Defining Routing Rules Routing User Guide This page is intentionally blank. 24 VistA Imaging V. 3.
Configuring Routing This chapter assumes that routing software has been installed, and that an initial set of routing rules have been defined. This chapter explains how to configure a routing system. The following table lists the configuration tasks described in this chapter.
Configuring Routing Routing User Guide Defining Imaging Destinations The following sections explain how to define an Imaging (non-DICOM) destination for routing. In general terms, defining an Imaging destination breaks down into the following steps: 1 Establish naming conventions that are agreed on by the sending and receiving sites. 2 Define storage folders for routed images at the receiving site and verify that the sending site can access those folders.
Routing User Guide Configuring Routing When an Imaging destination is established, all the above values should be related in some way. The following example illustrates destination names for a fictional routing system. In this system, the sending site uses autorouting to meet two sets of needs. MRI images are routed to an off-site specialist for interpretation. Urgent exams acquired in the evening are routed to an affiliated hospital for after-hours interpretation.
Configuring Routing Routing User Guide Storage Folders for Imaging Destinations This section explains how to create and verify a folder for an Imaging destination on a Windows-based server. The folder will be used as the storage location for routed images at a receiving site. The resulting folder will be referenced in the NETWORK LOCATION File (#2005.2).
Routing User Guide 5 Configuring Routing In the Sharing tab, click the option that allows for sharing the folder, then enter the share name you want used for the folder. 1 Â The share name cannot contain punctuation marks or spaces, and the combined string identifying the computer and the shared folder cannot be more than 63 characters long. Â The share name you enter must match the PHYSICAL REFERENCE field value (#2005.2,1) defined at the site that will be sending images to this folder.
Configuring Routing Routing User Guide 2 Start Windows Explorer (choose Start | Run, then type Explorer), then click Tools | Map Network drive. 3 In the Map Network Drive dialog, enter the drive letter, path, and username (including domain name) that the routing software will be using. Then click OK. Â If desired, you can map a drive to the folder to make troubleshooting easier. However, be aware that the transmission processor will map certain drives as it sends exams to Imaging destinations.
Routing User Guide Configuring Routing Imaging Destination Definition Imaging Destination Definition using FileMan The following steps explain how to create an Imaging destination using FileMan. For information about values for specific fields, refer to page 32. A destination definition worksheet is also located on page 71. Editing the Network Location File at the sending site 1 Log into the VistA Hospital Information System. 2 Use FileMan to select the NETWORK LOCATION File (#2005.2) for editing.
Configuring Routing Routing User Guide OPERATIONAL STATUS: 1 On-Line HASH SUBDIRECTORY: ABSTRACT: N No FULL: Y Yes BIG: Y Yes TEXT: Y Yes DICOM: N No COMPRESSION: USER NAME:
Routing User Guide Configuring Routing PHYSICAL REFERENCE The value of this field identifies the physical network location where routed images will be stored. This value must contain the computer name and the share name of the directory where routed images will be stored. \\ISWIMG01\IMAGE1$\ \\TeleRad\Wichita$\ This value must be entered using UNC (Universal Naming Convention) standards.
Configuring Routing Routing User Guide BIG The value of this field indicates whether or not “big” files should be transmitted to this destination. Big files contain the complete image, always at the original resolution. For routing, this field should be set to Yes. TEXT The value of this field indicates whether or not text files should be transmitted to this destination. Text files contain the header information from the original DICOM file. For routing, this field should be set to Yes.
Routing User Guide Configuring Routing USER NAME The value of this field is the username that the routing software will use to log into the shared folder defined in the PHYSICAL REFERENCE field. This username must include permission to read, write, and delete on the physical storage space for this destination. PASSWORD The value of this field is the password that is used with the username above to log into the destination. The password is case-sensitive and is stored in an encrypted format.
Configuring Routing Routing User Guide RETENTION PERIOD The value of this field determines the number of days routed image files are stored at this destination. A typical value is five days. Whenever a transmission processor connects to a destination, it checks whether or not it has executed a purge for that destination on that day. If the connection in question is the first of the day and no purge has been executed yet, a purge will be initiated.
Routing User Guide Configuring Routing Defining DICOM Destinations In general terms, defining a DICOM destination breaks down into the following steps: 1 Determine the names that will be used to identify the destination and gather information about the receiving application. 2 Edit the SCU_List.dic file, a dictionary file used by the DICOM Gateway(s). 3 Use the DICOM Gateway to load the contents of SCU_List.dic into the MUMPS databases on the DICOM Gateway and on the VistA Host.
Configuring Routing Routing User Guide 2 On the DICOM Gateway, use a text editor to open x:\DICOM\Dict\SCU_List.dic, where x is the name of the drive used by the DICOM Gateway to store dictionary files. 3 Add the information for each DICOM destination as shown below (comment lines are preceded by #). Specific fields are defined in the next section.
Routing User Guide Configuring Routing Field Definitions Fields defined in SCU_List.dic and used in the DICOM TRANSMIT DESTINATION File (#2006.587) are described below. These fields are listed in the order that they are defined in SCU_List.dic. Application The name that will be used to identify the receiving application and to identify the destination in a routing rule. The value for this field may be up to 31 characters in length, is case-insensitive, and punctuation can be used.
Configuring Routing Routing User Guide Defining “Route Priors” Logic Verifying that Prefetch is Enabled The capability to route priors assumes that ‘prefetch’ is enabled. Prefetch is generally enabled at sites using VistARad. You can verify that prefetch is enabled by checking the following settings. In the Protocol File (#101), use FileMan to verify that MAGJ PREFETCH/SEND ORM is defined as a Subscriber to the RA REG protocol.
Routing User Guide Configuring Routing Note: Altering the settings used to identify a prior will affect both VistARad’s prefetch function as well as the auto-route priors capability. However, the settings that determine the number and age of priors to be auto-routed can be set independently from the similar settings used for prefetch. To change “route priors” logic 1 Log into the VistA Hospital Information System. 2 Use FileMan to select the MAG RAD PRIOR EXAMS LOGIC File (#2006.65) for editing.
Configuring Routing 6 Routing User Guide Set the following three prompts as desired for autorouting priors. Details follow. AUTO-DISPLAY: YES// VERSION LIMIT/AUTO-DISPLAY: 1// DAYS LIMIT/AUTO-DISPLAY: 1800// AUTO-DISPLAY? The value of this field should be set to “YES” for entries that should cause autorouting of prior studies DAYS LIMIT/AUTO-DISPLAY The value of this field should be set to an integer number.
Routing User Guide Configuring Routing 3 Enter 2 to select “Gateway Configuration and DICOM Master Files.” 4 Enter 1 to select “Update Gateway Configuration files.” 5 Set the prompts indicated in bold below to Yes.
Configuring Routing 6 Routing User Guide Press to cycle though the rest of the prompts and to exit the program. Importing Routing Rules (Route.dic) This section covers the following topics: Creating and Importing a Routing Rules File Verifying Imported Rules Re-Importing Routing Rules Routing Rules & Multiple Routing Gateways This section assumes that you have prepared your routing rules as described in the previous chapter.
Routing User Guide Configuring Routing 4 Open a terminal window and log into the Routing Gateway software. 5 Enter 3 to select “Routing Gateway” from the DICOM Gateway Menu [MAGDMENU]. 6 Enter 5 to select “Import Routing Rules.” 7 When you are prompted to build the Routing Table, enter Y. Ready to build the Routing Table? 8 y// y The file will be imported. If the import is successful, the following will be displayed. You will be prompted to return to the menu.
Configuring Routing Routing User Guide Routing rules: SEND(IMAGPROVIDER1) If: MODALITY=CT SEND(IMAGPROVIDER2) If: MODALITY=CR SEND(BAL2) If: MODALITY=XA Priority: HIGH Press to continue... 4 After the rules are displayed and double-checked, press Enter to return to the menu. Re-Importing Routing Rules To be change routing rules, Route.dic will need to be modified, and then re-imported. When routing rules are re-imported: The existing routing table will be replaced.
Routing User Guide Configuring Routing VistARad Configuration—Sending Sites For sites that will be sending autorouted images: The MAG VISTARAD SITE PARAMETERS File (#2006.69) needs to be edited. A site’s SITE CODE (IMAGING SITE PARAMETERS File (#2006.1)) must be set to a non-null value that will identify the sending site. To set routing-related VistARad site parameters 1 Open a terminal window and log into the VistA Hospital Information System.
Configuring Routing Routing User Guide receiving sites (see the next section for details). It is recommended that the SITE CODE be set to your standard 3-digit site code. Select OPTION: E ENTER OR EDIT FILE ENTRIES INPUT TO WHAT FILE: 2006.1 IMAGING SITE PARAMETERS (1 entry) EDIT WHICH FIELD: ALL// .
Routing User Guide Configuring Routing  Partial matching can be used to allow VistARad to access images from multiple destinations. For more information, see the next section. … [Workstation Settings] WorkStation TimeOut minutes=0 ID=UNKnown Location=UNKnown VistaRad test mode=FALSE CacheLocationID=DEMO … 5 Save and close the file. Making Multiple Destinations Accessible to VistARad A VistARad workstation can be used to display images from multiple (local) destinations.
Configuring Routing Routing User Guide Changes Affecting Routing System Configuration The following table lists situations that will require a change in routing configuration, and outlines the changes that will need to be made. Routing System Change Related Configuration Change Alteration of location, permissions, etc., of a Imaging destination folder Update NETWORK LOCATION File (#2005.
Using the Routing Gateway This chapter explains how to use the Routing Gateway. This chapter covers the following topics: Activating Routing Maintaining Routing Disabling Routing Routing Gateway Menu Options This chapter assumes that the Routing Gateway has been properly installed and configured. ! US Federal regulations and VA internal policy prohibit unencrypted transmission of patient information outside the VA's intranet. ! Routing can have a significant impact on network traffic.
Using the Routing Gateway 5 Routing User Guide Position and size the terminal window for subsequent monitoring. (Note that no new information will be shown in the terminal window until the evaluation processor encounters entries in the rule evaluation queue.) Starting the Transmission Processor 1 Open a new terminal window and log into the DICOM Gateway software. 2 Enter 3 to select “Routing Gateway” from the DICOM Gateway Menu [MAGDMENU]. 3 Enter 1 to select “Start the Transmission Processor.
Routing User Guide Using the Routing Gateway Maintaining Routing This section provides a summary of maintenance tasks for a routing system and explains how to access Routing Gateway log files. Periodic Maintenance The following tasks should be performed periodically to control the size of the transmission queue and to detect potential routing problems. Task Interval Menu Seq.
Using the Routing Gateway Routing User Guide Disabling Routing Short-Term Routing Shutdown If routing needs to be disabled for a short period of time, the easiest thing to do is to stop the transmission processor(s). When this is done, images will still be evaluated and queued, but they will not be transmitted until the transmission processor is restarted.
Routing User Guide Using the Routing Gateway Routing Gateway Menu Options This section describes the menu options associated with the Routing Gateway. Routing Gateway menu options are accessed by entering 3: Routing Gateway from the DICOM Gateway main menu.
Using the Routing Gateway Routing User Guide 3 Start the Evaluation Processor When this option is executed, the evaluation processor will begin examining routing-specific entries in the rule evaluation queue. This file is populated by Image Gateways (provided that Image Gateways are configured as part of a routing system). The evaluation processor uses the rule evaluation queue and site-specific routing rules to determine which images are to be routed and where they are to be routed.
Routing User Guide Using the Routing Gateway 7 Purge completed and expired entries in the Transmission Queue Use this option to control the size of the transmission queue. Executing this option will remove entries if both of the following conditions are met: The status of the entry indicates that an image file has been transmitted successfully. The entry is older than the RETENTION PERIOD (number of days) for the applicable destination.
Using the Routing Gateway Routing User Guide This page is intentionally blank. 58 VistA Imaging V. 3.
Using VistARad in a Routing System This chapter explains how to use the VistARad diagnostic workstation software at sites that are part of a routing system. This chapter covers the following topics: Displaying Routed Exams VistARad & On-Demand Routing Displaying Routed Exams In VistA Imaging, the VistARad diagnostic workstation is used to display routed exams.
Using VistARad in a Routing System Routing User Guide To display a routed exam 1 Log into the site or division that the routed exam was sent from. 2 Use an exam list to locate the routed exam you want to open. By default, exam lists are filtered to show only exams that have been routed from the site or division you are performing remote reading for. Â You can view all exams (routed and non-routed) by clearing the checkbox in the Remote Read Filter area near the top of the Manager window.
Routing User Guide Using VistARad in a Routing System VistARad & On-Demand Routing This section describes on-demand routing prerequisites and explains how to use VistARad’s on-demand routing capability. ! US Federal regulations and VA internal policy prohibit unencrypted transmission of patient information outside the VA's intranet. ! Like autorouting, on-demand routing can have a significant impact on network traffic.
Using VistARad in a Routing System Routing User Guide To use on-demand routing 1 Log into VistARad. The VistARad workstation used for on-demand routing must be logged into a VistA system that includes a Routing Gateway. Â If you have access to more than one division, log into the division where the exams to be routed originate from. 2 Use the exam lists in the VistARad Manager to select the exams you want to send. 3 Click the Route Exams button, located in the upper right corner of the exam list.
Routing User Guide Using VistARad in a Routing System  The priority assigned to exams for on-demand routing is not related to the exam priority indicated in VistARad’s exam lists. 7 Confirm that the settings in the Route Request dialog are correct.  You can choose not to route a listed exam by selecting the Route To box for that exam and choosing the [Do Not Route] option.  You can click Cancel to close the Route Request dialog without routing any exams. 8 Click OK to route the exams.
Using VistARad in a Routing System Routing User Guide This page is intentionally blank. 64 VistA Imaging V. 3.
Troubleshooting Routing This chapter covers the following topics: Basic Troubleshooting Getting Help Additional Routing Considerations Basic Troubleshooting If images are not arriving as expected at a routing destination, perform the following steps: If… Then… This is the first time that routing software is being used Verify that all configuration steps described in this document have been completed. Configuration checklists are available in Appendix A.
Troubleshooting Routing Routing User Guide Additional Routing Considerations Transmission Processors and Drive Mapping For each Imaging destination that it sends exams to, the transmission processor will map a drive using the following progression of drive letters: Q – Z, then G – P. If a drive letter (Q, for example) is not available, it will move to the next letter (R, for example) and so on. When all entries for a particular destination have been processed, the applicable drive is unmapped.
Routing User Guide Troubleshooting Routing for that workstation. Images not found in local storage will be retrieved from their originating site. How the RC Column is Populated The RC (Remote Cache) column in VistARad's exam lists is populated with a destination-specific indicator when a routed exam is received by a destination. The same indicator is removed from the RC column when the routing software deletes the local copy of the exam.
Troubleshooting Routing Routing User Guide This page is intentionally blank. 68 VistA Imaging V. 3.
Appendix A This appendix contains worksheets that can be used while setting up a routing system. They can also be used for record-keeping purposes. The following worksheets are provided: Imaging Destination Worksheet DICOM Destination Worksheet Routing Rule Definition Worksheet Routing Setup Checklist April 2006 VistA Imaging V. 3.
Appendix A Routing User Guide This page is intentionally blank. 70 VistA Imaging V. 3.
Routing User Guide Appendix A Imaging Destination Worksheet Use this worksheet to record information about a specific Imaging destination. A sample Network Location File definition is provided on the next page.
Appendix A NETWORK LOCATION Routing User Guide File Sample For detailed information about specific fields, see page 32.
Routing User Guide Appendix A DICOM Destination Worksheet Use this worksheet to record information about a specific DICOM destination. Destination name 1 Site served by destination General purpose of this destination Alternate/backup destination Calling AE Title Called AE Title IP address/hostname Socket/port Presentation Context / Transfer Syntax (list all used) DICOM Destination Sample For detailed information about specific fields, see page 39.
Appendix A Routing User Guide Routing Rule Definition Worksheet Rule Request (to be completed by Radiology staff or supervisor) Identify the purpose of the rule (circle one): a Routine workload sharing b Rapid access for clinic / facility c After-hours or holiday coverage d Second opinions / consults e Transfer of images to a non-local specialist / support for a new modality or imaging type f Other List each destination that this rule will serve: a d b e c Will prior exams be included with this rul
Routing User Guide Appendix A List conditions that will trigger the execution of the rule (fill any all that apply): a Exam modality of: b Off hours/holiday coverage (specify hours/days) c Other Rule Impact/Review (to be completed by Imaging Coordinator) Estimated amount of storage needed at each destination for this rule: Bandwidth available between sending and receiving sites: Total number of exams expected to be transmitted per month: Rule adheres to routing policies established by sending site (
Appendix A Routing User Guide Sample Rules The following sample rules use the fictional destinations listed below: Imaging destinations (entered in the Network Location File (#2005.2)) Archive Contractor1 Contractor2 Contractor3 ContractingReader LocalJukeBox LogBook DICOM destinations (entered in the DICOM Transmit Destination File (#2005.587) via SCU_List.
Routing User Guide Appendix A Example #4: # auto-route all important studies to an internal # workstation, using standard copy for transmission Send("LogBook") When MODALITY="*" URGENCY="STAT" Example #5: # # # # # auto-route all images from a specific modality to three contractors, balancing the load, so that each contract receives a pre-determined fraction of the studies and leaving a pre-determined fraction for interpretation by local staff, using standard copy for transmission Balance("Contractor1"
Appendix A Routing User Guide Routing Setup Checklist Imaging Destination Setup a Username and password available for each destination? b Folders created and shared for each destination? c Ability to access and write to each storage folder verified? d Network location entry defined for each destination? e VistARad site parameters set up at sending site? f CacheLocationID set on workstations at receiving sites? DICOM Destination Setup a Destination information added to SCU_List.dic? b SCU_List.
Appendix B: Using MAG_Decompressor This section explains how to install and configure the Automatic Decompression Service (MAG_Decompressor). MAG_Decompressor can be installed on a VistARad workstation or on any other system that is receiving compressed images via automatic or on-demand routing. Note that MAG_Decompressor should NOT be installed on a DICOM Gateway.
Appendix B: Using MAG_Decompressor Routing User Guide b In the System Properties dialog, click the Advanced tab, then click Environment Variables. c In the System Variables list at the bottom of the dialog, locate the following variables and adjust the values if needed. DECOMP_LOG_FSPEC: the path and file name of the decompression service log file. The administrative user must have write-permission for this file. The format of this name must follow the usual pattern: \\.
Routing User Guide Appendix B: Using MAG_Decompressor Note: If the DLL file is not present, contact the Imaging Group for information about acquiring a toolkit license. The decompression software will not work without the DLL file. d Enter the following command to activate the program (The command will complete without any warning or error messages). Mag_Decompressor –install e 5 Close the command window.
Appendix B: Using MAG_Decompressor Routing User Guide 2005-04-19 16:59:01 S T A R T E D Directory-Watch/Decompression Service over C:\test_img_cache\ 2005-04-19 17:01:10 C:\test_img_cache\MAG_EyeClot.J2K Status -> SUCCESS (0) 2005-04-19 17:01:11 C:\test_img_cache\MAG_Skull.J2K Status -> SUCCESS (0) 2005-04-19 17:01:19 C:\test_img_cache\MAG_Spine.J2K Status -> SUCCESS (0) 2005-04-20 13:32:59 C:\test_img_cache\MAG_Spine.J2K Status -> OutFile Already Exists, InFile Removed ….. …..
Glossary This manual uses the following terms: autorouting The automatic transmission of selected images to one or more destinations. Autorouting functions are managed using the Routing Gateway. destination An intended recipient of routed images. Destinations can be Imaging destinations, such as VistARad workstations, or DICOM destinations, such as a film printer or external PACS (or any other DICOM Storage Service Class Provider). DICOM TRANSMIT DESTINATION File (#2006.
Glossary Routing User Guide routing In the VistA system, the process responsible for sending images across a WAN to one or more remote locations. Routing can be performed automatically (autorouting), or on-demand. Routing Gateway A computer running the DICOM Gateway software that is configured to manage the routing of images in the VistA system. A Routing Gateway is typically run on a dedicated computer. Also, the set of menu options in the DICOM Gateway software specific to routing.
Routing User Guide Glossary VistARad In VistA Imaging, the software used to display diagnostic-quality radiologic exams. VistARad is the primary tool used to display routed exams and to route exams on-demand. April 2006 VistA Imaging V. 3.
Glossary Routing User Guide This page is intentionally blank. 86 VistA Imaging V. 3.
Index A-C after-hours coverage 11, 21 autorouting defining rules for 9–23 described 1, 4–6, 83 prior exams 5, 22, 40 z see also routing Background Processor 32 balance command 12 cache, remote see RC column; storage folders CacheLocationID 48 comments in routing rules 23 completed trans.
Index Routing User Guide H-I O-P help desk 65 hidden shares, creating 29 historical exams, routing 5, 22, 40 holidays, routing rules and 11, 21 IMAGE BACKGROUND QUEUE File (#2006.
Routing User Guide routing (cont.) VistARad configuration 47–49 Routing Gateway 55 configuring 43 described 2, 84 importing rules for 44–46 log files 53 menu options for 55–57 using 51–54 rule evaluation queue 4, 51, 84 rules, routing comments in 23 conditions in 14–22 date/time in 21 described 9, 84 destinations in 12 displaying 45, 57 examples of 10–11 formatting 23 importing 44–46, 56 load balancing with 12 multiple sets of 46 operators 20 priority 8, 22 wildcards 20 worksheet 74 S SCU_List.