
Use and Care Manual


Please contact 1-855-847-7264 for further assistance.
8
5
4
3
6
7
2
1
1 2 3 4 5
Operation
1
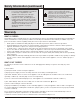
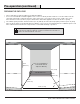
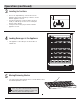
Learning the Appliance Features
2
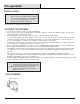
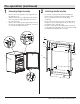
Adjusting The Temperature
Low-E Glass Door (1): Low-E glass used to reect
and absorb heat.
Electronic Display and Controls (2): For viewing
and regulating the temperature.
Magnetic Door Gaskets (3): Tight tting seals retain
all the cooling power and humidity levels.
Wooden shelf (4).
Handle (5).
Front Mounted Exhaust (6): Allows for integrated
(built-in) applications.
Light Switch (7): Allows for constant illumination of
the interior of the appliance.
Leveling Legs (8): Adjust to level the appliance.
Interior Light (not shown): Blue LED lighting
illuminates the interior without the heat of an
incandescent bulb.
Lock Button (1): Press and hold for 3 seconds to lock the control panel. No buttons can be pressed while the
control panel is locked. Press and hold the lock button for 3 seconds to unlock the control panel.
Upper/lower area temperature setting switch button (2): Press the button, then the digital tube in the current
temperature setting zone ashes, and the temperature setting can be performed on the temperature setting
zone. Press the button again, then switch to another temperature area, and so on.
°C / °F: Button (3): Press to change the temperature display between °C and °F.
Temperature Display (4): Shows the set temperature.
Up and Down Buttons (5): Used to increase or decrease the set temperature in 1° increments.
9
HOMEDEPOT.COM
□
□
□
□
□
□
□
□
□
□
□
□
□
□