
User Manual

D-302893 3
14.
15.
or
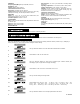
Select between "NOT connected" and "Connected to AC".
16.
17.
Here you determine whether the image will be in black & white or color.
18.
19.
or
Select between "
Black & White
" and "
Color
".
20.
21.
Here you set the pixel quality of the image. Select 160 x 120 for lower quality or 320 x 240
for higher quality.
22.
23.
or
Select between "
Resol. 160 x 120
" and "
Resol. 320 x 240
".
24.
25.
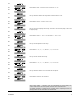
Here you set the brightness of the image.
26.
27.
or
Select between "-3", "-2", "-1", "Normal", "+1", "+2" and "+3".
28.
29.
Here you set the contrast of the image.
30.
31.
or
Select between "-3", "-2", "-1", "Normal", "+1", "+2" and "+3".
32.
33.
Here you determine whether or not to activate the microphone.
34.
35.
or
Select between "
Enable
" and "
Disable
".
36.
When exiting "
ZONES / DEVICES
" menu, the PowerMaster-10 system displays the
number of devices that need to be updated, as follows: DEV UPDATING NNN.
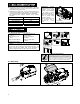
For detailed instructions on Adding Devices, Deleting Devices, Replacing Devices and
Defining Defaults see the PowerMaster-10 Installer Guide.
MIC. SETTINGS
Enable
MIC. SETTINGS
IMAGE CONTRAST
Normal
IMAGE CONTRAST
IMAGE BRIGHTNESS
Normal
IMAGE BRIGHTNESS
IMAGE RESOLUTION
IMAGE COLOR
Black & White
IMAGE COLOR
Resol. 160 x120
IMAGE RESOLUTION
AC POWER CONNECT
NOT connected