
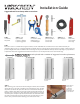
Installation Guide

Measure both
ends so that the
visi marker is
equal distance to
the edge of the
door frame
clamping one
side helps
STEP 3
Now you are ready to install
VisiScreen. When laying out the
material over the frame, lay it out with
the curved or concave side down. This
will make it easier to install the screen
and will make it easier to install the
screen by helping the material to lie
at in the frame. Now it is time to
align your visi marker in your desired
position in your frame. Using a ruler
and starting at either the top or
bottom, measure the visi markers
distance to the handle side of the
frame. It is helpful if someone else can
assist you by holding the screen at
one end in place, while you measure
the other end of the material on the
frame. If you do have a helper, using a
clip, clamp, or piece of tape is
sucient and sometimes easier.
Installation Guide pg. 2
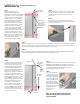
STEP 4
When the visi marker is in the chosen position, begin
pressing the VisiScreen into the top or bottom of the
doorframe’s channel with the convex roller on the
spline tool.
STEP 4.1
Start at one corner and in one motion with even
pressure roll the tool to the opposite side inserting the
screen into the channel.
STEP 5
Before pressing any other screen into the channels of the frame, it is important to secure this rst length of
material to ensure a proper alignment of the marker. Using the concave roller tool, secure the top or bottom
portion or the doorframe that you just rolled over with your convex tool.
STEP 5.1
Now use a concave roller tool to press the spline material into the groove. Apply gentle pressure and angle
the tool slightly toward the outside of the frame to avoid tearing the screen.
STEP 6
Now that one side is secure you can re
adjust the placement of the marker
on the opposite side from the side
you just applied the spline to. Make
sure both ends of the Visi marker
measure the same distance from the
side of the doorframe where the
handle is. If you need to re adjust the
clamp, tape, or the person helping
you needs to tighten their grip on the
screen, now is the time to do so. Now
repeat Step 4.1, using the convex
roller tool, Start where there is excess
spline material that has just been
inserted into the channel is, by
pressing the screen into the rest of
the door frame’s channel. Now you
can repeat Step 5.1. Once the spline
has been inserted into the second
side, you can now remove your clap
or other securing device.
STEP 7
Complete the rest of the two remaining sides, by repeating
Step 4.1 and then Step 5.1 consecutively on each side.
Once the spline has been inserted into the entire channel,
you are now ready to remove the extra screen that is
surrounding the doorframes channel.
STEP 8
Use a sharp utility knife
to trim the excess screen.
Position the knife tip at
The junction of the spline
and outside edge of the
spline grove. Once all of
the excess screen has
been removed, cut away
the excess spline material
that is left over at the end
of the last portion of
channel that you
installed.
spline tool
direction
measure
and secure
excess
spline
material
spline tool
STEP 6
starting
point
Now you are ready to re install your
door and enjoy your VisiScreen for
years to come.