
Product Manual

Solstice Solo Package
Features and Installation Instructions
Washington Office
901 Algona Blvd N.
Unit F
Algona, WA 98001
Ph: 888-489-9820
Fx: 253-218-2905
Arizona Office
6501 E. Greenway
Suite 103-542
Scottsdale, AZ 85254
Ph: 800-994-4460
Fx: 480-922-5655
www.visionxusa.com
Page 2 of 2
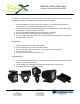
Installation Instructions:
Flat Mount – The Flat Mount is used to mount the Solo pod on a flat surface and is also used as
the adapter bracket for the Helmet Mount and the Handle Bar Mount.
1. Insert Flat Mount into Omni-Lick channel and place in desired mounting position to
check clearances. (Do not affix bolt into the Omni-Link yet.)
2. Remove bracket from the Solo pod and place the Flat Mount only in desired mounting
position and mark the four holes for drilling.
3. Remove Flat Mount and drill out each mark with a 1/8” drill bit.
4. Brush shavings clean and affix bracket to mounting surface.
5. Re insert Solo Pod via the Omni-Link system and affix the bolt through the Flat Mount
Bracket into the Solo Pod.
Helmet Mount
1. Clean mounting area on helmet with alcohol.
2. Clean mounting area on helet mount with alcohol.
3. Remove adhesive strip from protective sleve and place on helmet mount.
4. Adhere firmly to helmet.
5. Let adhesive cure for 48 hours before use.
Handlebar Mount
1. Insert silicon through bracket holes if needed depending on handle bar diameter. (Pliars
may be needed to pull through.)
2. Losten phillips bolt completely and expand bracket to slip over handle bar.
3. Re install phillips bolt and tighten securely.