Installation Instructions & User’s Manual VISIONXLIGHTING.
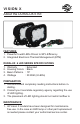
VISION X About the DURALUX 6 Kit: FEATURES 1. Powerful 5-watt LEDs Driven to 90% Efficiency 2. Integrated Electronic Thermal Management (ETM) DURALUX 6 LED SERIES SPECIFICATIONS 1. Warranty : Extended 2. Housing Colors : Black 3. Beam Patterns : 10° 4. Wattage : 30 Watt (6 LEDs) PREPARATION 1. We recommend completely reading instructions before installing. 2. Consult your local state regulatory agency regarding the use of LED lighting. 3.
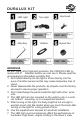
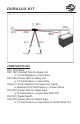
DURALUX KIT 1 LED Light MOUNTING Qty: 2 4 Allen Key PART (M5) Qty: 1 2 Two Light WIRING 5 Qty: 1 Washer PART (M2) Qty: 2 3 Hex Head PART (M1) Qty: 2 6 Nylock Nut PART (M3) Qty: 2 WARNINGS As with many other high-tech products, this VISION X LED requires a bit of attention before you can use it. Please read the accompanying information carefully first. 1. Don’t stare directly into the light or shine directly into the eyes of another person as this may cause temporary loss of vision. 2.
VISION X WIRING INSTALLATION 1. Find a suitable place to mount Relay [Part R1] leaving enough room for Power & Ground Wire [Parts W1 & W2] to reach the Battery & the Deutsch Connector Wiring [Parts C1 & C2] to reach the Lights. Mount Relay. 2. Run Power Wire [Part W1] & Ground Wire [Part W2] to the Battery. Connect the Power Wire [Part W1] to the Positive (+) Battery Terminal & connect the Ground Wire [Part W2] to the Negative (-) Battery Terminal. 3.
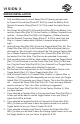
DURALUX KIT (R1) (W2) (S1) (W3) (W1) (C1) *To Light (C2) *To Light COMPONENTS KEY Part (R1) Relay Part (W1) Ground Wire for Relay Coil a. 12 Volt Negative (-) Input Wire Part (W2) Power Wire for Relay Coil a. 12 Volt Positive (+) Input Wire Parts (C1 & C2) Deutsch Connectors for Lights a. Attached to12 Volt Positive (+) Power Wires Part (W3) Power Wire for Relay Input a.12 Volt Positive (+) Input Wire [Part R1] Part (S1) Toggle Switch Part (W4) Power Wire for Switch Input a.
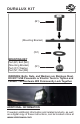
VISION X MOUNTING INSTALLATION INSTALLATION 1. Determine where the light/lights will be placed. 2. Place mounting bracket with light to desired location. Using a marker or pick tool, mark the center point of the bolt hole on the mounting surface. 3. Set the light aside. Drill out a large enough hole to fit the [M8] bolt Part (B1). 4. Remove the mounting bracket from the lights by unscrewing the (2) 5mm Allen Head Bolt Part (B2). 5.
DURALUX KIT (B1) (Mounting Bracket) (W1) MOUNTING KEY Part (B1) Bolt [M8] (Mounting Bracket) Part (W1) Washer Part (N1) Nut [M8] (N1) WARNING: Bolts, Nuts, and Washers are Stainless Steel. DO NOT USE Pneumatic or Electric Tools to Tighten and Loosen. The Hardware Will Permanently Lock Together. ADDITIONAL INFORMATION If needed, additional information and related products, as well as a digital copy of these instructions, can be located online at www.visionxusa.
You May Also Be Interested In: SECURITY BOLT Available in multiple sizes Part # - 9900162 Item # - P-DURA4FLUSHMOUNT DURA 4 Flush Mount Bracket SECURITY NUT Available in multiple sizes Part # - 9895499 Item # - DURA-M460 2.75” Mini DURA CLAMP TUBE MOUNT (0.75”-3.0” Diameter Available) VISIONXLIGHTING.