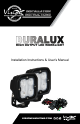
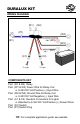
Installation Instructions & User’s Manual VISIONXLIGHTING.
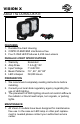
VISION X About The DURALUX KIT: FEATURES 1. Durable Die-Cast Housing 2. CISPR 25 EMC/EMI interference free 3. Four 5 Watt LED Produces 4,224 raw Lumens DURALUX 410KIT SPECIFICATIONS 1. Warranty : Extended 2. Amp Draw : 1.6.A @ 12V 3. Input Voltage : 11-65V DC 4. Beam Patterns : 10°, 40°, 60° 90° 5. LED Lifespan : 50,000 Hours PREPARATION 1. We recommend completely reading instructions before installing. 2. Consult your local state regulatory agency regarding the use of LED lighting. 3.
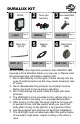
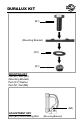
DURALUX KIT 1 LIGHT 4 2 DURA Qty: 2 Allen Key [5mm] PART (A1) Qty: 2 Two Light Harness WIRING 5 Qty: 1 Washer [M8] PART (W1) Qty: 2 Bolt 3 Hex Head [M [M8] PART (B1) Qty: 2 6 Nylock Nut [M8] PART (N1) Qty: 2 WARNINGS As with many other high-tech products, this VISION X LED requires a bit of attention before you can use it. Please read the accompanying information carefully first. 1.
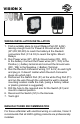
VISION X WIRING INSTALLATION INSTALLATION 1. Find a suitable place to mount Relays Part (R1 & R2) leaving enough room for Power & Ground wires Part (W1,W2,W3,W4) to reach the battery & the Deutsch connectors Part (C1 & C2) to reach the lights. Mount Relays. 2. Run Power wires (W1, W3) & Ground wires (W2 , W4) to the battery. Connect the Power wires (W1 , W3) to the Positive (+) battery terminal and connect the Ground wire (W2 , W4) to the Negative (-) Battery Terminal. 3.
DURALUX KIT WIRING DIAGRAM: (R1) (R2) (P1) (W4) (S1) (W3) (W2) (W1) (C1) *To Light (C2) *To Light COMPONENTS KEY Part (R1 & R2) Relay Part (W1 & W3) Power Wire for Relay Coil a. 9-32V DC Volt Positive (+) Input Wire Part (W2 & W4) Ground Wire for Relay Coil a. 9-32V DC Volt Negative (-) Input Wire Part (C1 & C2) Deutsch Connectors for Lights a.
VISION X WARNING: Bolts, Nuts, and Washers are Stainless Steel. DO NOT USE Pneumatic or Electric Tools to Tighten and Loosen. The Hardware Will Permanently Lock Together. MOUNTING INSTALLATION INSTALLATION 1. Determine where the light/lights will be placed. 2. Place mounting bracket with light to desired location. Using a marker or pick tool, mark the center point of the bolt hole on the mounting surface. 3. Set the light aside. Drill out a large enough hole to fit the [M8] bolt Part (B1). 4.
DURALUX KIT (B1) (Mounting Bracket) (W1) (N1) MOUNTING KEY Part (B1) Bolt [M8] (Mounting Bracket) Part (W1) Washer Part (N1) Nut [M8] (B2) ADJUSTMENT KEY Part (B2) 5mm Locking Bolt (Mounting Bracket)
You May Also Be Interested In: SECURITY BOLT Available in multiple sizes Part # - 9900162 Item # - P-DURA4FLUSHMOUNT DURA 4 Flush Mount Bracket SECURITY NUT Available in multiple sizes Part # - 9895499 Item # - DURA-M460 2.75” Mini DURA CLAMP TUBE MOUNT (0.75”-3.0” Diameter Available) VISIONXLIGHTING.