GAS INSERT FOR S-SERIES KAMADO GRILLS OWNER’S MANUAL Model # VGK-GPAK-S1 EN GL IS H Quickchange
SAFETY INFORMATION PLEASE READ THE ENTIRE MANUAL BEFORE OPERATING YOUR VISION KAMADO GRILL. PLEASE KEEP THIS MANUAL FOR FUTURE REFERENCE. ATTENTION! Use caution when cooking as grill surfaces get hot. To avoid burns, always use protective gloves when grill is in use. Do not wear loose clothing near the grill. ATTENTION! This barbecue will become very hot, do not move it during operation. For outdoor cooking use only. Do not operate grill indoors or in an enclosed space.
GENERAL INSTRUCTIONS (CONTINUED) 5) Please inspect the hose before each use of the outdoor cooking gas appliance. If it is evident there is excessive abrasion or wear, or the hose is cut, it must be replaced prior to the outdoor cooking gas appliance being put into operation. The replacement hose assembly shall be that specified by the manufacturer. 6) Lighting Instruction (a) Read the instructions before lighting. (b) Confirm that the control knob is in the “OFF” position. (c) Open lid during lighting.
COMPONENTS 1 3 2 4 4.1 5 7 6 6.2 6.1 PART NAMES PART NUMBERS 1 2 3 4 4.1 5 6 6.1 6.
WELCOME TO VERSATILE KAMADO COOKING Your new Vision Grills Kamado Quickchange Gas Insert completes your existing Vision Grills Kamado, allowing you to sear, grill, bake and smoke all types of food with your choice of Charcoal or Gas. For those times you want to quickly prepare a meal without the use of charcoal, you have the Quickchange Gas Insert to help you.
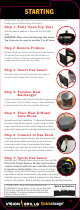
STARTING ATTENTION: The grill needs to be cooled before switching from the ProZone to the Quickchange Gas Insert. Step 1: Fully Open Top Vent Turn Top Vent to position 3. Keep the Top Vent fully open. WARNING: When using Quickchange Gas Insert, Top Vent must be open to position 3 at all times. Step 2: Remove ProZone Remove Cooking Grates and Charcoal Grate. Sweep all excess charcoal and ash into Ash Drawer of ProZone. Pull out ProZone and empty ash from drawer and store in a cool, dry place.
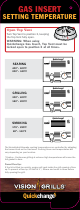
GAS INSERT SETTING TEMPERATURE Open Top Vent Turn Top Vent to position 3, keeping the Top Vent fully open. 0 1 2 3 WARNING: When using Quickchange Gas Insert, Top Vent must be locked open to position 3 at all times.
COOKING TEMPERATURE SMOKING Smoker Temp (°F) Meat Temp. (°F) BEEF Brisket (8 - 12 lbs) Short Ribs Tenderloin (3 - 4 lbs) 1.5 hours/lb 5 hours 1-4 hours 225 - 250 225 - 250 225 - 250 185 - 205 Pulls back from bones 120 - 160 PORK Baby Back Ribs (1.5 - 2.5 lbs) Butt (6 - 8 lbs) Ham (Bone In) Shoulder (6 - 10 lbs) Spare Ribs (2.5 - 3 lbs) Tenderloin (1.5 - 2 lbs) 5 hours 1.5 hours/lb 1.5 hours/lb 5 - 12 hours 5 - 7 hours 2.
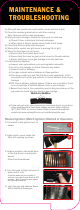
MAINTENANCE & TROUBLESHOOTING 1) After grill has cooled use a soft cloth to clean exterior of grill. 2) Clean the cooking grates before and after cooking. Note: Remove surface dust and grease. 3) Infrared heat exchanger should be clean prior to each use. a) Check if there is debris in the heat exchanger. b) When there is debris, please clean it with a stiff brush. 4) Clean Side Shelves with mild detergent. 5) When grill is cooled, use grill cover to prolong life of grill.
WARRANTY Subject to the following terms and conditions, Phase 2, LLC, d/b/a Vision Grills (“Vision Grills”) warrants to the original purchaser that the grill insert manufactured or supplied by Vision Grills will be free from defects in material and workmanship under normal use for the following periods from the original date of purchase: Five years for burner and all other metal parts; 90 days for lava stone, quick disconnect, hose and regulator.