
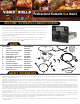
Full Product Manual


SMOKING
GRILLING (350 - 450°F)
COOKING TEMPERATURE
Approximate
Cooking Time Smoker Temp (°F) Meat Temp. (°F)
BEEF
Brisket (8 - 12 lbs) 1.5 hours/lb 225 - 250 185 - 205
Short Ribs 5 hours 225 - 250 Pulls back from bones
Tenderloin (3 - 4 lbs) 1-4 hours 225 - 250 120 - 160
PORK
Baby Back Ribs
(1.5 - 2.5 lbs)
5 hours 225 - 250 Pulls back from bones
Shoulder / Butt (6 - 8 lbs) 1.5 hours/lb 225 - 250 170 - 205
Ham (Bone In) 1.5 hours/lb 225 - 250 160
Spare Ribs (2.5 - 3 lbs) 5 - 7 hours 225 - 250 Pulls back from bones
Tenderloin (1.5 - 2 lbs) 2.5 - 3 hours 225 - 250 160
POULTRY
Turkey
(Whole)
15 - 20 min./lb 240 - 275 170
Chicken
(Whole: 2.5 - 4.5 lbs) 2.
5 - 4 hours 250 - 275 170
Beef Temp (°F) Pork Temp (°F)
Rare 125 + 3 min. Rest ---------
Medium-Rare 130 - 135 145 + 3 min. Rest
Medium 135 - 140 150
Medium-Well 140 - 150 155
Well-Done 155+ 160+
Ground 160
Poultry Temp (°F)
Dark Meat 165 - 175
White Meat 165
Ground 170 - 175
Lock Top Vent
Turn Cast Iron Top Vent to position 3. Turn locking
pin counter clockwise until it drops down in place,
keeping the Top Vent fully open.
WARNING: When using Quickchange Gas Insert, Top Vent
must be locked open to position 3 at all times.
SETTING TEMPERATURE
Step 2: Remove Ash Drawer
Remove Cooking Grates and Charcoal Grate.
Sweep all excess charcoal and ash into Ash
Drawer. Pull out Ash Drawer and empty ash from
drawer, then store in a cool, dry place.
ATTENTION: The grill needs to be cooled before switching
from the Ash Drawer to the Quickchange Gas Insert.
Step 3: Insert Gas Insert
Slide Gas Insert into grill opening in the base of
the grill until it stops and locks into place.
Step 4: Position Heat Exchanger
Install the stainless steel infrared Heat Exchanger
on top of the Gas Insert. Allow the 2 bottom stems
of Heat Exchanger to drop into the slots on top of
the Gas Insert.
Step 5: Place Heat Diffuser Lava Stone
Spread bracket so it makes an “X” shape and lower onto fire bowl, allowing the
bracket to rest on edge of bowl. Lower Lava Stone onto the bracket. Replace
cooking grates with hinged sections facing towards the front of grill.
Step 6: Connect to Gas Tank
Using the Quick Connect fitting on the Gas Supply Hose, pull back spring-loaded
locking ring and slide over male connection. Once it has snapped into place,
give slight tug on gas line to ensure that it is securely connected. Turn the valve
on gas tank to Open position SLOWLY.
Step 7: Ignite Gas Insert
Use leak test* to ensure there are no leaks. Open grill lid. Confirm the Control Knob
is in the “OFF” position. Press and hold in the Red Ignition Button.
Device will emit a “clicking” sound. Push the control knob in and slowly turn from
OFF setting to LOW setting. Continue to hold knob. While holding the control knob
on the LOW setting press the Red Ignition Button. Continue to hold the knob on the
LOW setting for about 5-6 seconds, to allow the thermocouple inside to get warm
enough to maintain the flame. Observe fire is lit in Heat Exchanger. Close grill lid and
observe grill thermometer. Adjust to desired temperature by adjusting Control Knob.
NOTE: ALWAYS IGNITE YOUR INSERT IN THE LOW SETTING. In order to get to
“HIGH”, push the Control Knob in and turn counter-clockwise until second “click”
is heard and the tick mark is completely horizontal.
If ignition does not occur within 5 seconds, turn the Control Knob to OFF position.
Wait 5 minutes and repeat the lighting procedure.
Step 1: Fully Open Top Vent
Turn Top Vent to position 3 (or SEAR).
Keep the Top Vent fully open.
WARNING: When using Quickchange Gas
Insert, Top Vent must be open to position 3 (or
SEAR) at all times.
Watch For Bubbles
*Leak Test: Pour Leak Test Solution (not
included) or soapy water at the connection spot
of the gas cylinder to check whether there is
air leakage. If solution produces bubbles this
means there is a leak.
All cooking times and temperatures are approximate.
Visit www.foodsafety.gov for additional information on safe minimum cooking temperatures.
STARTING
SMOKING
SEARING
GRILLING
400º– 640ºF
200º– 340ºC
300º– 400ºF
150º– 200ºC
175º– 225ºF
80º– 110ºC
Quickchange
Med
Low
OFF
High
Med
Low
OFF
High
Quickchange
Med
Low
OFF
High
Quickchange
The Quickchange cooking temperatures are controlled by adjusting the burner knob on the Gas
Insert. Experiences may vary depending on your environment, temperature, wind flow, etc. We
suggest grilling initially with the Kamado for 5-6 times to get past the learning curve of your grill,
in your environment. The top vent plays a big role in regulating temperatures and putting out fuel.
Your grill is properly seasoned when it has a buildup of creosote on the ceramic and top vent.
*Caution – If you’re cooking low and slow, do not let the grill get too hot. Keep the temperature
low, it will take time to cool down.
*Caution - Continuous grilling at high temperatures will cause the felt gasket to burn.
PREVENT FLARE-UPS:
TO EXTEND THE LIFE OF THE FELT, MAKE SURE TO AVOID FLARE-UPS BY “BURPING YOUR GRILL”.
If the lid is lifted too quickly, oxygen will rush inside the grill causing a flare-up. To
prevent a flare up, lift the lid 1”/25mm and count to three before fully opening the
grill. This method is called “Burping your Grill.”
®
®
®